테라폼 모듈
September 2023 (3544 Words, 20 Minutes)
블로그 내용은 ‘테라폼으로 시작하는 IaC’책을 기준으로 작성되었습니다.
데이터 소스
데이터 소스는 테라폼으로 정의되지 않은 외부 리소스 또는 저장된 정보를 테라폼에서 참조할때 사용합니다.
데이터 소스 구성
데이터 소스는 외부 리소스나 저장된 정보를 참조할 때 사용합니다.
데이터 소스를 설정하는 방법은 리소스 블록을 정의하는 것과 비슷합니다.
데이터 소스 유형은 프로바이더 이름과 리소스 유형으로 구성되며, 이후에는 고유한 이름과 구성 인수를 선언합니다.
cat <<'EOT' > main.tf
data "local_file" "abc" {
  filename = "${path.module}/abc.txt"
}
EOT
메타인수로는 depends_on, count, for_each, lifecycle 등이 사용 가능합니다.
- depends_on : 종속성을 선언하며, 선언된 구성요소와의 생성 시점에 대해 정의
- count : 선언된 개수에 따라 여러 리소스를 생성
- for_each : map 또는 set 타입의 데이터 배열의 값을 기준으로 여러 리소스를 생성
- lifecycle : 리소스의 수명주기 관리
실습
# 실습 확인을 위해서 abc.txt 파일 생성
echo "t101 study - 2week" > abc.txt
#
terraform init && terraform plan && terraform apply -auto-approve
terraform state list
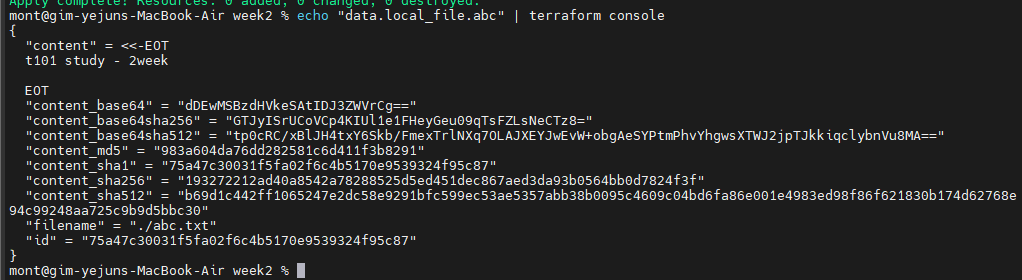
# 테라폼 콘솔 : 데이터 소스 참조 확인
echo "data.local_file.abc" | terraform console
데이터 소스 속성 참조
데이터 소스 속성 참조는 테라폼에서 데이터 소스의 특정 속성에 접근하기 위해 사용됩니다.
데이터 소스를 참조할 때는 “data” 키워드가 앞에 붙고, 속성에는 점(.)으로 접근합니다.
AWS 가용영역 데이터 소스는 “aws_availability_zones”를 사용하고, 이를 참조하여 서브넷 리소스의 availability_zone 값을 설정합니다.
data "aws_availability_zones" "available" {
  state = "available"
}

resource "aws_subnet" "primary" {
  availability_zone = data.aws_availability_zones.available.names[0]
  # 예: ap-northeast-2a
}
도전과제
도전과제로, 이 정보를 사용하여 VPC 리소스를 생성하거나, 관련 데이터 소스를 사용하는 실습을 권장하고 있습니다.
하나의 파일(abc.txt)의 내용을 읽어 다른 파일(def.txt)에 쓰는 작업을 수행합니다.
이를 위해 data.local_file.abc.content와 같은 방식으로 데이터 소스의 속성을 참조합니다.
provider "aws" {
  region  = "ap-northeast-2"
  profile = "default"
}
vpc.tf
# VPC
resource "aws_vpc" "main" {
  cidr_block = "10.0.0.0/16"
  tags = {
    Name = "main-vpc"
  }
}

# Availability Zones Data
data "aws_availability_zones" "available" {
  state = "available"
}

# Primary Subnet
resource "aws_subnet" "primary" {
  vpc_id                  = aws_vpc.main.id
  cidr_block              = "10.0.1.0/24"
  availability_zone       = data.aws_availability_zones.available.names[0]
  map_public_ip_on_launch = true

  tags = {
    Name = "primary-subnet"
  }
}

# Secondary Subnet
resource "aws_subnet" "secondary" {
  vpc_id                  = aws_vpc.main.id
  cidr_block              = "10.0.2.0/24"
  availability_zone       = data.aws_availability_zones.available.names[1]
  map_public_ip_on_launch = true

  tags = {
    Name = "secondary-subnet"
  }
}
생성을 진행합니다.
terraform apply -auto-approve

terraform state list
	data.aws_availability_zones.available
	aws_subnet.primary
	aws_subnet.secondary
	aws_vpc.main

추가 실습 - az.tf 파일 생성
az.tf 파일 생성 - az datasource
cat <<'EOT' > main.tf
data "aws_availability_zones" "available" {
  state = "available"
}
EOT

#
terraform init -upgrade && terraform apply -auto-approve
terraform state list
해당 명령어로
terraform state show data.aws_availability_zones.available
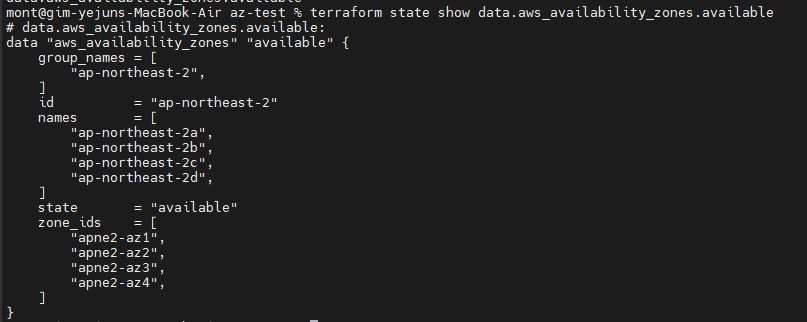
조금 더 구체적으로 살펴봅니다.
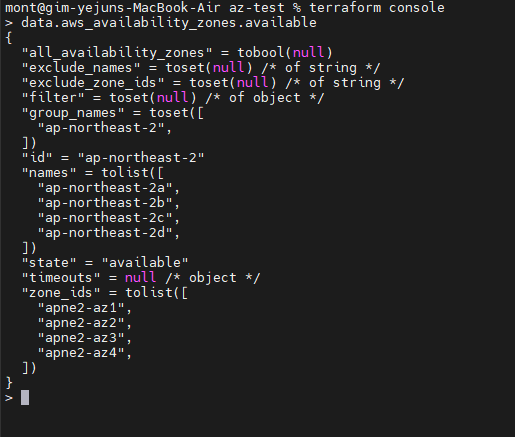
terraform console
>
-----------------
data.aws_availability_zones.available
data.aws_availability_zones.available.names
data.aws_availability_zones.available.names[0]
data.aws_availability_zones.available.names[1]
data.aws_availability_zones.available.zone_ids[0]
data.aws_availability_zones.available.zone_ids[1]
exit
입력변수 (Variable)
입력 변수는 테라폼에서 인프라 구성에 필요한 속성을 동적으로 전달할 수 있게 해줍니다. 이를 통해 코드를 수정하지 않고도 다양한 인프라를 생성할 수 있습니다.
변수 선언 방식
- 변수는
variable키워드로 선언됩니다. - 변수 이름은 모듈 내에서 고유해야 하며, 다른 코드에서 이 이름으로 참조할 수 있습니다.
bashCopy code
variable "<이름>" {
  <인수> = <값>
}
변수의 메타인수
default: 변수의 기본값type: 변수의 데이터 유형description: 변수에 대한 설명validation: 변수 유효성 검사sensitive: 민감 정보를 숨김nullable: 값이 없어도 되는 경우 지정
변수 유형
- 기본 유형:
string,number,bool,any - 집합 유형:
list,map,set,object,tuple
예시
-
number 유형의 변수
variable "number_example" { description = "An example of a number variable in Terraform" type = number default = 42 } -
list 유형의 변수
variable "list_example" { description = "An example of a list in Terraform" type = list default = ["a", "b", "c"] } -
조건 결합으로 list(number) 유형의 변수
variable "list_numeric_example" { description = "An example of a numeric list in Terraform" type = list(number) default = [1, 2, 3] } -
map 유형의 변수
variable "map_example" { description = "An example of a map in Terraform" type = map(string) default = { key1 = "value1" key2 = "value2" key3 = "value3" } } -
복잡한 구조의 object 유형의 변수
 variable "object_example" {
   description = "An example of a structural type in Terraform"
   type        = object({
     name    = string
     age     = number
     tags    = list(string)
     enabled = bool
   })
   default = {
     name    = "value1"
     age     = 42
     tags    = ["a", "b", "c"]
     enabled = true
   }
 }
6 .auto.tfvars.json에 정의된 변수 선언
이 방법은 파일명에 따라 변수의 우선순위가 적용됩니다.
# a.auto.tfvars.json 파일 생성
cat <<EOF > a.auto.tfvars.json
{
  "my_var" : "var6_a"
}
EOF
# 변수 적용 및 확인
terraform apply -auto-approve
cat abc.txt ; echo
다른 .tfvars.json 파일을 생성하면:
# c.auto.tfvars.json 파일 생성
cat <<EOF > c.auto.tfvars.json
{
  "my_var" : "var6_c"
}
EOF
# 변수 적용 및 확인
terraform apply -auto-approve
cat abc.txt ; echo
7. CLI 실행 시 var 또는 var-file로 변수 지정
나중에 선언된 변수가 높은 우선순위를 가집니다.
# 단일 변수 지정
terraform apply -auto-approve -var=my_var=var7
cat abc.txt ; echo

# 여러 변수 지정; 나중의 값이 우선순위
terraform apply -auto-approve -var=my_var=var7 -var=my_var=var8
cat abc.txt ; echo
.tfvars와 같은 형식의 파일을 사용할 경우 -var-file로 지정할 수 있습니다.
# var9.txt 파일 생성
echo 'my_var="var9"' > var9.txt

# var-file로 변수 지정
terraform apply -auto-approve -var=my_var=var7 -var-file="var9.txt"
cat abc.txt ; echo
.tfvars 확장자를 가진 파일을 사용하면, 실행 시에 입력해야 할 모든 변수 값을 하나의 파일에서 쉽게 관리할 수 있습니다.
VPC + 보안그룹 + EC2 배포
목표 : default VPC 대신 직접 VPC를 만들고, 해당 VPC내에 EC2 1대를 배포
도전과제2 : 위 3개 코드 파일 내용에 리소스의 이름(myvpc, mysubnet1 등)을 반드시! 꼭! 자신의 닉네임으로 변경해서 배포 실습해보세요!
- 리소스의 유형과 리소스의 이름이 차이를 알고, 리소스의 속성(예. ID)를 참조하는 방법에 대해서 익숙해지자
provider.tf
provider "aws" {
  region  = "ap-northeast-2"
  profile = "default"
}
vpc.tf
resource "aws_vpc" "main" {
  cidr_block = "10.0.0.0/16"
  **enable_dns_support   = true
  enable_dns_hostnames = true**

  tags = {
    Name = "mont-vpc"
  }
}

# Availability Zones Data
data "aws_availability_zones" "available" {
  state = "available"
}

# Primary Subnet
resource "aws_subnet" "primary" {
  vpc_id                  = aws_vpc.main.id
  cidr_block              = "10.0.1.0/24"
  availability_zone       = data.aws_availability_zones.available.names[0]
  map_public_ip_on_launch = true

  tags = {
    Name = "mont-subnet1"
  }
}

# Secondary Subnet
resource "aws_subnet" "secondary" {
  vpc_id                  = aws_vpc.main.id
  cidr_block              = "10.0.2.0/24"
  availability_zone       = data.aws_availability_zones.available.names[1]
  map_public_ip_on_launch = true

  tags = {
    Name = "mont-subnet2"
  }
}

# IGW
resource "aws_internet_gateway" "igw" {
  vpc_id = aws_vpc.main.id

  tags = {
    Name = "mont-igw"
  }
}

# Route Table
resource "aws_route_table" "rt" {
  vpc_id = aws_vpc.main.id

  tags = {
    Name = "mont-rt"
  }
}

resource "aws_route_table_association" "mont_rtassociation1" {
  subnet_id      = aws_subnet.primary.id
  route_table_id = aws_route_table.rt.id
}

resource "aws_route_table_association" "mont_rtassociation2" {
  subnet_id      = aws_subnet.secondary.id
  route_table_id = aws_route_table.rt.id
}

resource "aws_route" "main_route" {
  route_table_id         = aws_route_table.rt.id
  destination_cidr_block = "0.0.0.0/0"
  gateway_id             = aws_internet_gateway.igw.id
}

output "aws_vpc_id" {
  value = aws_vpc.main.id
}
배포
terraform plan && terraform apply -auto-approve
**terraform state list**
보안그룹, EC2 배포
sg.tf - 보안 그룹 생성
resource "aws_security_group" "sg" {
  vpc_id      = aws_vpc.main.id
  name        = "mont-sg"
  description = "mont's SG"
}

resource "aws_security_group_rule" "sg_inbound" {
  type              = "ingress"
  from_port         = 80
  to_port           = 80
  protocol          = "tcp"
  cidr_blocks       = ["0.0.0.0/0"]
  security_group_id = aws_security_group.sg.id
}

resource "aws_security_group_rule" "sg_outbound" {
  type              = "egress"
  from_port         = 0
  to_port           = 0
  protocol          = "-1"
  cidr_blocks       = ["0.0.0.0/0"]
  security_group_id = aws_security_group.sg.id
}
terraform plan && terraform apply -auto-approve
**terraform state list**
protocol = "-1"을 사용하면 모든 프로토콜을 허용하게 됩니다. AWS에서 이 값을 사용하면 ICMP, TCP, UDP 등 모든 프로토콜에 대한 트래픽을 허용하게 설정할 수 있습니다.
**data** "**aws_ami**" "**amazonlinux2**" {
  most_recent = true
  filter {
    name   = "owner-alias"
    values = ["amazon"]
  }

  filter {
    name   = "name"
    values = ["amzn2-ami-hvm-*-x86_64-ebs"]
  }

  owners = ["amazon"]
}

resource "**aws_instance**" "**ec2**" {

  **depends_on** = [
    aws_internet_gateway.**igw**
  ]

  **ami**                         = **data**.**aws_ami**.**amazonlinux2**.**id**
  **associate_public_ip_address** = true
  instance_type               = "t2.micro"
  **vpc_security_group_ids**      = ["${aws_security_group.**sg**.**id**}"]
  **subnet_id**                   = aws_subnet.primary.**id**

  user_data = <<-EOF
              #!/bin/bash
              wget https://busybox.net/downloads/binaries/1.31.0-defconfig-multiarch-musl/busybox-x86_64
              mv busybox-x86_64 busybox
              chmod +x busybox
              **RZAZ=$(curl http://169.254.169.254/latest/meta-data/placement/availability-zone-id)
              IID=$(curl 169.254.169.254/latest/meta-data/instance-id)
              LIP=$(curl 169.254.169.254/latest/meta-data/local-ipv4)
              echo "<h1>RegionAz($RZAZ) : Instance ID($IID) : Private IP($LIP) : Web Server</h1>" > index.html**
              nohup ./busybox httpd -f -p 80 &
              EOF

  user_data_replace_on_change = true

  tags = {
    Name = "mont-ec2"
  }
}

**output** "mont_ec2_public_ip" {
  value       = aws_instance.**ec2.**public_ip
  description = "The public IP of the Instance"
}
terraform plan && **terraform apply -auto-approve**
**terraform state list

terraform console**
>
data.aws_ami.amazonlinux2.id

terraform destroy -auto-approve
Local 지역 값
테라폼의 local은 모듈 내에서만 접근 가능한 값이나 표현식을 정의할 때 사용합니다. 이는 코드 내에서 사용자가 지정한 값을 가공하여 재사용 가능하게 만들며, 이렇게 정의된 local 값은 그 모듈 내에서만 유효합니다.
지역 값의 특징
- 모듈 내부 접근만 가능:
local값은 선언된 모듈 내에서만 접근할 수 있습니다. - 실행 시 입력 불가: 변수와 달리,
local은 사용자 입력을 허용하지 않습니다. - 값 및 표현식 사용: 상수, 리소스의 속성, 다른 변수들을 조합해 정의할 수 있습니다.
- 유일한 이름 필요: 같은 모듈 내에서
local의 이름은 중복될 수 없습니다.
유의사항
- 복잡성 관리: 여러 곳에서
local을 사용하면 추적 및 유지 관리가 어려워질 수 있습니다.
local 선언 예시
main.tf 파일에 local을 선언하는 방법은 다음과 같습니다:
variable "prefix" {
  default = "hello"
}

locals {
  name    = "terraform"
  content = "${var.prefix} ${local.name}"
  my_info = {
    age    = 20
    region = "KR"
  }
  my_nums = [1, 2, 3, 4, 5]
}
중복 선언과 오류
같은 모듈 내에서 local 이름이 중복되면 오류가 발생합니다.
locals {
  content = "content2" # 이미 선언된 'content'로 인해 오류 발생
}
실행 단계
실행 단계에서는 특별히 terraform init과 terraform apply 명령어를 실행합니다. 단, 이 예제에서는 실제로 프로비저닝되는 리소스가 없으므로, terraform state list 명령어의 출력은 비어 있습니다.
terraform init
terraform apply -auto-approve
terraform state list # 출력 없음
실습 - IAM Use성
- 신규 폴더 생성 후 작업
mkdir local-test && cd local-test
- iamuser.tf 파일 생성
provider "aws" {
  region = "ap-northeast-2"
}

**locals** {
  **name** = "iam-test"
  **team** = {
    group = "dev"
  }
}

resource "aws_iam_user" "mont-iam1" {
  name = "${local.name}1"
  tags = local.team
}

resource "aws_iam_user" "mont-iam2" {
  name = "${local.name}2"
  tags = local.team
}
- 확인 : AWS 관리콘솔에서 IAM User 확인
#
terraform init && terraform apply -auto-approve
terraform state list
terraform state show aws_iam_user.mont-iam1
# graph 확인 > graph.dot 파일 선택 후 오른쪽 상단 DOT 클릭
terraform graph > **graph.dot**
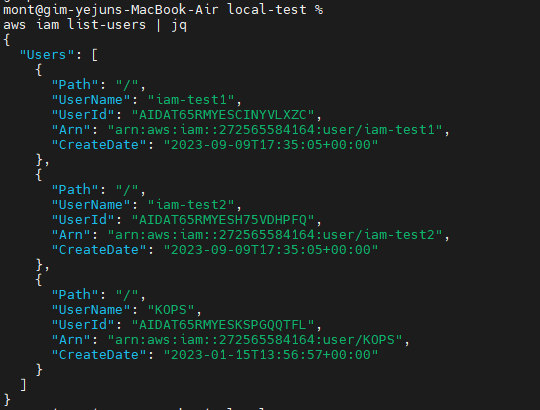
# iam 사용자 리스트 확인
aws iam list-users | jq
# 삭제
terraform destroy -auto-approve
출력 output
출력은 프로비저닝된 리소스의 속성을 확인하는 강력한 도구로 작용합니다. 자바와 같은 프로그래밍 언어의 ‘getter’ 함수와 유사하게, 출력은 테라폼 모듈이나 워크스페이스 내외부에서 정보의 제한된 노출을 가능하게 합니다.
출력의 주요 목적
- 중요 속성 표시: 루트 모듈 내에서 특정 리소스 속성을 빠르게 접근할 수 있습니다.
- 모듈 간 통신: 자식 모듈에서 생성된 출력을 루트 모듈에서 사용할 수 있습니다.
- 워크스페이스 간 데이터 공유: 다른 루트 모듈의 상태 데이터를 원격으로 읽기 위한 엔드포인트로 작용할 수 있습니다.
출력 선언 방법
output 블록 내부에서 출력을 정의합니다. 기본 예시는 다음과 같습니다:
output "instance_ip_addr" {
  value = "http://${aws_instance.server.private_ip}"
}
- 출력되는 값은
value인수에 의해 정의되며, 테라폼의 내장 함수와 구조를 사용하여 동적으로 구성할 수 있습니다
고려할 사항
- 리소스 속성 중 프로비저닝 후에만 결정되는 것은, 프로비저닝이 완료된 후에만 최종적으로 확인할 수 있습니다.
terraform plan단계에서는 출력되지 않습니다.
사용 가능한 메타 인수
description: 출력 값에 대한 설명을 제공합니다.sensitive: 출력 값이 민감한 데이터를 포함하고 있는 경우를 표시하여, 테라폼 로그에서의 노출을 제한합니다.depends_on: 값이 특정 구성에 종속적인 경우, 리소스가 생성되는 순서를 수동으로 설정할 수 있습니다.precondition: 값이 출력되기 전에 만족해야 하는 조건을 지정합니다.
출력은 단순히 표시 메커니즘이 아니라 테라폼의 데이터 흐름의 중요한 부분이며, 그 유연성과 모듈성을 높여줍니다.
반복문
list 형태의 값 목록이나 Key-Value 형태의 문자열 집합인 데이터가 있는 경우 동일한 내용에 대해 테라폼 구성 정의를 반복적으로 하지 않고 관리할 수 있다.
count, for_each, for, 그리고 dynamic 키워드가 있습니다.
1. Count
count는 리소스를 일정 횟수만큼 반복하여 생성하는 가장 간단한 방법입니다.
resource "aws_instance" "example" {
  count = 3
  ami           = "ami-0c55b159cbfafe1f0"
  instance_type = "t2.micro"
}
이 예시에서는 aws_instance 리소스를 3번 생성합니다.
2. For_each
for_each는 복잡한 데이터 구조를 사용하여 리소스를 생성할 수 있습니다. for_each는 map이나 set 등을 이용합니다.
resource "aws_instance" "example" {
  for_each = {
    a = "m5.large"
    b = "t2.micro"
  }
  ami           = "ami-0c55b159cbfafe1f0"
  instance_type = each.value
}
이 예시에서는 두 개의 aws_instance 리소스가 생성되고, 각각은 m5.large와 t2.micro 타입이 됩니다.
3. For
for 표현식은 list, map, set을 생성하거나 조작할 때 사용합니다.
locals {
  list_example = [1, 2, 3]
  new_list = [for i in local.list_example: i * 2]
}
이 예시에서는 new_list가 [2, 4, 6]이 됩니다.
4. Dynamic
dynamic 블록은 중첩된 블록의 목록을 생성할 때 사용됩니다. 보통 반복 가능한 설정이 필요한 리소스에서 사용됩니다.
resource "aws_security_group" "example" {
  name = "example"

  dynamic "ingress" {
    for_each = [
      {
        from_port = 22
        to_port   = 22
        protocol  = "TCP"
      },
      {
        from_port = 80
        to_port   = 80
        protocol  = "TCP"
      },
    ]
    content {
      from_port   = ingress.value.from_port
      to_port     = ingress.value.to_port
      protocol    = ingress.value.protocol
      cidr_blocks = ["0.0.0.0/0"]
    }
  }
}
AWS Security Group에 두 개의 ingress 규칙이 생성하는 예시입니다
오늘은 이렇게
데이터소스, 입력변수, 지역값, 출력 및 반복문에 대해서 공부해봤습니다.
양이 꽤 방대하지만, 하나씩 소화 하다보면 충분히 내 것으로 만들 수 있지 않을까 싶습니다.