Istio는 어떻 홉을 가질까?
October 2024 (4164 Words, 24 Minutes)
Traffic Flow on ISTIO
Istio 통신 : 호스트의 tcp/ip 와 iptables 과 파드 내에 iptables 와 envoy 를 경유
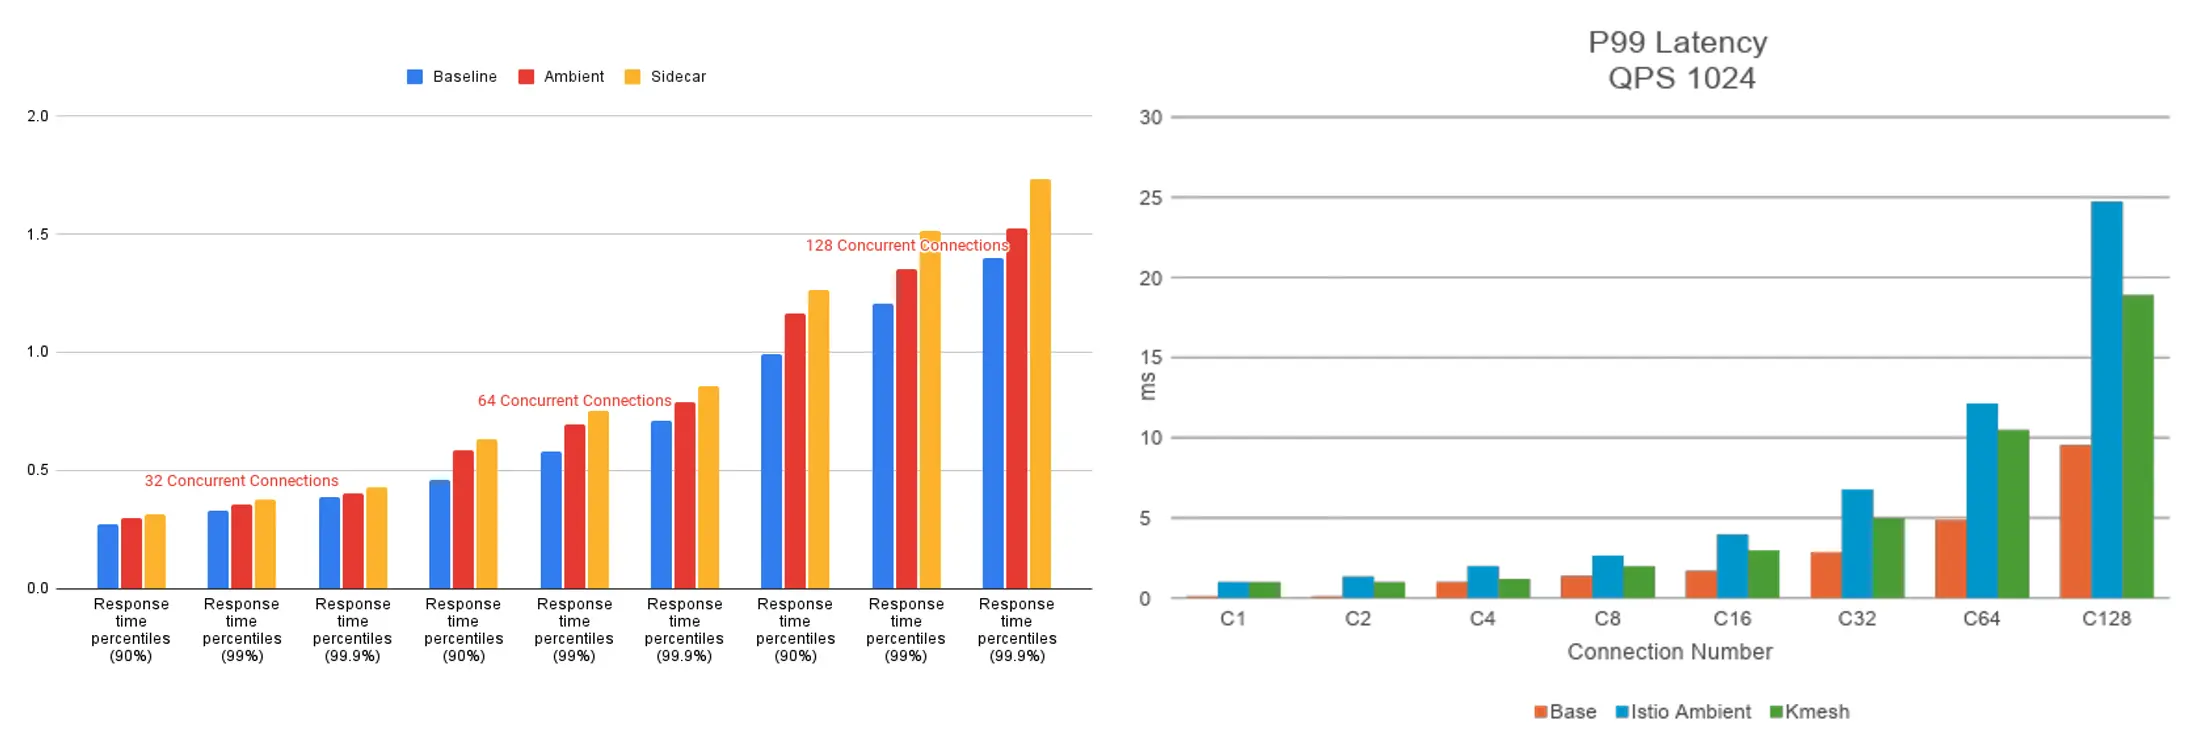
- 달리기에 비유하자면, Istio 가 없을 경우를 운동장 한바퀴라면, istio 사용 시 대략 운동장 세바퀴라고 볼 수 있습니다.
- Istio 사용 시 장점도 있지만, 없을 경우 대비 비용(지연 추가, 프로세싱 추가, 복잡한 구조 등)이 추가됩니다.
](/images/KANS/week7/part2/Untitled.png)
https://cilium.io/blog/2021/12/01/cilium-service-mesh-beta
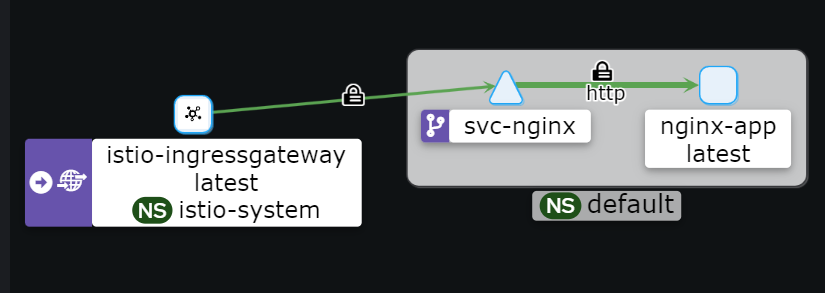
- 외부 클라이언트 PC에서 K8S 파드(웹서버)로 접속 과정
Istio 접속 테스트를 위한 변수 지정*
k3s-s)
# istio ingress gw NodePort(HTTP 접속용) 변수 지정 : 아래 ports[0] 은 어떤 용도의 포트일까요?
export IGWHTTP=$(kubectl get service -n istio-system istio-ingressgateway -o jsonpath='{.spec.ports[1].nodePort}')
echo $IGWHTTP

## istio-ingressgateway 파드가 배치된 노드의 유동 공인 IP 확인
aws ec2 describe-instances --query "Reservations[*].Instances[*].{PublicIPAdd:PublicIpAddress,InstanceName:Tags[?Key=='Name']|[0].Value,Status:State.Name}" --filters Name=instance-state-name,Values=running --output text
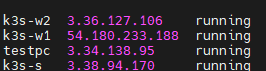
해당 ingress gateway는 ingress gateway가 떠있는 노드의 publicip : nodeport로 맵핑이되며, 해당 노드 ip 에 대해 남는 도메인을 직접 맵핑하여 보다 편하게 테스트를 진행해봅니다.
실습을 위한 환경 설정 및 배포 : nginx-app 로 향하는 통신의 경우 peer 간 mtls 끄기
cat <<EOF | kubectl create -f -
apiVersion: v1
kind: Pod
metadata:
  name: nginx-pod
  labels:
    app: nginx-app
spec:
  terminationGracePeriodSeconds: 0
  containers:
  - name: nginx-container
    image: nginx
    ports:
    - containerPort: 80
---
apiVersion: v1
kind: Service
metadata:
  name: svc-nginx
spec:
  ports:
    - name: svc-nginx
      port: 80
      targetPort: 80
  selector:
    app: nginx-app
  type: ClusterIP
---
apiVersion: networking.istio.io/v1alpha3
kind: Gateway
metadata:
  name: test-gateway
spec:
  selector:
    istio: ingressgateway
  servers:
  - port:
      number: 80
      name: http
      protocol: HTTP
    hosts:
    - "*"
---
apiVersion: networking.istio.io/v1alpha3
kind: VirtualService
metadata:
  name: nginx-service
spec:
  hosts:
  - "$MYDOMAIN"
  gateways:
  - test-gateway
  http:
  - route:
    - destination:
        host: svc-nginx
        port:
          number: 80
EOF
# 모니터링
watch -d "kubectl get svc -n istio-system -l app=istio-ingressgateway;echo;kubectl get pod -n istio-system -o wide -l app=istio-ingressgateway;echo;kubectl get pod -owide nginx-pod"
watch -d "kubectl get pod -n istio-system -o wide -l app=istio-ingressgateway;echo;kubectl get pod -owide nginx-pod"
- istio-proxy peer 간 mtls 끄기 - 링크
# 서비스 중 app: nginx-app 로 향하는 통신의 경우 peer 간 mtls 끄기(istio-ingressgw 와 목적지 워커노드의 파드에 istio-proxy 간)
cat <<EOF | kubectl create -f -
apiVersion: security.istio.io/v1beta1
kind: PeerAuthentication
metadata:
  name: "example-workload-policy"
spec:
  selector:
     matchLabels:
       app: nginx-app
  portLevelMtls:
    80:
      mode: DISABLE
EOF
-
(옵션) 특정 노드에 파드 지정해서 설치 → 실습을 위해 istio-ingressgateway 파드와 nginx-pod 파드를 다른 노드에 배치를 권장
  cat <<EOF | kubectl create -f -
  apiVersion: v1
  kind: Pod
  metadata:
    name: nginx-pod
    labels:
      app: nginx-app
  spec:
    terminationGracePeriodSeconds: 0
    nodeName: k3s-w1
    containers:
    - name: nginx-container
      image: nginx
      ports:
      - containerPort: 80
  EOF
Client IP 확인을 위한 추가 설정
# istio-ingressgateway 서비스 externalTrafficPolicy 설정 : 점검
kubectl patch svc -n istio-system istio-ingressgateway -p '{"spec":{"externalTrafficPolicy": "Local"}}'

# testpc 에 /etc/hosts 에 istio-ingressgateway 파드가 배포된 ec2의 private ip 로 도메인 변경
vi /etc/hosts
Client To Pod
트래픽 흐름
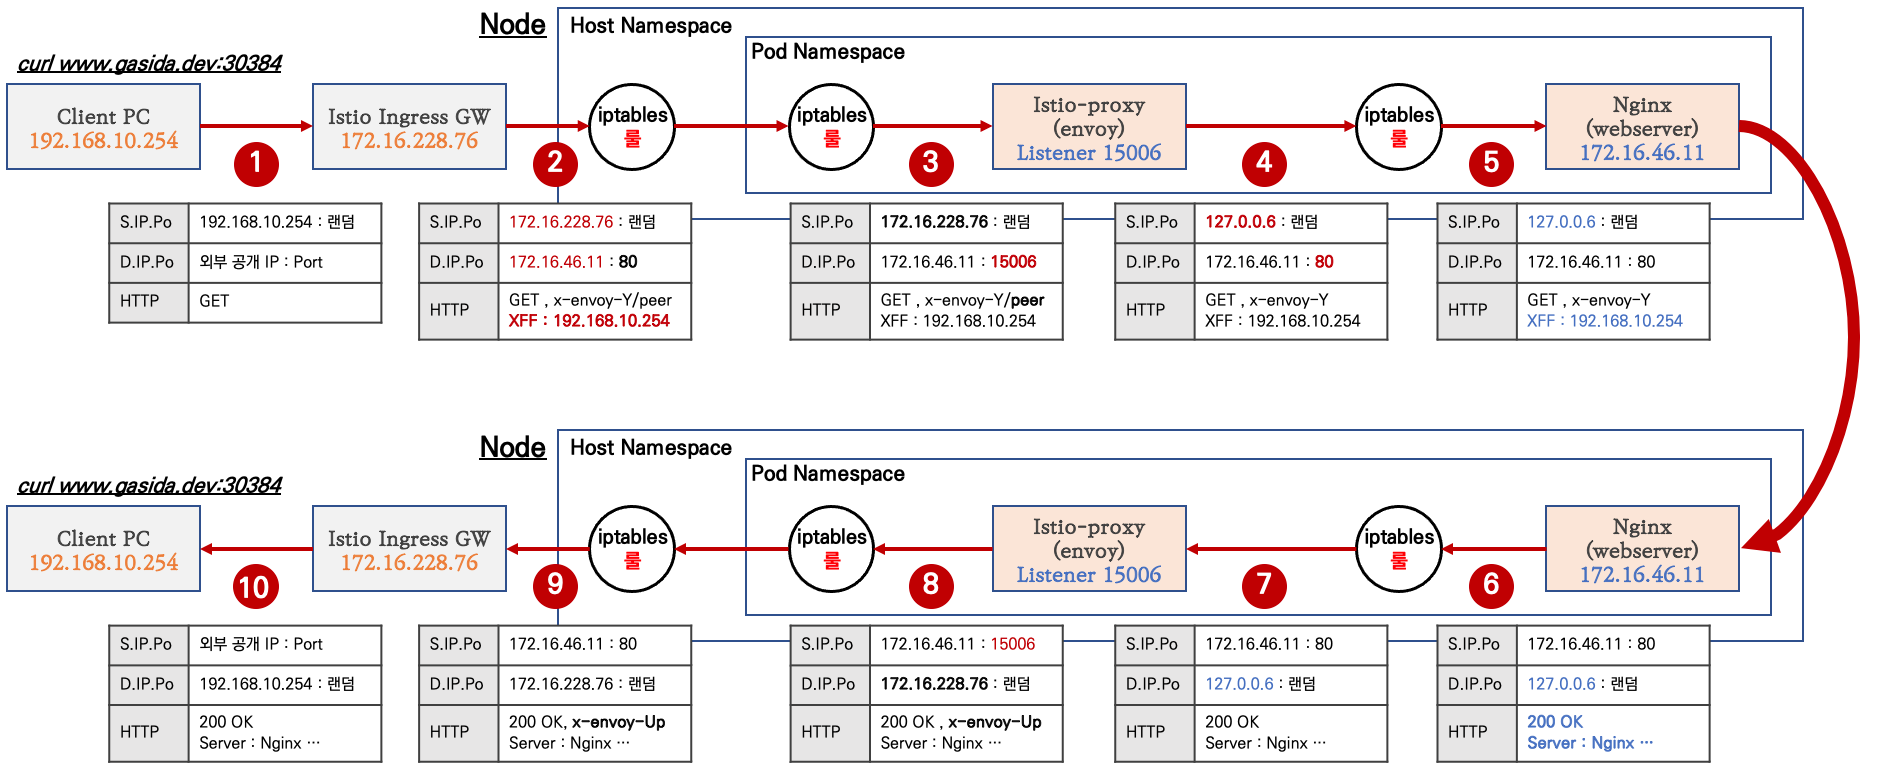
- 외부 클라이언트 PC에서 k8s 클러스터 내부의 웹 서버 파드로 인입 시 트래픽 흐름입니다.
- 기존 패킷 내용 중 변경 전(굵음)과 변경 후(빨간 색)으로 표현하였습니다.

파드 내 IPTables 적용 흐름 : 아래 (1) ~ (8) 까지의 과정을 먼저 설명합니다.
](/images/KANS/week7/part2/istio-iptables-flow.png)
https://jimmysong.io/en/blog/sidecar-injection-iptables-and-traffic-routing/
추천링크 : Life of a Packet in ISTIO Part 1 - 링크
-
(통신시작) 트래픽 인입 → 목적지 파드
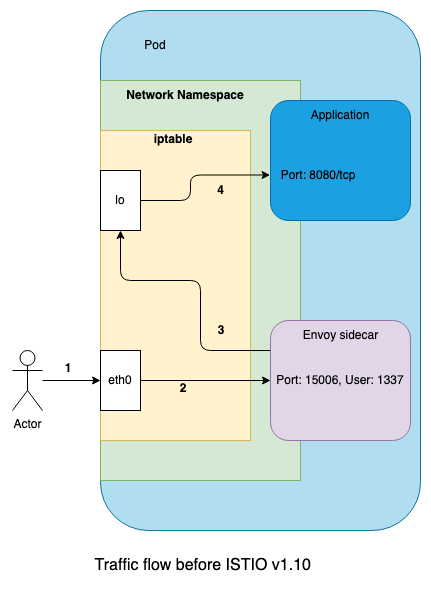
-
(통신시작) 파드 → 외부
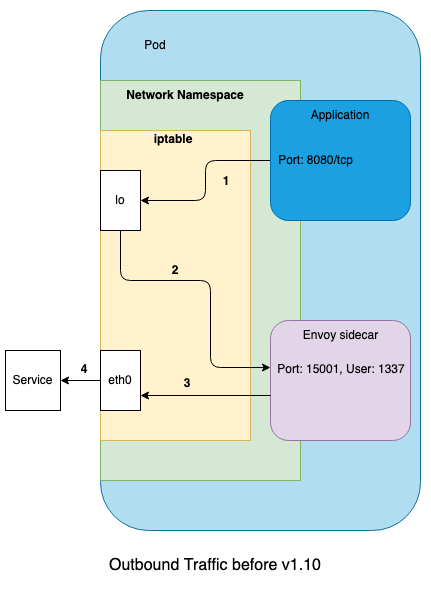
- 내부 파드1 → 내부 파드2 접속 시 : Outbound 그림 중간에 ISTIO_IN_REDIRECT → ISTIO_REDIRECT 로 오타!
Client To Istio Gateway
외부 클라이언트 PC 에서 웹 서버 파드로 접속 시도
- 외부에서 Istio IngressGateway 파드로 인입 과정 부분은 생략하였습니다.
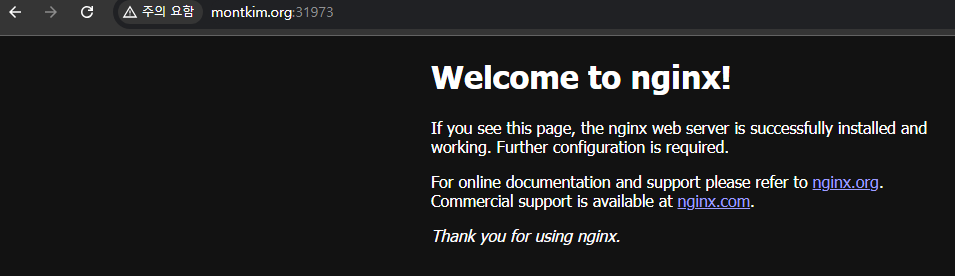
# 아래 처럼 정상적으로 웹 서버 접속 정보 출력 확인
curl -s -v $MYDOMAIN:$IGWHTTP
curl -s $MYDOMAIN:$IGWHTTP | grep -o "<title>.*</title>"
while true; do curl -s $MYDOMAIN:$IGWHTTP | grep -o "<title>.*</title>" ; echo "--------------" ; sleep 1; done
while true; do curl -s $MYDOMAIN:$IGWHTTP | grep -o "<title>.*</title>" ; echo "--------------" ; sleep 0.1; done

curl -s --user-agent "IPHONE" $MYDOMAIN:$IGWHTTP | grep -o "<title>.*</title>"
while true; do curl -s $MYDOMAIN:$IGWHTTP | grep -o "<title>.*</title>"; date "+%Y-%m-%d %H:%M:%S" ; echo "--------------" ; sleep 1; done

# 로그 확인
kubetail -l app=nginx-app -f
nginx-container 127.0.0.6 - - [19/Oct/2024:15:01:45 +0000] "GET / HTTP/1.1" 200 615 "-" "IPHONE" "@@"
nginx application에서는 clent ip 만 간단하게 찍힙니다.
istio gateway 의 접속로그를 보다 상세히 파싱해봅니다.
Timestamp:        [2024-10-19T15:01:45.813Z]
Request:          "GET / HTTP/1.1"
Response code:    200
Response flags:   via_upstream
Connection ID:    "-"
Request size:     0 bytes
Response size:    615 bytes
Upstream service: svc-nginx.default.svc.cluster.local
Upstream IP:      172.16.2.31:80
Client IP:        @@
User agent:       IPHONE
Trace ID:         6f9e449f-3eb9-9bd2-9705-fc77182c6f09
Host:             montkim.org:31973
Source IP:        172.16.2.29:35350
Destination IP:   172.16.2.29:8080
Client source:    @@:54696
Istio Gateway Pod to Node
Istio IngressGateway(envoy) 파드를 경유하여 웹 서버 파드가 있는 노드로 인입
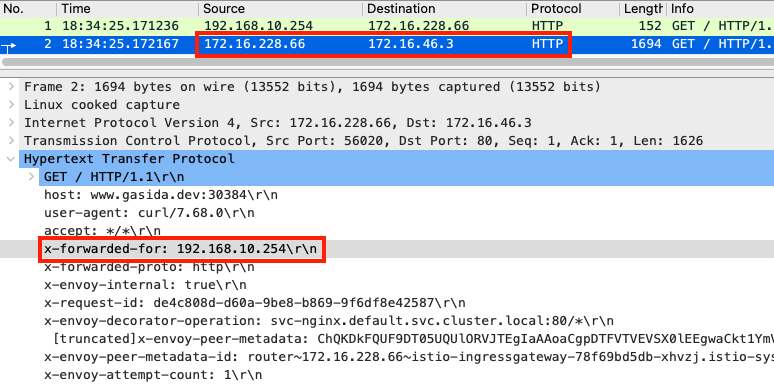
- Istio IngressGateway(envoy) 파드는 클라이언트 PC의 IP를 HTTP
XFF(X-Forwarded-for) 헤더에 담아서 전달합니다. - Istio IngressGateway(envoy) 파드 x-envoy-Y 헤더를 추가해서 전달합니다.
웹 서버 파드가 있는 노드로 웹 서버 파드의 목적지 IP로 바로 인입
- 실습 환경은 Flannel을 사용 중이고, 파드의 IP가 라우팅 테이블에 올라와 있다.
- 호스트 네임스페이스에 IPTables 에 특별한 Rule 매칭 없이 파드쪽으로 전달된다.
# 파드의 IP가 라우팅 테이블에 있으며, veth NIC 인 cali8b56182ddcf 으로 전달된다
root@k8s-w2:~# ip -c route | grep 172.16.46.11
172.16.46.11 dev cali8b56182ddcf scope link

# 노드의 NIC에서 패킷 덤프 시 파드의 목적지 IP로 바로 인입되는 것을 알 수 있다
root@k8s-w2:~# tcpdump -i enp0s8 -nn tcp port 80 -q
17:31:16.074031 IP 172.16.228.76.54522 > 172.16.46.11.80: tcp 1626
17:31:16.074096 IP 172.16.46.11.80 > 172.16.228.76.54522: tcp 0
17:31:16.075258 IP 172.16.46.11.80 > 172.16.228.76.54522: tcp 1591
17:31:16.075598 IP 172.16.228.76.54522 > 172.16.46.11.80: tcp 0

root@k8s-w2:~# ngrep -d enp0s8 -tW byline port 80
T 2022/02/11 20:08:17.034879 172.16.158.5:43372 -> 172.16.184.1:80 [AP] #153
GET / HTTP/1.1.
host: www.gasida.dev:31526.
user-agent: curl/7.68.0.
accept: */*.
x-forwarded-for: 192.168.10.254.
x-forwarded-proto: http.
x-envoy-internal: true.
POD 내부의 IPTables
‘PAUSE 컨테이너‘가 파드 네트워크 네임스페이스를 생성하여 제공하며, ‘Init 컨테이너‘는 Istio-proxy가 트래픽을 가로챌 수 있게 파드 내에 iptables rules 설정을 완료합니다.
# 아래 처럼 'istio-init 컨테이너' 의 로그에 iptables rules 설정을 확인할 수 있습니다.
# 참고로, NAT Tables 만 설정되고, 그외(filter, mangle, raw 등)은 설정하지 않습니다.
(istio-k8s:default) root@k8s-m:~# kubectl logs nginx-pod -c istio-init
* nat
-N ISTIO_INBOUND
-N ISTIO_REDIRECT
-N ISTIO_IN_REDIRECT
-N ISTIO_OUTPUT
-A ISTIO_INBOUND -p tcp --dport 15008 -j RETURN
-A ISTIO_REDIRECT -p tcp -j REDIRECT --to-ports 15001
-A ISTIO_IN_REDIRECT -p tcp -j REDIRECT --to-ports 15006
-A PREROUTING -p tcp -j ISTIO_INBOUND
-A ISTIO_INBOUND -p tcp --dport 22 -j RETURN
-A ISTIO_INBOUND -p tcp --dport 15090 -j RETURN
-A ISTIO_INBOUND -p tcp --dport 15021 -j RETURN
-A ISTIO_INBOUND -p tcp --dport 15020 -j RETURN
-A ISTIO_INBOUND -p tcp -j ISTIO_IN_REDIRECT
-A OUTPUT -p tcp -j ISTIO_OUTPUT
-A ISTIO_OUTPUT -o lo -s 127.0.0.6/32 -j RETURN
-A ISTIO_OUTPUT -o lo ! -d 127.0.0.1/32 -m owner --uid-owner 1337 -j ISTIO_IN_REDIRECT
-A ISTIO_OUTPUT -o lo -m owner ! --uid-owner 1337 -j RETURN
-A ISTIO_OUTPUT -m owner --uid-owner 1337 -j RETURN
-A ISTIO_OUTPUT -o lo ! -d 127.0.0.1/32 -m owner --gid-owner 1337 -j ISTIO_IN_REDIRECT
-A ISTIO_OUTPUT -o lo -m owner ! --gid-owner 1337 -j RETURN
-A ISTIO_OUTPUT -m owner --gid-owner 1337 -j RETURN
-A ISTIO_OUTPUT -d 127.0.0.1/32 -j RETURN
-A ISTIO_OUTPUT -j ISTIO_REDIRECT
COMMIT
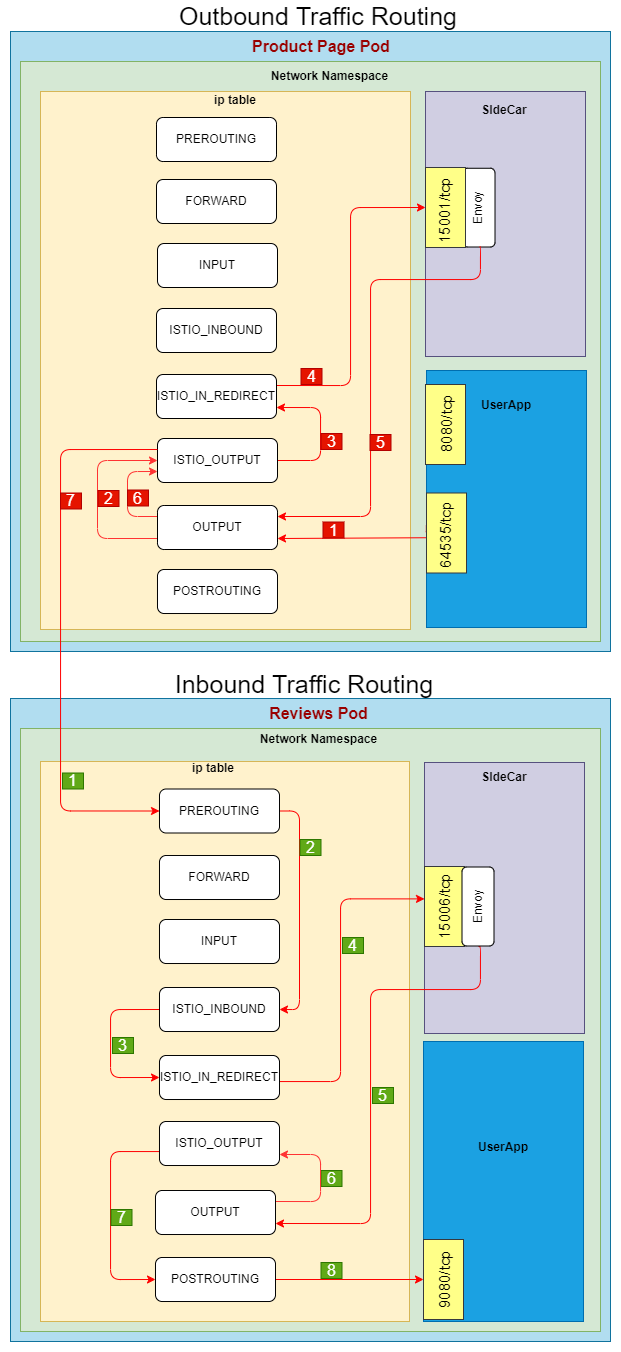
파드 내 IPTables Chains/Rules 적용 (NAT 테이블) → ‘Istio-proxy 컨테이너‘로 인입됩니다.
- PREROUTING → ISTIO_INBOUND → ISTIO_IN_REDIRECT (redir ports 15006)
nginx 파드가 배치된 노드에서 아래 실행
# 아래 확인은 istio-proxy 대신 pause 에서 iptables 확인 해보자...

# 변수 지정 : C1(Istio-proxy, Envoy , 단축키 지정
lsns -t net
ps -ef |grep istio
1337      347173  347155  0 18:52 ?        00:00:01 /usr/local/bin/envoy -c etc/istio/proxy/envoy-rev.json --drain-time-s 45 --drain-strategy immediate --local-address-ip-version v4 --file-flush-interval-msec 1000 --disable-hot-restart --allow-unknown-static-fields -l warning --component-log-level misc:error --concurrency 2
C1PID=347173
alias c1="nsenter -t $C1PID -n"

# Istio-proxy 컨테이너의 iptables 확인
c1 iptables -t nat --zero # 패킷 카운트 초기화

# 트래픽 인입 시 TCP 경우 모든 트래픽을 15006 으로 리다이렉트한다, 일부 포트는 제외(22, 15008, 15020, 15021, 15090)
c1 iptables -t nat -L -n -v
Chain PREROUTING (policy ACCEPT 44 packets, 2640 bytes)
 pkts bytes target     prot opt in     out     source               destination
   45  2700 ISTIO_INBOUND  tcp  --  *      *       0.0.0.0/0            0.0.0.0/0

Chain ISTIO_INBOUND (1 references)
 pkts bytes target             prot opt in     out     source               destination
...
    1    60 ISTIO_IN_REDIRECT  tcp  --  *      *       0.0.0.0/0            0.0.0.0/0

Chain ISTIO_IN_REDIRECT (3 references)
 pkts bytes target     prot opt in     out     source               destination
    1    60 REDIRECT   tcp  --  *      *       0.0.0.0/0            0.0.0.0/0            redir ports 15006

# 모니터링 >> 아래 ss 소켓 강제 Reset 참고
c1 iptables -t nat --zero
c1 iptables -t nat -S | grep 15006
c1 iptables -v --numeric --table nat --list ISTIO_IN_REDIRECT
watch -d "nsenter -t $C1PID -n iptables -v --numeric --table nat --list PREROUTING ; echo ; nsenter -t $C1PID -n iptables -v --numeric --table nat --list ISTIO_INBOUND; echo ; nsenter -t $C1PID -n iptables -v --numeric --table nat --list ISTIO_IN_REDIRECT"
watch -d "nsenter -t $C1PID -n iptables -t nat -L -n -v"
‘Istio-proxy 컨테이너’의 15006 Listener 확인
# ss (socket statistics)로 시스템 소켓 상태 확인 : 15006 은 envoy 프로세스가 Listen 하고 있다
root@k8s-w2:~# c1 ss -tpnl '( dport = :15006 or sport = :15006 )'
State      Recv-Q      Send-Q           Local Address:Port            Peer Address:Port     Process
LISTEN     0           4096                   0.0.0.0:15006                0.0.0.0:*         users:(("envoy",pid=3928,fd=37))
LISTEN     0           4096                   0.0.0.0:15006                0.0.0.0:*         users:(("envoy",pid=3928,fd=36))

# 확인 예시
c1 ss -tpnt '( dport = :15006 or sport = :15006 or sport = :80 or dport = :80 )'
watch -d "nsenter -t $C1PID -n  ss -tpnt '( dport = :15006 or sport = :15006 or sport = :80 or dport = :80 )'"

# 연결된 소켓 강제 Reset
# c0 ss -K dst 172.16.228.66 dport = 44526
c1 ss -K dst 172.16.228.66
c1 ss -K dst 172.16.46.13
TIP : debug 파드 활용하기
tcpdump, ngrep 등을 이용한 debugging
# debug 컨테이너
kubectl debug nginx-pod -it --image=nicolaka/netshoot -c netdebug
-----
ip -c addr
curl localhost
ss
ss -l
ss -4tpl
ss -4tp
ss -xpl
ss -xp
tcpdump -i any -nnq
ngrep -d any -tW byline
exit
-----
Istio Proxy Container 의 IPTables
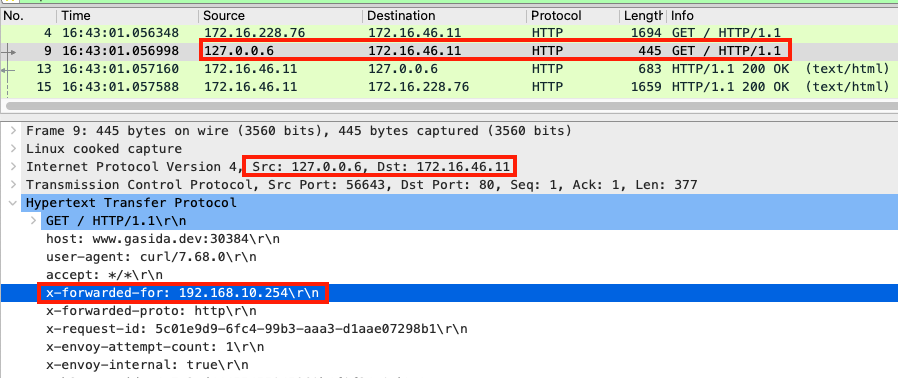
‘Istio-proxy 컨테이너’ 는 대리인(Proxy) 역할로, 출발지 IP를 127.0.0.6 으로 변경하여 ‘Nginx 컨테이너‘와 연결을 한다
- ‘Istio-proxy 컨테이너’의 로그 확인
[2024-10-19T15:01:45.813Z] "GET / HTTP/1.1" 200 - via_upstream - "-" 0 615 7 6 "@@@" "IPHONE" "6f9e449f-3eb9-9bd2-9705-fc77182c6f09" "montkim.org:31973" "172.16.2.31:80" outbound|80||svc-nginx.default.svc.cluster.local 172.16.2.29:35350 172.16.2.29:8080 @@@:54696 - -
- 파드 내에서 패킷 덤프 후 확인 : 출발지 IP가 127.0.0.6 으로 변경되었다!
- 파드 내 lsof (list open files) 확인
# 아래 처럼 126.0.0.6 -> 172.16.46.11(nginx)로 TCP 세션이 연결된것을 알 수 있다
c1 lsof -i TCP:80,15006 -n
COMMAND  PID            USER   FD   TYPE DEVICE SIZE/OFF NODE NAME
envoy   3928            1337   40u  IPv4 901362      0t0  TCP 127.0.0.6:41109->172.16.46.11:http (ESTABLISHED)
nginx   3864 systemd-resolve    9u  IPv4 901363      0t0  TCP 172.16.46.11:http->127.0.0.6:41109 (ESTABLISHED)
envoy   3928            1337   38u  IPv4 901360      0t0  TCP 172.16.46.11:15006->172.16.228.76:40486 (ESTABLISHED)

# 확인 예시
c1 lsof -i TCP:80,15006 -n
c1 lsof -i TCP:80,15001,15006 -n

# 연결된 TCP 강제 Reset
# c0 ss -K dst 172.16.228.66 dport = 44526
c1 ss -K dst 172.16.228.95
c1 ss -K dst 172.16.46.14
(참고) ‘Istio-proxy 컨테이너’ → ‘Nginx 컨테이너’ 와 통신 시에는 로컬 통신
- 두 컨테이너는 동일한 NET NS 를 사용하므로, 별도 통신을 위해서 ‘istio-proxy’ 는 lo 통신이 가능한 127.0.0.6 주소로 변경 후 로컬 통신을 수행한다
# 기본적으로 127.0.0.0/8 대역 통신은 lo local 통신 라우팅 처리다!
c1 ip route show table local
broadcast 127.0.0.0 dev lo proto kernel scope link src 127.0.0.1
local 127.0.0.0/8 dev lo proto kernel scope host src 127.0.0.1
local 127.0.0.1 dev lo proto kernel scope host src 127.0.0.1

# lo 인터페이스도 통신에 사용된다 : 실제 아래 RX/TX packets 이 증가한다!
c1 ifconfig lo
lo: flags=73<UP,LOOPBACK,RUNNING>  mtu 65536
        inet 127.0.0.1  netmask 255.0.0.0
        loop  txqueuelen 1000  (Local Loopback)
        RX packets 28141  bytes 19036394 19.0 MB
        RX errors 0  dropped 0  overruns 0  frame 0
        TX packets 28141  bytes 19036394 19.0 MB
        TX errors 0  dropped 0 overruns 0  carrier 0  collisions 0
Pod의 IPTables → Nginx 컨테이너 인입
파드 내에 IPTables 는 전역(?)으로 적용되므로, ‘Istio-proxy’ 의 인/아웃 시 트래픽 구별이 중요하다.
- ‘Istio-proxy’ 를 빠져나올때는 출발지 IP가 127.0.0.6 이므로 ISTIO_OUTPUT 에 적용되어 리턴되어 POSTROUTING 를 통해 nginx 로 도착한다
- IPTables 확인 : istio-proxy → OUTPUT → ISTIO_OUTOUT(맨 상단 Rule 매칭으로 RETURN) -> POSTROUTING -> NGINX 컨테이너
# 출발IP가 127.0.0.6 이고, 빠져나오는 인터페이스가(-o lo)에 매칭되어 리턴됨
c1 iptables -v --numeric --table nat --list ISTIO_OUTPUT
Chain ISTIO_OUTPUT (1 references)
 pkts bytes target     prot opt in     out     source               destination
    2   120 RETURN     all  --  *      lo      127.0.0.6            0.0.0.0/0

# POSTROUTING 은 특별한 rule 이 없으니 통과!
Chain POSTROUTING (policy ACCEPT 144 packets, 12545 bytes)
 pkts bytes target     prot opt in     out     source               destination

# 모니터링 예시
c1 iptables -t nat --zero
c1 iptables -v --numeric --table nat --list ISTIO_OUTPUT
watch -d "nsenter -t $C1PID -n iptables -v --numeric --table nat --list OUTPUT; echo ; nsenter -t $C1PID -n iptables -v --numeric --table nat --list ISTIO_OUTPUT; echo ; nsenter -t $C1PID -n iptables -v --numeric --table nat --list POSTROUTING"
watch -d "nsenter -t $C1PID -n iptables -t nat -L -n -v"
최종적으로 nginx 컨테이너에 클라이언트의 요청 트래픽이 도착한다.
- nginx 컨테이너의 웹 액세스 로그에서 확인 : XFF 헤더에서 클라이언트의 출발지 IP를 확인!
# nginx 웹 데몬에 도착하여 액세스 로그 기록되고, 이후 200ok 리턴되며, XFF 헤더에서 클라이언트의 IP를 확인 할 수 있다
(istio-k8s:default) root@k8s-m:~# kubectl logs nginx-pod -f
127.0.0.6 - - [15/Dec/2021:18:37:38 +0000] "GET / HTTP/1.1" 200 615 "-" "curl/7.68.0" "192.168.10.254"
127.0.0.6 - - [15/Dec/2021:18:40:52 +0000] "GET / HTTP/1.1" 200 615 "-" "curl/7.68.0" "192.168.10.254"
...
Pod → Client 응답
트래픽 흐름
- nginx (웹 서버)컨테이너에서 리턴 트래픽(응답, 200 OK)를 클라이언트에 전달합니다.
- IPTables CT(Connection Table)에 정보를 참고해서 역변환 등이 적용되어 전달됩니다.

8번 과정의 패킷
- 200 OK 응답이며, ‘Istio-proxy’ 에 의해서 x-envoy-upstream-Y 헤더가 추가되어 있습니다.

-
(참고) 1.1 에서 알아본 3번 과정 직전과 위 8번 과정의 NAT 트래픽 정보
  c1 conntrack -L --dst-nat
  tcp      6 430172 ESTABLISHED src=172.16.228.76 dst=172.16.46.11 sport=40882 dport=80 src=172.16.46.11 dst=172.16.228.76 sport=15006 dport=40882 [ASSURED] mark=0 use=1
   src=172.16.228.76 dst=172.16.46.11 sport=40882 dport=80     # 3번 과정 직전(IPTables 적용 전)의 IP/Port 정보
   src=172.16.46.11 dst=172.16.228.76 sport=15006 dport=40882  # 8번 과정 의 IP/Port 정보, 특히 출발지 포트가 15006 으로, 'istio-proxy' 경유를 했음을 알 수 있다
Pod의 요청 → Web Server
트래픽 흐름
- 파드에서 업데이트 나 패치 다운로드 처럼 외부 웹서버 나 인터넷 연결 과정에서의 트래픽의 흐름입니다.
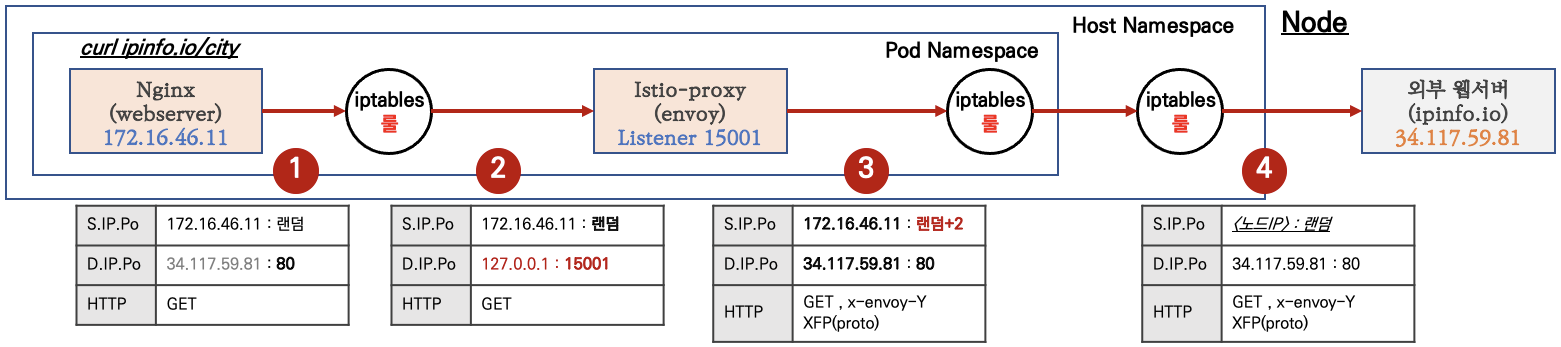
파드 내 IPTables 적용 흐름 : 아래 (9) ~ (15) 까지의 과정을 먼저 설명합니다.
https://jimmysong.io/en/blog/sidecar-injection-iptables-and-traffic-routing/
Pod (Client) → Istio Gateway
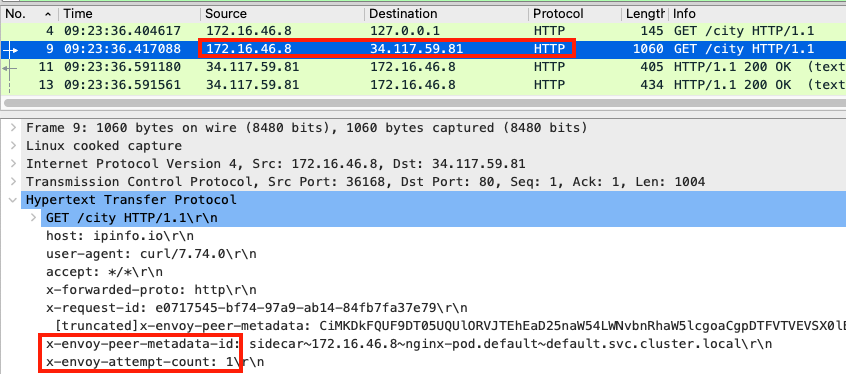
nginx 컨테이너 에서 외부 웹서버 요청을 합니다.
# 아래 처럼 'nginx 컨테이너' 에서 외부 웹서버 요청
kubectl exec -it nginx-pod -c nginx-container -- curl -s 192.168.10.254
kubectl exec -it nginx-pod -c nginx-container -- curl -s http://wttr.in/seoul
kubectl exec -it nginx-pod -c nginx-container -- curl -s wttr.in/seoul?format=3
kubectl exec -it nginx-pod -c nginx-container -- curl -s 'wttr.in/{London,Busan}'
kubectl exec -it nginx-pod -c nginx-container -- curl -s http://ipinfo.io/city
kubectl exec -it nginx-pod -c nginx-container -- curl -k https://www.google.com | grep -o "<title>.*</title>";echo
while true; do kubectl exec -it nginx-pod -c nginx-container -- curl -s http://ipinfo.io/city; date "+%Y-%m-%d %H:%M:%S" ; echo "--------------" ; sleep 3; done
- (참고) 파드 내에서 NAT 트래픽 정보
root@k8s-w2:~# c1 conntrack -L --dst-nat
tcp      6 0 TIME_WAIT src=172.16.46.11 dst=34.117.59.81 sport=59010 dport=80 src=127.0.0.1 dst=172.16.46.11 sport=15001 dport=59010 [ASSURED] mark=0 use=1
conntrack v1.4.5 (conntrack-tools): 1 flow entries have been shown.
 src=172.16.46.11 dst=34.117.59.81 sport=59010 dport=80     # 최초 요청 트래픽 정보
 src=127.0.0.1    dst=172.16.46.11 sport=15001 dport=59010  # 리턴 트래픽에서 IP/Port 정보를 보면, 출발지 포트가 15001 으로, 'istio-proxy' 경유를 했음을 알 수 있다
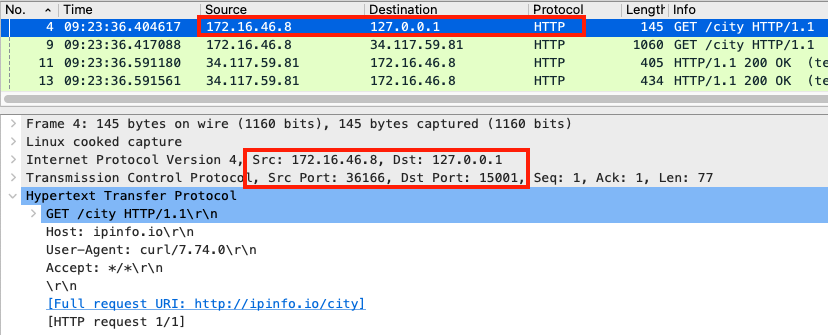
Pod IPTables → Istio Proxy 컨테이너 인입
파드 내 IPTables Chains/Rules 적용 (NAT 테이블) → ‘Istio-proxy 컨테이너‘로 인입됩니다.
- OUTPUT → ISTIO_OUTPUT → ISTIO_REDIRECT (redir ports 15001)
# iptables 확인
c1 iptables -t nat --zero
c1 iptables -v --numeric --table nat --list ISTIO_REDIRECT
watch -d "nsenter -t $C1PID -n iptables -v --numeric --table nat --list OUTPUT; echo ; nsenter -t $C1PID -n iptables -v --numeric --table nat --list ISTIO_OUTPUT; echo ; nsenter -t $C1PID -n iptables -v --numeric --table nat --list ISTIO_REDIRECT"
watch -d "nsenter -t $C1PID -n iptables -t nat -L -n -v"

# nginx 파드에서 TCP 트래픽 요청으로 인입 시, ISTIO_REDIRECT 에서 redir ports 15001 되어 'Istio-proxy 컨테이너'로 인입됩니다.
c1 iptables -t nat -L -n -v
Chain OUTPUT (policy ACCEPT 5 packets, 455 bytes)
 pkts bytes target        prot opt in     out     source               destination
    0     0 ISTIO_OUTPUT  tcp  --  *      *       0.0.0.0/0            0.0.0.0/0

Chain ISTIO_OUTPUT (1 references)
 pkts bytes target          prot opt in     out     source               destination
 ...
    0     0 ISTIO_REDIRECT  all  --  *      *       0.0.0.0/0            0.0.0.0/0

Chain ISTIO_REDIRECT (1 references)
 pkts bytes target     prot opt in     out     source               destination
    0     0 REDIRECT   tcp  --  *      *       0.0.0.0/0            0.0.0.0/0            redir ports 15001
nginx 파드에서 ‘Istio-proxy 컨테이너’로 들어갈 때의 트래픽 입니다.
Istio Proxy → Node
노드의 호스트 Namespace로의 인입 과정을 살펴봅니다.
‘Istio-proxy 컨테이너’ 는 대리인(Proxy) 역할로, 출발지 포트를 변경(+2) 후 외부 웹서버에 연결을 한다
- ‘Istio-proxy 컨테이너’의 로그 확인
(istio-k8s:default) root@k8s-m:~# kubectl logs nginx-pod -c istio-proxy -f
[2021-12-15T21:13:34.787Z] "GET /loc HTTP/1.1" 200 - via_upstream - "-" 0 17 187 187 "-" "curl/7.74.0" "d86b9c0b-9519-9c96-9b06-17938fa6ed3b" "ipinfo.io" "34.117.59.81:80" PassthroughCluster 172.16.46.11:36198 34.117.59.81:80 172.16.46.11:36196 - allow_any
- 파드 내에서 패킷 덤프 후 확인 : 출발지 포드를 변경(+2) 및 x-envoy 헤더를 추가
- lsof 확인 : envoy 에서 외부로 연결되는 정보이며, User ID(UID)가 1337 이다.
root@k8s-w2:~# c1 lsof -i TCP:80,15006 -n
COMMAND  PID            USER   FD   TYPE  DEVICE SIZE/OFF NODE NAME
envoy   3928            1337   40u  IPv4 1405154      0t0  TCP 172.16.46.11:38428->34.117.59.81:http (ESTABLISHED)
파드를 빠져나가기 전, 다시 한번 더 IPTables 적용 된다 ⇒ 이때, 이전 트래픽과 매칭되는 Rule 이 다른 것은 UID 1337 때문입니다.
- OUTPUT → ISTIO_OUTPUT
# iptables 확인
c1 iptables -t nat --zero # 패킷 카운트 초기화

# 아래 처럼 Istio-proxy(15001)에서 빠져나온 부분은 UID 1337 매칭되어서 RETURN 되어 파드를 빠져나오게 됩니다!
c1 iptables -t nat -L -n -v
Chain ISTIO_OUTPUT (1 references)
 pkts bytes target             prot opt in     out     source               destination
    0     0 RETURN             all  --  *      lo      127.0.0.6            0.0.0.0/0
    0     0 ISTIO_IN_REDIRECT  all  --  *      lo      0.0.0.0/0           !127.0.0.1            owner UID match 1337
    0     0 RETURN             all  --  *      lo      0.0.0.0/0            0.0.0.0/0            ! owner UID match 1337
    2   120 RETURN             all  --  *      *       0.0.0.0/0            0.0.0.0/0            owner UID match 1337
    0     0 ISTIO_IN_REDIRECT  all  --  *      lo      0.0.0.0/0           !127.0.0.1            owner GID match 1337
    0     0 RETURN             all  --  *      lo      0.0.0.0/0            0.0.0.0/0            ! owner GID match 1337
    0     0 RETURN             all  --  *      *       0.0.0.0/0            0.0.0.0/0            owner GID match 1337
    0     0 RETURN             all  --  *      *       0.0.0.0/0            127.0.0.1
    2   120 ISTIO_REDIRECT     all  --  *      *       0.0.0.0/0            0.0.0.0/0
Node → Egress
노드에 SNAT(masquerading) 설정이 되어 있을 경우, 출발지 IP 를 노드의 NIC IP로 변환하여 외부 웹서버에 요청을 전달합니다.
External Web Server(Return) → Pod
웹 서버에서 리턴 트래픽이 파드에 돌아오는 과정은 1.2 에서 알아본 흐름과 유사합니다.
다만, 파드 내로 인입 시 목적지 포트(+2) 이므로, ‘Nginx 컨테이너’ 로 바로 가지 않고, ‘Istio-proxy 컨테이너’ 로 먼저 가게 됩니다.
테스트 리소스 정리
(실습 종료 후) istio 삭제 ← 그냥 vagrant 삭제가 빠르긴 합니다!
# Addon 삭제
kubectl delete -f ~/istio-1.12.1/samples/addons

# 파드와 서비스 삭제
kubectl delete pod,svc --all

# Bookinfo 삭제
cd $VERSION/samples/bookinfo/platform/kube
./cleanup.sh
cd

# istio 삭제
istioctl manifest generate --set profile=demo | kubectl delete --ignore-not-found=true -f -  # 2분 정도 시간 소요
kubectl delete namespace istio-system
kubectl delete namespace istio-operator
kubectl label namespace default istio-injection-
Istio Ambient Mesh
‣
k3s 환경에 설치 시 아래 파라미터 설정 필요 - Docs
- When using K3s and one of its bundled CNIs, you must append some values to your installation command, as K3S uses nonstandard locations for CNI configuration and binaries.
- These nonstandard locations may be overridden as well, according to K3s documentation. If you are using K3s with a custom, non-bundled CNI, you must use the correct paths for those CNIs, e.g.
/etc/cni/net.d- see the K3s docs for details. - For example:
# istioctl
istioctl install --set profile=ambient --set values.cni.cniConfDir=/var/lib/rancher/k3s/agent/etc/cni/net.d --set values.cni.cniBinDir=/var/lib/rancher/k3s/data/current/bin/

# helm
helm install istio-cni istio/cni -n istio-system --set profile=ambient --wait --set cniConfDir=/var/lib/rancher/k3s/agent/etc/cni/net.d --set cniBinDir=/var/lib/rancher/k3s/data/current/bin/
Introducing Kmesh: Revolutionizing Service Mesh Data Planes With Kernel-Native Technology
](/images/KANS/week7/part2/image3.png)
https://jimmysong.io/en/blog/introducing-kmesh-kernel-native-service-mesh/