IPVS Proxy Mode
October 2024 (3291 Words, 19 Minutes)
IPVS Proxy 모드
참고 링크
- https://github.com/kubernetes/kubernetes/blob/master/pkg/proxy/ipvs/README.md
- https://kubernetes.io/docs/reference/networking/virtual-ips/#proxy-mode-ipvs
KUBE-PROXY에서는 대규모 서비스를 처리하기위해 iptables의 한계점으로 인해 IPVS 모드를 출시했습니다.
1,000개 이상의 서비스가 있는 대규모 클러스터에서 발생할 수 있는 네트워크 지연 문제를 해결할 수 있습니다.
이 성능 문제는 iptables 모드에서 각 패킷에 대해 순차적으로 패킷 필터링 규칙을 처리하는 과정에서 발생합니다.
이러한 지연 문제는 iptables의 후속 기술인 nftables에서 해결되었지만, 이 글을 작성할 당시 kube-proxy가 nftables를 사용하도록 개발 중이었습니다.
이 문제를 해결하기 위해 클러스터를 IPVS 모드에서 kube-proxy를 실행하도록 설정할 수 있습니다.
1.31 버전에서는 kube-proxy nftable 모드가 출시되어 사용이 가능합니다.
https://aws.github.io/aws-eks-best-practices/networking/ipvs/
K8S 설치하기
macOS 기준 KIND 클러스터를 기준으로 작성했습니다.
👉🏻 실습 환경은 K8S v1.31.0 , CNI(Kindnet, Direct Routing mode) , IPVS proxy mode
- 노드(실제로는 컨테이너) 네트워크 대역 : 172.18.0.0/16
- 파드 사용 네트워크 대역 : 10.10.0.0/16 ⇒ 각각 10.10.1.0/24, 10.10.2.0/24, 10.10.3.0/24, 10.10.4.0/24
- 서비스 사용 네트워크 대역 : 10.200.1.0/24
](/images/KANS/week5/part2/image.png)
https://kschoi728.tistory.com/260
# 파일 작성
cat <<EOT> kind-svc-2w-ipvs.yaml
kind: Cluster
apiVersion: kind.x-k8s.io/v1alpha4
featureGates:
  "InPlacePodVerticalScaling": true
~~~~  "MultiCIDRServiceAllocator": true
nodes:
- role: control-plane
  labels:
    mynode: control-plane
    topology.kubernetes.io/zone: ap-northeast-2a
  extraPortMappings:
  - containerPort: 30000
    hostPort: 30000
  - containerPort: 30001
    hostPort: 30001
  - containerPort: 30002
    hostPort: 30002
  - containerPort: 30003
    hostPort: 30003
  - containerPort: 30004
    hostPort: 30004
  kubeadmConfigPatches:
  - |
    kind: ClusterConfiguration
    apiServer:
      extraArgs:
        runtime-config: api/all=true
    controllerManager:
      extraArgs:
        bind-address: 0.0.0.0
    etcd:
      local:
        extraArgs:
          listen-metrics-urls: http://0.0.0.0:2381
    scheduler:
      extraArgs:
        bind-address: 0.0.0.0
  - |
    kind: KubeProxyConfiguration
    metricsBindAddress: 0.0.0.0
    ipvs:
      strictARP: true
- role: worker
  labels:
    mynode: worker1
    topology.kubernetes.io/zone: ap-northeast-2a
- role: worker
  labels:
    mynode: worker2
    topology.kubernetes.io/zone: ap-northeast-2b
- role: worker
  labels:
    mynode: worker3
    topology.kubernetes.io/zone: ap-northeast-2c
networking:
  podSubnet: 10.10.0.0/16
  serviceSubnet: 10.200.1.0/24
  kubeProxyMode: "ipvs"
EOT

# k8s 클러스터 설치
kind create cluster --config kind-svc-2w-ipvs.yaml --name myk8s --image kindest/node:v1.31.0
docker ps
노듭별로 label에 topology를 위한 역할을 제각기 다르게 부여했습니다.
# 노드에 기본 툴 설치
docker exec -it myk8s-control-plane sh -c 'apt update && apt install tree psmisc lsof wget bsdmainutils bridge-utils net-tools dnsutils ipset ipvsadm nfacct tcpdump ngrep iputils-ping arping git vim arp-scan -y'
for i in worker worker2 worker3; do echo ">> node myk8s-$i <<"; docker exec -it myk8s-$i sh -c 'apt update && apt install tree psmisc lsof wget bsdmainutils bridge-utils net-tools dnsutils ipset ipvsadm nfacct tcpdump ngrep iputils-ping arping -y'; echo; done

# kube-proxy configmap 확인
kubectl describe cm -n kube-system kube-proxy
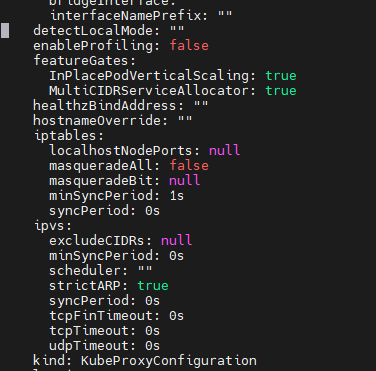
ipvs 모드가 활성화되어 사용 가능한것을 확인 할 수 있습니다.
- excludeCIDRs: 여기에 설정된 CIDR은 ipvs 규칙에서 제외됩니다. 즉, 이 네트워크 대역은 로드 밸런싱 대상에서 제외됩니다.
- minSyncPeriod: ipvs 규칙이 동기화되는 최소 주기입니다. 즉, 변경 사항이 감지되었을 때 얼마나 빨리 동기화할지를 결정하는 값입니다.
- scheduler: ipvs에서 사용되는 로드 밸런싱 스케줄링 알고리즘을 지정합니다. (예: rr = Round Robin, lc = Least Connection, wrr = Weighted Round Robin 등)
- syncPeriod: ipvs 규칙을 동기화하는 주기입니다. kube-proxy가 주기적으로 ipvs 규칙을 재설정하거나 업데이트합니다.
- strictARP: 이 값이 true로 설정된 경우, ipvs가 ARP 응답을 엄격하게 처리하도록 합니다. 즉, 각 서비스의 IP 주소에 대해 정확한 ARP 응답을 보장합니다.
- tcpTimeout, tcpFinTimeout, udpTimeout: ipvs의 TCP와 UDP 세션 타임아웃을 설정합니다. 특정 서비스 연결이 얼마나 오랫동안 유휴 상태일 수 있는지를 정의합니다.
# strictARP: true는 ARP 패킷을 보다 엄격하게 처리하겠다는 설정입니다.
## IPVS 모드에서 strict ARP가 활성화되면, 노드의 인터페이스는 자신에게 할당된 IP 주소에 대해서만 ARP 응답을 보내게 됩니다.
## 이는 IPVS로 로드밸런싱할 때 ARP 패킷이 잘못된 인터페이스로 전달되는 문제를 방지합니다.
## 이 설정은 특히 클러스터 내에서 여러 노드가 동일한 IP를 갖는 VIP(Virtual IP)를 사용하는 경우 중요합니다.
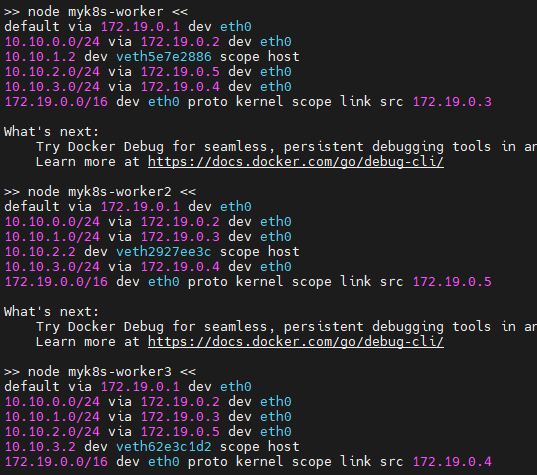
# 노드 별 네트워트 정보 확인 : kube-ipvs0 네트워크 인터페이스 확인
for i in control-plane worker worker2 worker3; do echo ">> node myk8s-$i <<"; docker exec -it myk8s-$i ip -c route; echo; done
for i in control-plane worker worker2 worker3; do echo ">> node myk8s-$i <<"; docker exec -it myk8s-$i ip -d -c addr show kube-ipvs0; echo; done
# kube-ipvs0 에 할당된 IP(기본 IP + 보조 IP들) 정보 확인
kubectl get svc,ep -A
NAMESPACE     NAME         TYPE        CLUSTER-IP    EXTERNAL-IP   PORT(S)                  AGE
default       kubernetes   ClusterIP   10.200.1.1    <none>        443/TCP                  3m8s
kube-system   kube-dns     ClusterIP   10.200.1.10   <none>        53/UDP,53/TCP,9153/TCP   3m7s

# ipvsadm 툴로 부하분산 되는 정보 확인 : 서비스의 IP와 서비스에 연동되어 있는 파드의 IP 를 확인
## Service IP(VIP) 처리를 ipvs 에서 담당 -> 이를 통해 iptables 에 체인/정책이 상당 수준 줄어듬
for i in control-plane worker worker2 worker3; do echo ">> node myk8s-$i <<"; docker exec -it myk8s-$i ipvsadm -Ln ; echo; done

## IPSET 확인
docker exec -it myk8s-worker ipset -h
docker exec -it myk8s-worker ipset -L

# iptables 정보 확인 : 정책 갯수를 iptables proxy 모드와 비교해보자
for i in filter nat mangle raw ; do echo ">> IPTables Type : $i <<"; docker exec -it myk8s-control-plane  iptables -t $i -S ; echo; done

# 각 노드 bash 접속
docker exec -it myk8s-control-plane bash
docker exec -it myk8s-worker bash
docker exec -it myk8s-worker2 bash
docker exec -it myk8s-worker3 bash
----------------------------------------
exit
----------------------------------------

# mypc 컨테이너 기동 : kind 도커 브리지를 사용하고, 컨테이너 IP를 직접 지정
docker run -d --rm --name mypc --network kind --ip 172.18.0.100 nicolaka/netshoot sleep infinity
docker ps
*## 만약 kind 네트워크 대역이 다를 경우 위 IP 지정이 실패할 수 있으니, 그냥 IP 지정 없이 mypc 컨테이너 기동 할 것
## docker run -d --rm --name mypc --network kind nicolaka/netshoot sleep infinity*

책 원고 및 k8s Docs

IPVS 프록시 모드 (kernel IPVS , iptables APIs → netfilter subsystem) http://www.linuxvirtualserver.org/software/ipvs.html
- In ipvs mode, kube-proxy uses the kernel IPVS and iptables APIs to create rules to redirect traffic from Service IPs to endpoint IPs.
- The IPVS proxy mode is based on netfilter hook function that is similar to iptables mode, but uses a hash table as the underlying data structure and works in the kernel space. That means kube-proxy in IPVS mode redirects traffic with lower latency than kube-proxy in iptables mode, with much better performance when synchronizing proxy rules. Compared to the iptables proxy mode, IPVS mode also supports a higher throughput of network traffic.
- IPVS Mode는 Linue Kernel에서 제공하는 L4 Load Balacner인 IPVS가 Service Proxy 역할을 수행하는 Mode이다.
- Packet Load Balancing 수행시 IPVS가 iptables보다 높은 성능을 보이기 때문에 IPVS Mode는 iptables Mode보다 높은 성능을 보여준다
- IPVS 프록시 모드는 iptables 모드와 유사한 넷필터 후크 기능을 기반으로 하지만, 해시 테이블을 기본 데이터 구조로 사용하고 커널 스페이스에서 동작한다.
- 이는 IPVS 모드의 kube-proxy는 iptables 모드의 kube-proxy보다 지연 시간이 짧은 트래픽을 리다이렉션하고, 프록시 규칙을 동기화할 때 성능이 훨씬 향상됨을 의미한다.
- 다른 프록시 모드와 비교했을 때, IPVS 모드는 높은 네트워크 트래픽 처리량도 지원한다.
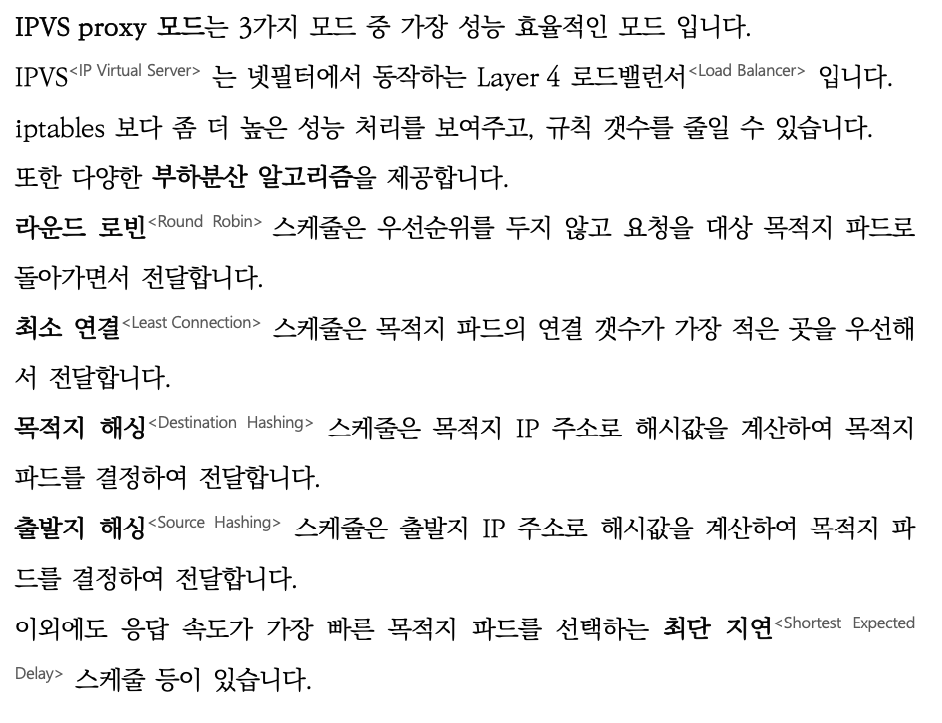
IPVS 부하분산 : rr, wrr, lc, wlc, lblc, lblc, lblcr, sh, dh, sed, nq
rr(Round Robin): Traffic is equally distributed amongst the backing servers.wrr(Weighted Round Robin): Traffic is routed to the backing servers based on the weights of the servers. Servers with higher weights receive new connections and get more requests than servers with lower weights.lc(Least Connection): More traffic is assigned to servers with fewer active connections.wlc(Weighted Least Connection): More traffic is routed to servers with fewer connections relative to their weights, that is, connections divided by weight.lblc(Locality based Least Connection): Traffic for the same IP address is sent to the same backing server if the server is not overloaded and available; otherwise the traffic is sent to servers with fewer connections, and keep it for future assignment.lblcr(Locality Based Least Connection with Replication): Traffic for the same IP address is sent to the server with least connections. If all the backing servers are overloaded, it picks up one with fewer connections and add it to the target set. If the target set has not changed for the specified time, the most loaded server is removed from the set, in order to avoid high degree of replication.sh(Source Hashing): Traffic is sent to a backing server by looking up a statically assigned hash table based on the source IP addresses.dh(Destination Hashing): Traffic is sent to a backing server by looking up a statically assigned hash table based on their destination addresses.sed(Shortest Expected Delay): Traffic forwarded to a backing server with the shortest expected delay. The expected delay is(C + 1) / Uif sent to a server, whereCis the number of connections on the server andUis the fixed service rate (weight) of the server.nq(Never Queue): Traffic is sent to an idle server if there is one, instead of waiting for a fast one; if all servers are busy, the algorithm falls back to thesedbehavior.
💡To run kube-proxy in IPVS mode, you must make IPVS available on the node before starting kube-proxy. When kube-proxy starts in IPVS proxy mode, it verifies whether IPVS kernel modules are available. If the IPVS kernel modules are not detected, then kube-proxy exits with an error.
IPVS 소개
- IPVS 는 리눅스 커널에서 동작하는 소프트웨어 로드밸런서이다. 백엔드(플랫폼)으로 Netfilter 를 사용하며, TCP/UDP 요청을 처리 할 수 있다.
- iptables 의 rule 기반 처리의 성능 한계와 분산 알고리즘이 없어서, 최근에는 대체로 IPVS 를 사용한다.
Netfilter Hook Function : 6개의 Netfilter Hook Function 을 사용 → Local Hook 사용 이유는 IPVS Dummy Interface 사용하기 때문
](/images/KANS/week5/part2/Untitled.png)
https://ssup2.github.io/theory_analysis/Linux_LVS_IPVS/
부하 분산 스케줄링 : kube-proxy 파라미터에 설정 적용 -ipvs-scheduler
](/images/KANS/week5/part2/Untitled1.png)
https://net711.tistory.com/entry/lvs-리눅스-l4-만들기
IPSET - 링크
- iptables로 5000건 이상의 룰셋이 등록 되었을때 시스템의 성능이 급격하게 떨어지는 반면 룰을 줄일 수 있는 방법 중 ‘IP들의 집합’ 으로 관리 ⇒ IPSET
- 아래는 ipvs proxy mode 사용 시 설정되는 기본 ipset 내용
](/images/KANS/week5/part2/Untitled2.png)
https://kubernetes.io/blog/2018/07/09/ipvs-based-in-cluster-load-balancing-deep-dive/
(심화) IPVS 정보 확인
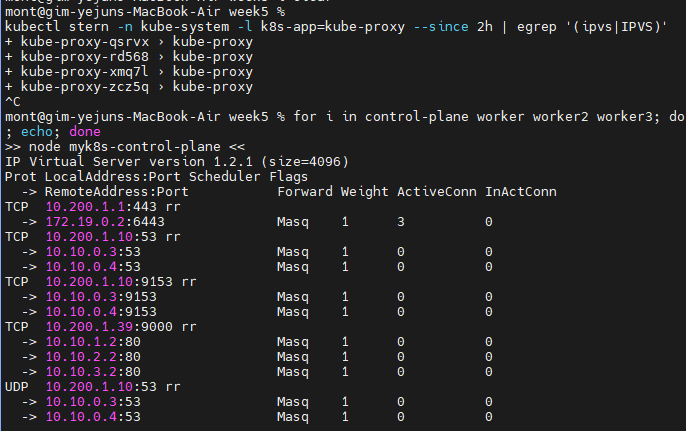
# kube-proxy 로그 확인 :  기본값 부하분산 스케줄러(RoundRobin = RR)
kubectl stern -n kube-system -l k8s-app=kube-proxy --since 2h | egrep '(ipvs|IPVS)'

# ipvsadm 툴로 부하분산 되는 정보 확인 : RR 부하분산 스케줄러 확인
for i in control-plane worker worker2 worker3; do echo ">> node myk8s-$i <<"; docker exec -it myk8s-$i ipvsadm -Ln ; echo; done
...
IP Virtual Server version 1.2.1 (size=4096)
Prot LocalAddress:Port Scheduler Flags
  -> RemoteAddress:Port           Forward Weight ActiveConn InActConn
TCP  10.200.1.1:443 rr
  -> 172.18.0.2:6443              Masq    1      3          0
...
# 커널 파라미터 확인
# (심화 옵션) strictARP - [링크](https://kubernetes.io/docs/reference/command-line-tools-reference/kube-proxy/) [설정(유사한)이유](https://pseonghoon.github.io/post/linux-parameters-for-l4-dsr/)
# --ipvs-strict-arp : Enable strict ARP by setting arp_ignore to 1 and arp_announce to 2
# arp_ignore : ARP request 를 받았을때 응답 여부 - 0(ARP 요청 도착시, any Interface 있으면 응답), 1(ARP 요청을 받은 Interface 가 해당 IP일때만 응답)
# arp_announce : ARP request 를 보낼 때 'ARP Sender IP 주소'에 지정 값 - 0(sender IP로 시스템의 any IP 가능), 2(sender IP로 실제 전송하는 Interface 에 IP를 사용)
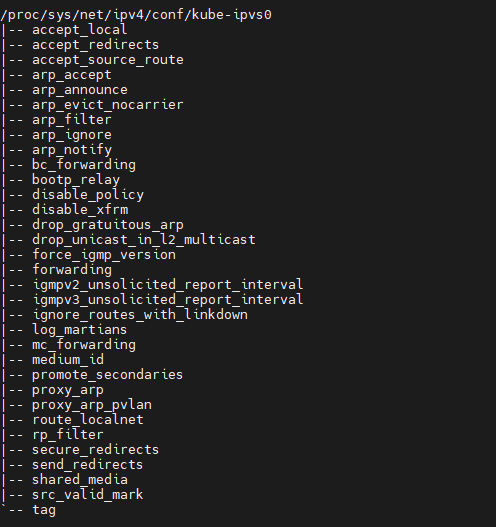
docker exec -it myk8s-worker tree /proc/sys/net/ipv4/conf/kube-ipvs0
docker exec -it myk8s-worker cat /proc/sys/net/ipv4/conf/kube-ipvs0/arp_ignore
docker exec -it myk8s-worker cat /proc/sys/net/ipv4/conf/kube-ipvs0/arp_announce
# all 은 모든 인터페이스에 영항을 줌, 단 all 과 interface 값이 다를때 우선순위는 커널 파라미터 별로 다르다 - [링크](https://unix.stackexchange.com/questions/90443/what-is-the-difference-between-all-default-and-eth-in-proc-sys-net-ipv)
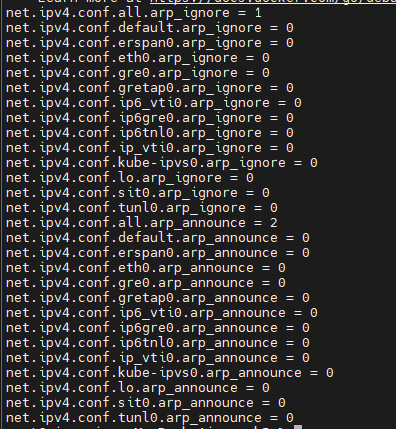
docker exec -it myk8s-worker sysctl net.ipv4.conf.all.arp_ignore
docker exec -it myk8s-worker sysctl net.ipv4.conf.all.arp_announce
docker exec -it myk8s-worker sysctl net.ipv4.conf.kube-ipvs0.arp_ignore
docker exec -it myk8s-worker sysctl net.ipv4.conf.kube-ipvs0.arp_announce
docker exec -it myk8s-worker sysctl -a | grep arp_ignore
docker exec -it myk8s-worker sysctl -a | grep arp_announce
# IPSET 확인
docker exec -it myk8s-worker ipset -h
docker exec -it myk8s-worker ipset -L
실습해보기
목적지 파드, 클라이언트, 서비스 생성
cat <<EOT> 3pod.yaml
apiVersion: v1
kind: Pod
metadata:
  name: webpod1
  labels:
    app: webpod
spec:
  nodeName: myk8s-worker
  containers:
  - name: container
    image: traefik/whoami
  terminationGracePeriodSeconds: 0
---
apiVersion: v1
kind: Pod
metadata:
  name: webpod2
  labels:
    app: webpod
spec:
  nodeName: myk8s-worker2
  containers:
  - name: container
    image: traefik/whoami
  terminationGracePeriodSeconds: 0
---
apiVersion: v1
kind: Pod
metadata:
  name: webpod3
  labels:
    app: webpod
spec:
  nodeName: myk8s-worker3
  containers:
  - name: container
    image: traefik/whoami
  terminationGracePeriodSeconds: 0
EOT

cat <<EOT> netpod.yaml
apiVersion: v1
kind: Pod
metadata:
  name: net-pod
spec:
  nodeName: myk8s-control-plane
  containers:
  - name: netshoot-pod
    image: nicolaka/netshoot
    command: ["tail"]
    args: ["-f", "/dev/null"]
  terminationGracePeriodSeconds: 0
EOT

cat <<EOT> svc-clusterip.yaml
apiVersion: v1
kind: Service
metadata:
  name: svc-clusterip
spec:
  ports:
    - name: svc-webport
      port: 9000        # 서비스 IP 에 접속 시 사용하는 포트 port 를 의미
      targetPort: 80    # 타킷 targetPort 는 서비스를 통해서 목적지 파드로 접속 시 해당 파드로 접속하는 포트를 의미
  selector:
    app: webpod         # 셀렉터 아래 app:webpod 레이블이 설정되어 있는 파드들은 해당 서비스에 연동됨
  type: ClusterIP       # 서비스 타입
EOT
생성 및 확인 : IPVS Proxy 모드
# 생성
kubectl apply -f 3pod.yaml,netpod.yaml,svc-clusterip.yaml
# 파드와 서비스 사용 네트워크 대역 정보 확인
kubectl cluster-info dump | grep -m 2 -E "cluster-cidr|service-cluster-ip-range"
# 확인
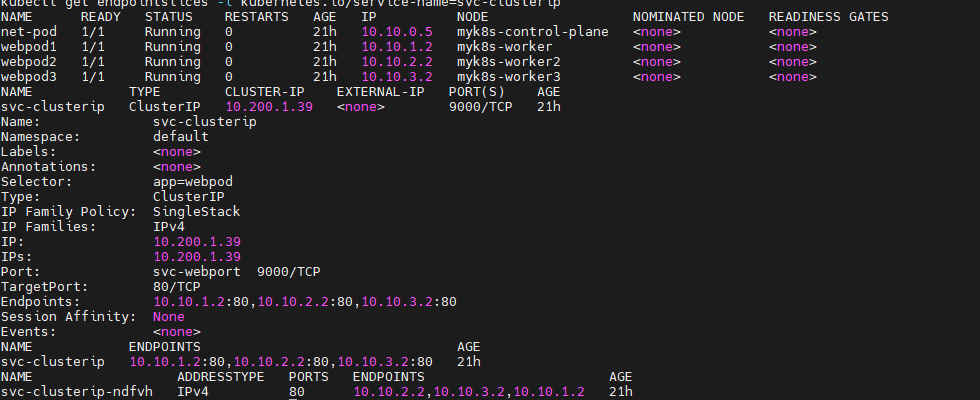
kubectl get pod -owide
kubectl get svc svc-clusterip
kubectl describe svc svc-clusterip
kubectl get endpoints svc-clusterip
kubectl get endpointslices -l kubernetes.io/service-name=svc-clusterip
# 변수 지정
CIP=$(kubectl get svc svc-clusterip -o jsonpath="{.spec.clusterIP}")
CPORT=$(kubectl get svc svc-clusterip -o jsonpath="{.spec.ports[0].port}")
echo $CIP $CPORT
# ipvsadm 툴로 부하분산 되는 정보 확인
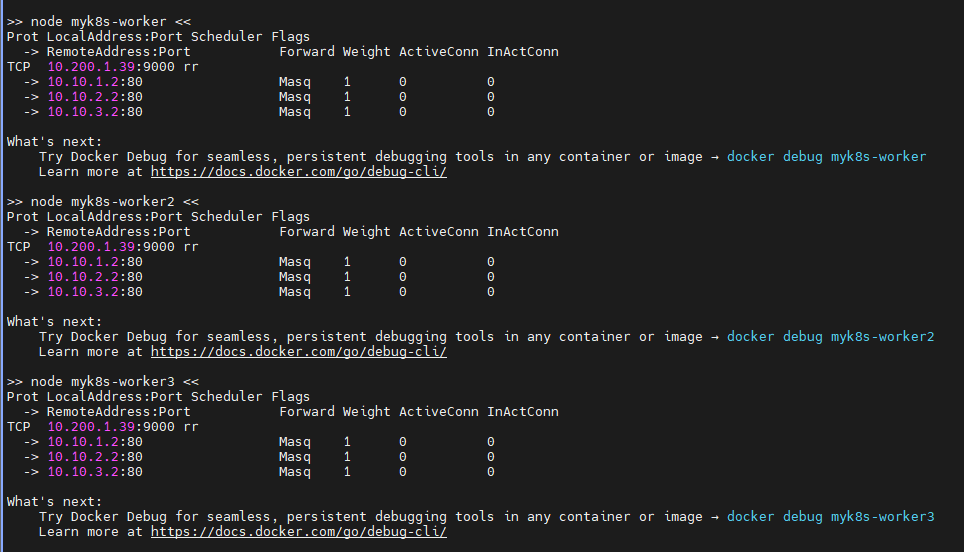
## 10.200.1.216(TCP 9000) 인입 시 3곳의 목적지로 라운드로빈(rr)로 부하분산하여 전달됨을 확인 : 모든 노드에서 동일한 IPVS 분산 설정 정보 확인
## 3곳의 목적지는 각각 서비스에 연동된 목적지 파드 3개이며, 전달 시 출발지 IP는 마스커레이딩 변환 처리
docker exec -it myk8s-control-plane ipvsadm -Ln -t $CIP:$CPORT
for i in control-plane worker worker2 worker3; do echo ">> node myk8s-$i <<"; docker exec -it myk8s-$i ipvsadm -Ln -t $CIP:$CPORT ; echo; done
# iptables 규칙 확인 : ipset list 를 활용
docker exec -it myk8s-control-plane iptables -t nat -S | grep KUBE-CLUSTER-IP
-A KUBE-SERVICES ! -s 10.10.0.0/16 -m comment --comment "Kubernetes service cluster ip + port for masquerade purpose" -m set --match-set KUBE-CLUSTER-IP dst,dst -j KUBE-MARK-MASQ
-A KUBE-SERVICES -m set --match-set KUBE-CLUSTER-IP dst,dst -j ACCEPT
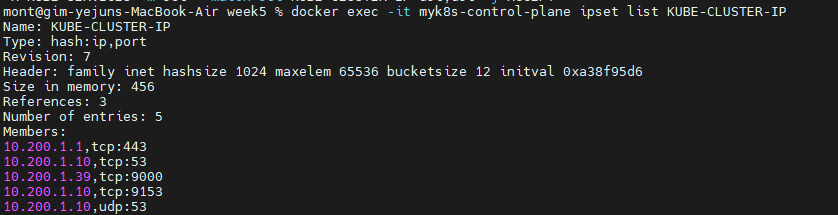
# ipset list 정보를 확인 : KUBE-CLUSTER-IP 이름은 아래 6개의 IP:Port 조합을 지칭
# 예를 들면 ipset list 를 사용하지 않을 경우 6개의 iptables 규칙이 필요하지만, ipset 사용 시 1개의 규칙으로 가능
docker exec -it myk8s-control-plane ipset list KUBE-CLUSTER-IP
IPVS 정보 확인 및 서비스 접속 확인
#
for i in control-plane worker worker2 worker3; do echo ">> node myk8s-$i <<"; docker exec -it myk8s-$i ipvsadm -Ln -t $CIP:$CPORT ; echo; done
# 변수 지정
CIP=$(kubectl get svc svc-clusterip -o jsonpath="{.spec.clusterIP}")
CPORT=$(kubectl get svc svc-clusterip -o jsonpath="{.spec.ports[0].port}")
echo $CIP $CPORT
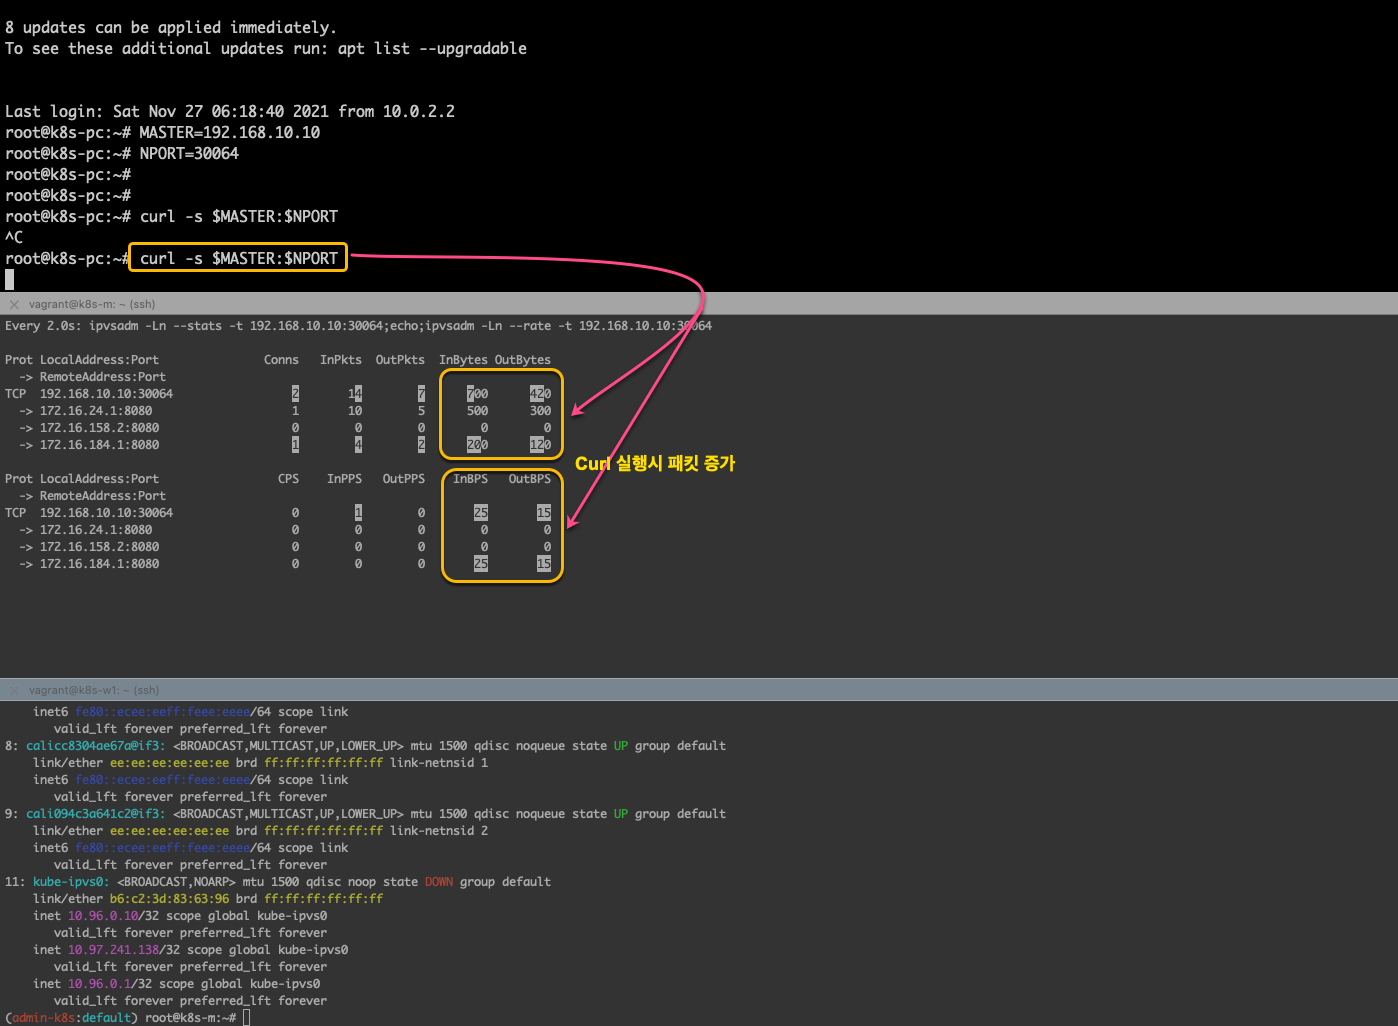
# 컨트롤플레인 노드에서 ipvsadm 모니터링 실행 : ClusterIP 접속 시 아래 처럼 연결 정보 확인됨
watch -d "docker exec -it myk8s-control-plane ipvsadm -Ln -t $CIP:$CPORT --stats; echo; docker exec -it myk8s-control-plane ipvsadm -Ln -t $CIP:$CPORT --rate"
--------------------------
# 서비스 IP 변수 지정 : svc-clusterip 의 ClusterIP주소
SVC1=$(kubectl get svc svc-clusterip -o jsonpath={.spec.clusterIP})
echo $SVC1
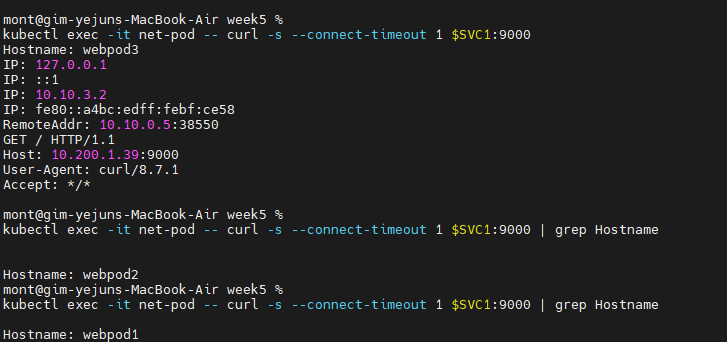
# TCP 80,9000 포트별 접속 확인 : 출력 정보 의미 확인
kubectl exec -it net-pod -- curl -s --connect-timeout 1 $SVC1:9000
kubectl exec -it net-pod -- curl -s --connect-timeout 1 $SVC1:9000 | grep Hostname
kubectl exec -it net-pod -- curl -s --connect-timeout 1 $SVC1:9000 | grep Hostname
# 서비스(ClusterIP) 부하분산 접속 확인 : 부하분산 비률 확인
kubectl exec -it net-pod -- zsh -c "for i in {1..1000}; do curl -s $SVC1:9000 | grep Hostname; done | sort | uniq -c | sort -nr"

    334 Hostname: webpod3
    333 Hostname: webpod2
    333 Hostname: webpod1

# 너무 정직한 결과…
현재 고객사에서 규모가 꽤 큰 클러스터를 운영하면서
초창기 설계단계에서 iptables VS IPVS 를 검토했던 자료를 본적이 있습니다.
네트워크 홉 자체가 크게 중요한 클러스터가 아님에도 불구하고,
클러스터 규모에 따라 설정해야하는 네트워크 레벨의 튜닝이 필요하다는것을 보는 자료였습니다.
아직도 네트워크를 깊이 이해하고, 그 모든 원리를 초월한 “왜” 에는 명확한 답이 나오지않는듯해 답답함이 가시지 않지만, 그것들마저 다 이어지는 순간이 오리라 생각이 됩니다.