GatewayAPI
October 2024 (4797 Words, 27 Minutes)
Gateway API 소개
Introduction to the Gateway API: Revolutionizing Kubernetes Networking
Gateway API의 주요 기능
-
개선된 리소스 모델
: API는 GatewayClass, Gateway 및 Route(HTTPRoute, TCPRoute 등)와 같은 새로운 사용자 정의 리소스를 도입하여 라우팅 규칙을 정의하는 보다 세부적이고 표현력 있는 방법을 제공합니다.
-
프로토콜 독립적
: 주로 HTTP용으로 설계된 Ingress와 달리 Gateway API는 TCP, UDP, TLS를 포함한 여러 프로토콜을 지원합니다.
-
강화된 보안
: TLS 구성 및 보다 세부적인 액세스 제어에 대한 기본 제공 지원.
-
교차 네임스페이스 지원
: 서로 다른 네임스페이스의 서비스로 트래픽을 라우팅하여 보다 유연한 아키텍처를 구축할 수 있는 기능을 제공합니다.
-
확장성
: API는 사용자 정의 리소스 및 정책으로 쉽게 확장할 수 있도록 설계되었습니다.
-
역할 지향
: 클러스터 운영자, 애플리케이션 개발자, 보안 팀 간의 우려를 명확하게 분리합니다.
이것은 제 겸손한 의견으로는 Gateway API의 가장 흥미로운 기능 중 하나일 것입니다.
Gateway API 소개 : 기존의 Ingress 에 좀 더 기능을 추가, 역할 분리(role-oriented) - Docs
- 서비스 메시(istio)에서 제공하는 Rich 한 기능 중 일부 기능들과 혹은 운영 관리에 필요한 기능들을 추가
- 추가 기능 : 헤더 기반 라우팅, 헤더 변조, 트래픽 미러링(쉽게 트래픽 복제), 역할 기반
](/images/KANS/week6/part2/Untitled.png)
https://youtu.be/GiFQNevrxYA?t=172
- Gateway API is a family of API kinds that provide dynamic infrastructure provisioning and advanced traffic routing.
- Make network services available by using an extensible, role-oriented, protocol-aware configuration mechanism.
- Gateway API is an add-on containing API kinds that provide dynamic infrastructure provisioning and advanced traffic routing.
구성 요소 (Resource)
-
GatewayClass,Gateway,HTTPRoute,TCPRoute,Service](/images/KANS/week6/part2/image.png)
https://kubernetes.io/docs/concepts/services-networking/gateway/
- GatewayClass: Defines a set of gateways with common configuration and managed by a controller that implements the class.
- Gateway: Defines an instance of traffic handling infrastructure, such as cloud load balancer.
- HTTPRoute: Defines HTTP-specific rules for mapping traffic from a Gateway listener to a representation of backend network endpoints. These endpoints are often represented as a Service.
](/images/KANS/week6/part2/Untitled1.png)
https://gateway-api.sigs.k8s.io/
![[AWS Seoul Summit 2024] Amazon EKS를 활용한 플랫폼 엔지니어링 적용하기](/images/KANS/week6/part2/CleanShot_2024-10-06_at_18.26.03.png)
[AWS Seoul Summit 2024] Amazon EKS를 활용한 플랫폼 엔지니어링 적용하기
- Kubernetes Traffic Management: Combining Gateway API with Service Mesh for North-South and East-West Use Cases - Blog
Why does a role-oriented API matter?
- 담당 업무의 역할에 따라서 동작/권한을 유연하게 제공할 수 있음
- 아래 그림 처럼 ‘스토어 개발자’는 Store 네임스페이스내에서 해당 store PATH 라우팅 관련 정책을 스스로 관리 할 수 있음
](/images/KANS/week6/part2/Untitled2.png)
https://gateway-api.sigs.k8s.io/
- Infrastructure Provider: Manages infrastructure that allows multiple isolated clusters to serve multiple tenants, e.g. a cloud provider.
- Cluster Operator: Manages clusters and is typically concerned with policies, network access, application permissions, etc.
- Application Developer: Manages an application running in a cluster and is typically concerned with application-level configuration and Service composition.
추천 글
https://www.anyflow.net/sw-engineer/kubernetes-gateway-api-1
https://www.anyflow.net/sw-engineer/kubernetes-gateway-api-2
Gloo Gateway
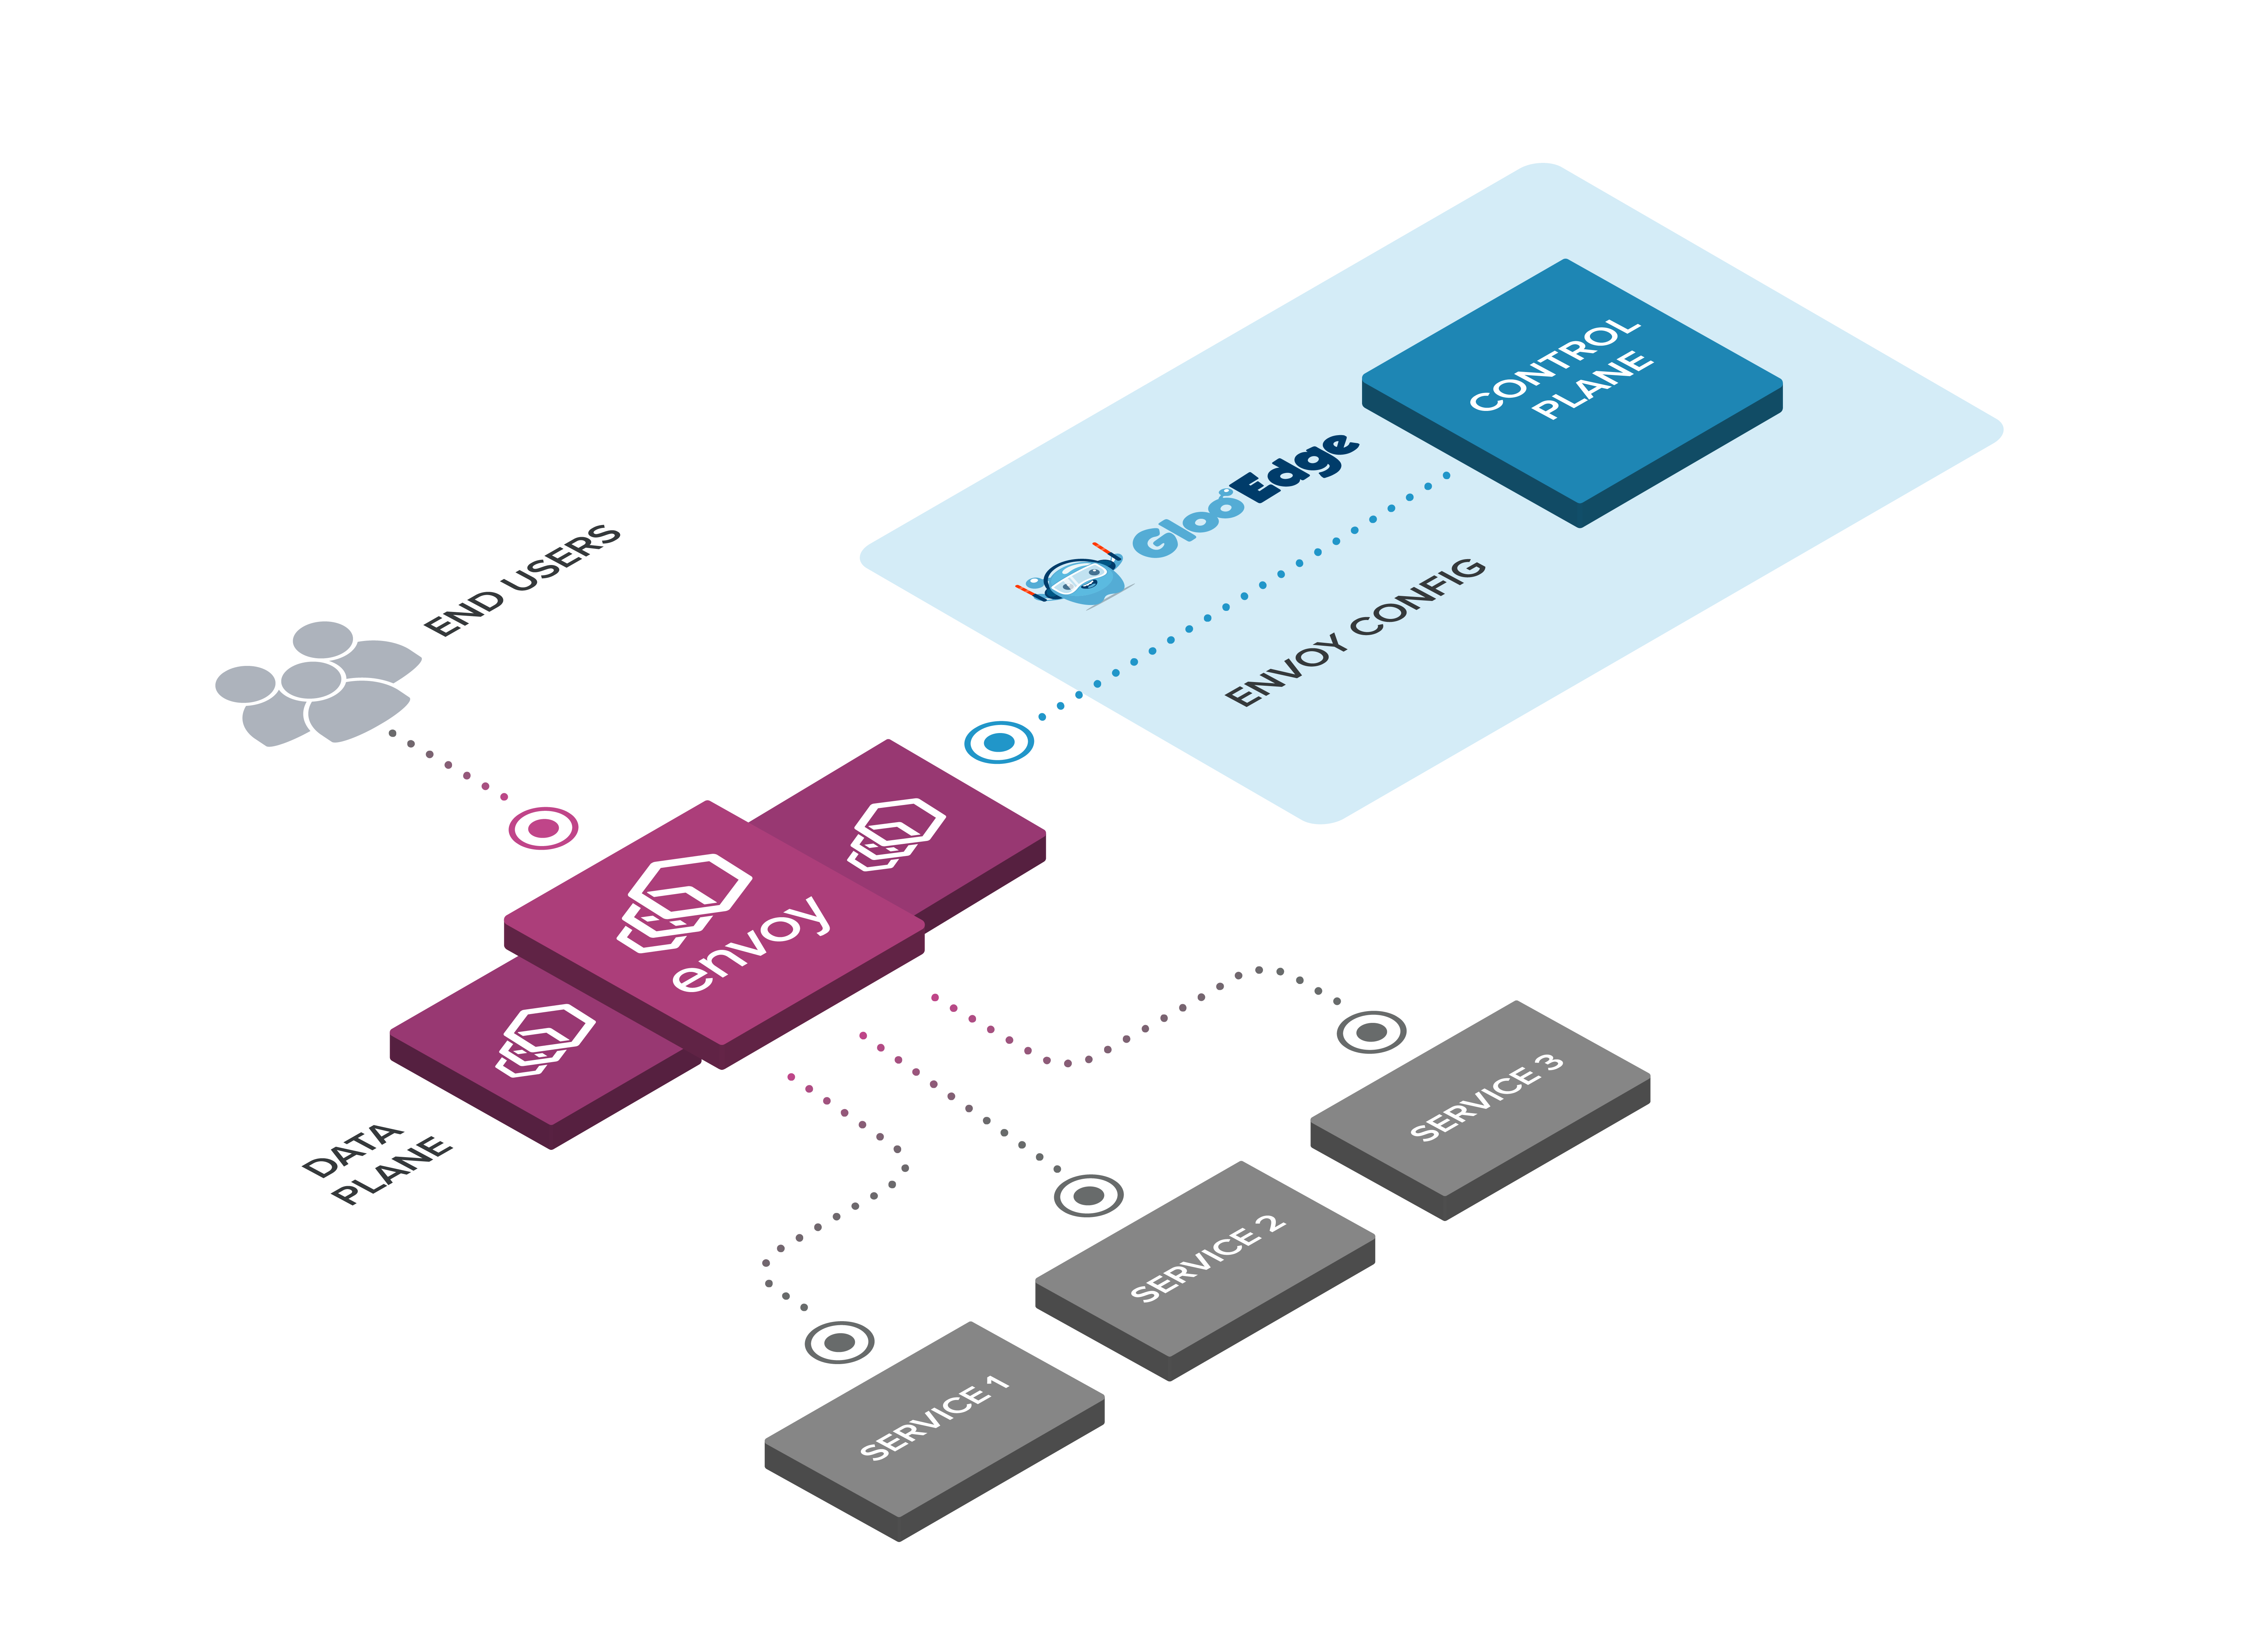
https://docs.solo.io/gloo-edge/main/img/gloo-architecture-envoys.png
- https://www.solo.io/blog/gateway-api-tutorial-blog/*
- https://www.solo.io/blog/gateway-api-workshop/
- https://www.solo.io/blog/fast-and-furious-gateway-api-at-scale-with-envoy-proxy-and-gloo-gateway/
- https://www.solo.io/blog/getting-the-most-out-of-gateway-api-lessons-learned-from-gloo-migrations/
- https://www.solo.io/blog/solving-an-information-leakage-problem-with-the-envoy-extproc-filter-and-kube-gateway-api/
- https://www.solo.io/blog/gateway-api-gitops-argo-tutorial-blog/*
Gloo Gateway Architecture : These components work together to translate Gloo and Kubernetes Gateway API custom resources into Envoy configuration
](/images/KANS/week6/part2/image2.png)
https://docs.solo.io/gateway/latest/about/architecture/
gloopod의 config 및 secret watcher 구성 요소는 클러스터에서 새로운 Kubernetes Gateway API 및 Gloo Gateway 리소스(예: Gateways, HTTPRoutes, 또는 RouteOptions)를 감시합니다.- config 또는 secret watcher가 새로운 리소스나 업데이트된 리소스를 감지하면, 해당 리소스 구성 정보를 Gloo Gateway 번역 엔진으로 전송합니다.
- 번역 엔진은 Kubernetes Gateway API 및 Gloo Gateway 리소스를 Envoy 구성으로 변환합니다. 모든 Envoy 구성은 xDS 스냅샷으로 통합됩니다.
- 리포터는 번역 엔진에 의해 처리된 모든 리소스에 대한 상태 보고서를 수신합니다.
- 리포터는 리소스 상태를 etcd 데이터 저장소에 다시 기록합니다.
- xDS 스냅샷은
gloopod의 Gloo Gateway xDS 서버 구성 요소에 제공됩니다. - 클러스터 내의 Gateway 프록시는 Gloo Gateway xDS 서버에서 최신 Envoy 구성을 가져옵니다.
- 사용자는 Gateway 프록시가 노출된 IP 주소 또는 호스트 이름으로 요청을 보냅니다.
- Gateway 프록시는 xDS 스냅샷에서 제공된 listener 및 경로별 구성을 사용하여 라우팅 결정을 내리고, 클러스터 내의 목적지로 요청을 전달합니다.
Translation engine
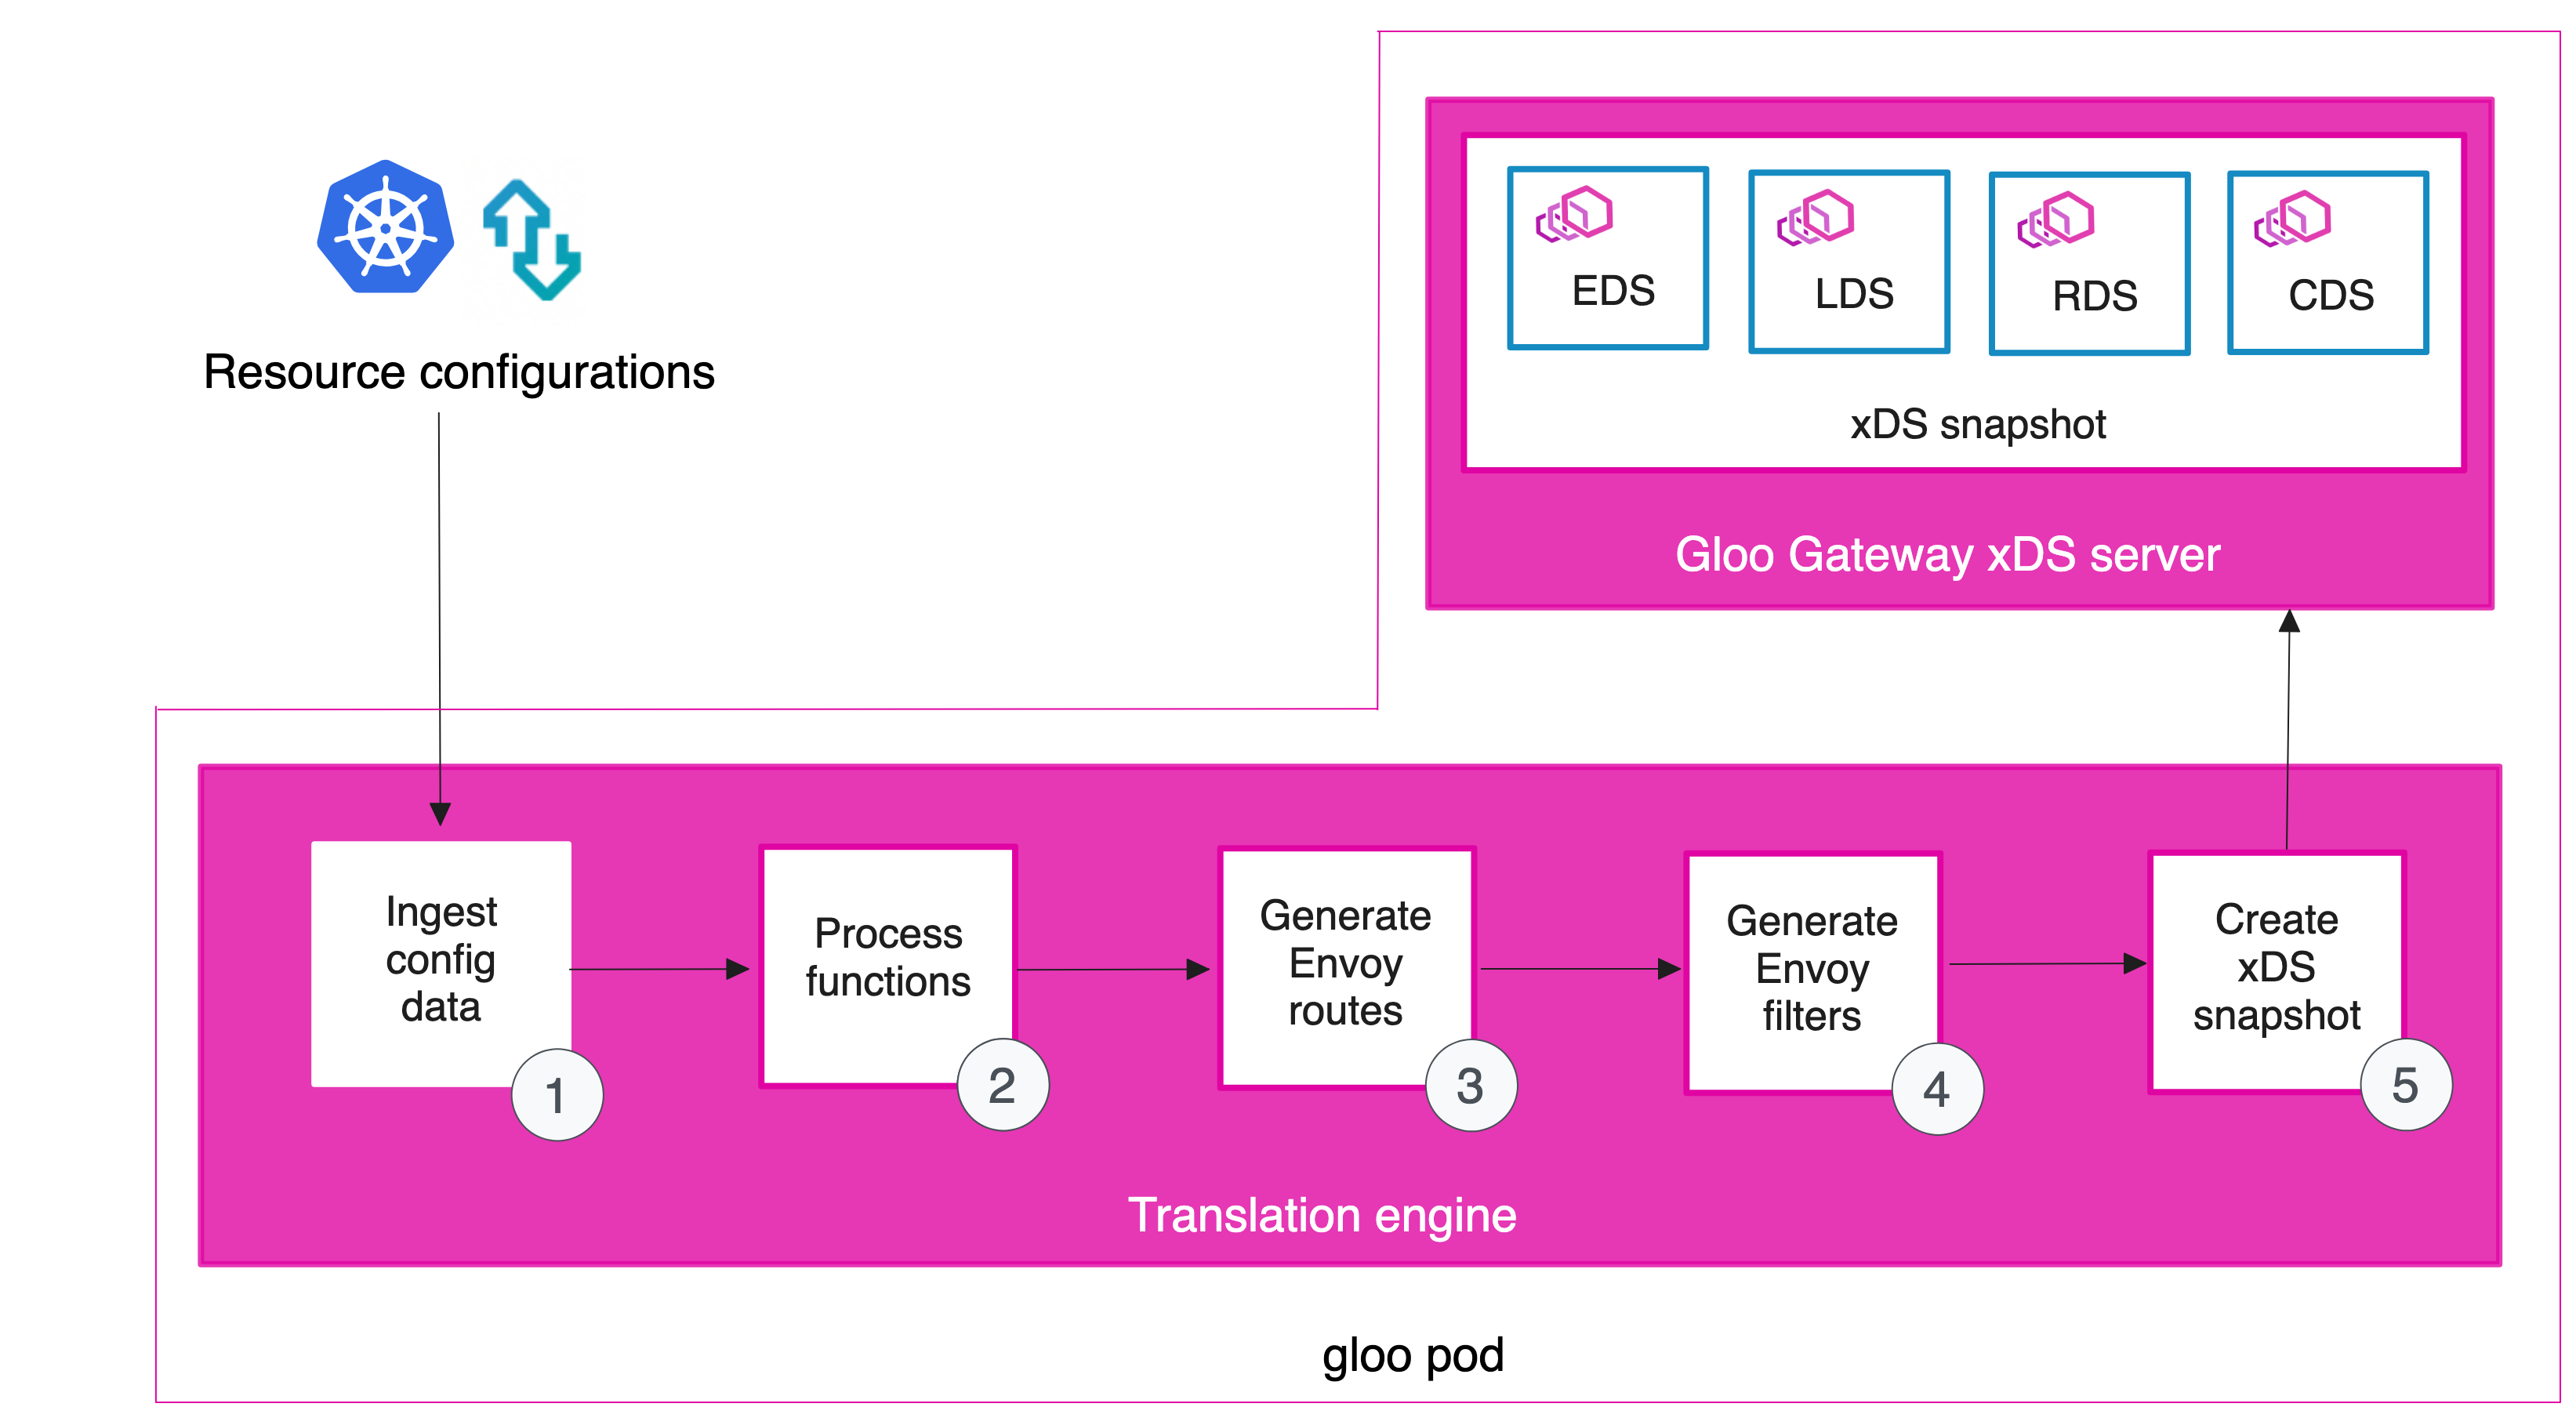
- 번역 사이클은 모든 구성된 Upstream 및 Kubernetes 서비스 리소스로부터 Envoy 클러스터를 정의하는 것에서 시작됩니다. 여기서 클러스터는 유사한 호스트들의 그룹을 의미합니다. 각 Upstream에는 Upstream이 처리되는 방식을 결정하는 유형이 있습니다. 올바르게 구성된 Upstream과 Kubernetes 서비스는 해당 유형에 맞는 Envoy 클러스터로 변환되며, 클러스터 메타데이터와 같은 정보가 포함됩니다.
- 번역 사이클의 다음 단계는 각 Upstream에 대한 모든 기능을 처리하는 것입니다. 기능별 클러스터 메타데이터가 추가되고 나중에 기능별 Envoy 필터에 의해 처리됩니다.
- 그 다음 단계에서는 모든 Envoy 경로가 생성됩니다. 경로는 HTTPRoute 및 RouteOption 리소스에 정의된 각 경로 규칙에 대해 생성됩니다. 모든 경로가 생성되면, 번역기는 VirtualHostOption, ListenerOption 및 HttpListenerOption 리소스를 처리하고 이를 Envoy 가상 호스트에 집계하여 새로운 Envoy HTTP 연결 관리자 구성에 추가합니다.
- 필터 플러그인은 필터 구성을 쿼리하여 Envoy 리스너에 추가될 HTTP 및 TCP 필터 목록을 생성합니다.
- 마지막으로, 모든 유효한 엔드포인트(EDS), 클러스터(CDS), 경로 구성(RDS) 및 리스너(LDS)를 포함한 xDS 스냅샷이 작성됩니다. 이 스냅샷은 Gloo Gateway xDS 서버로 전송됩니다. 클러스터 내의 Gateway 프록시는 xDS 서버를 모니터링하여 새 구성을 감지하며, 새 구성이 감지되면 그 구성을 Gateway 프록시에 가져옵니다.
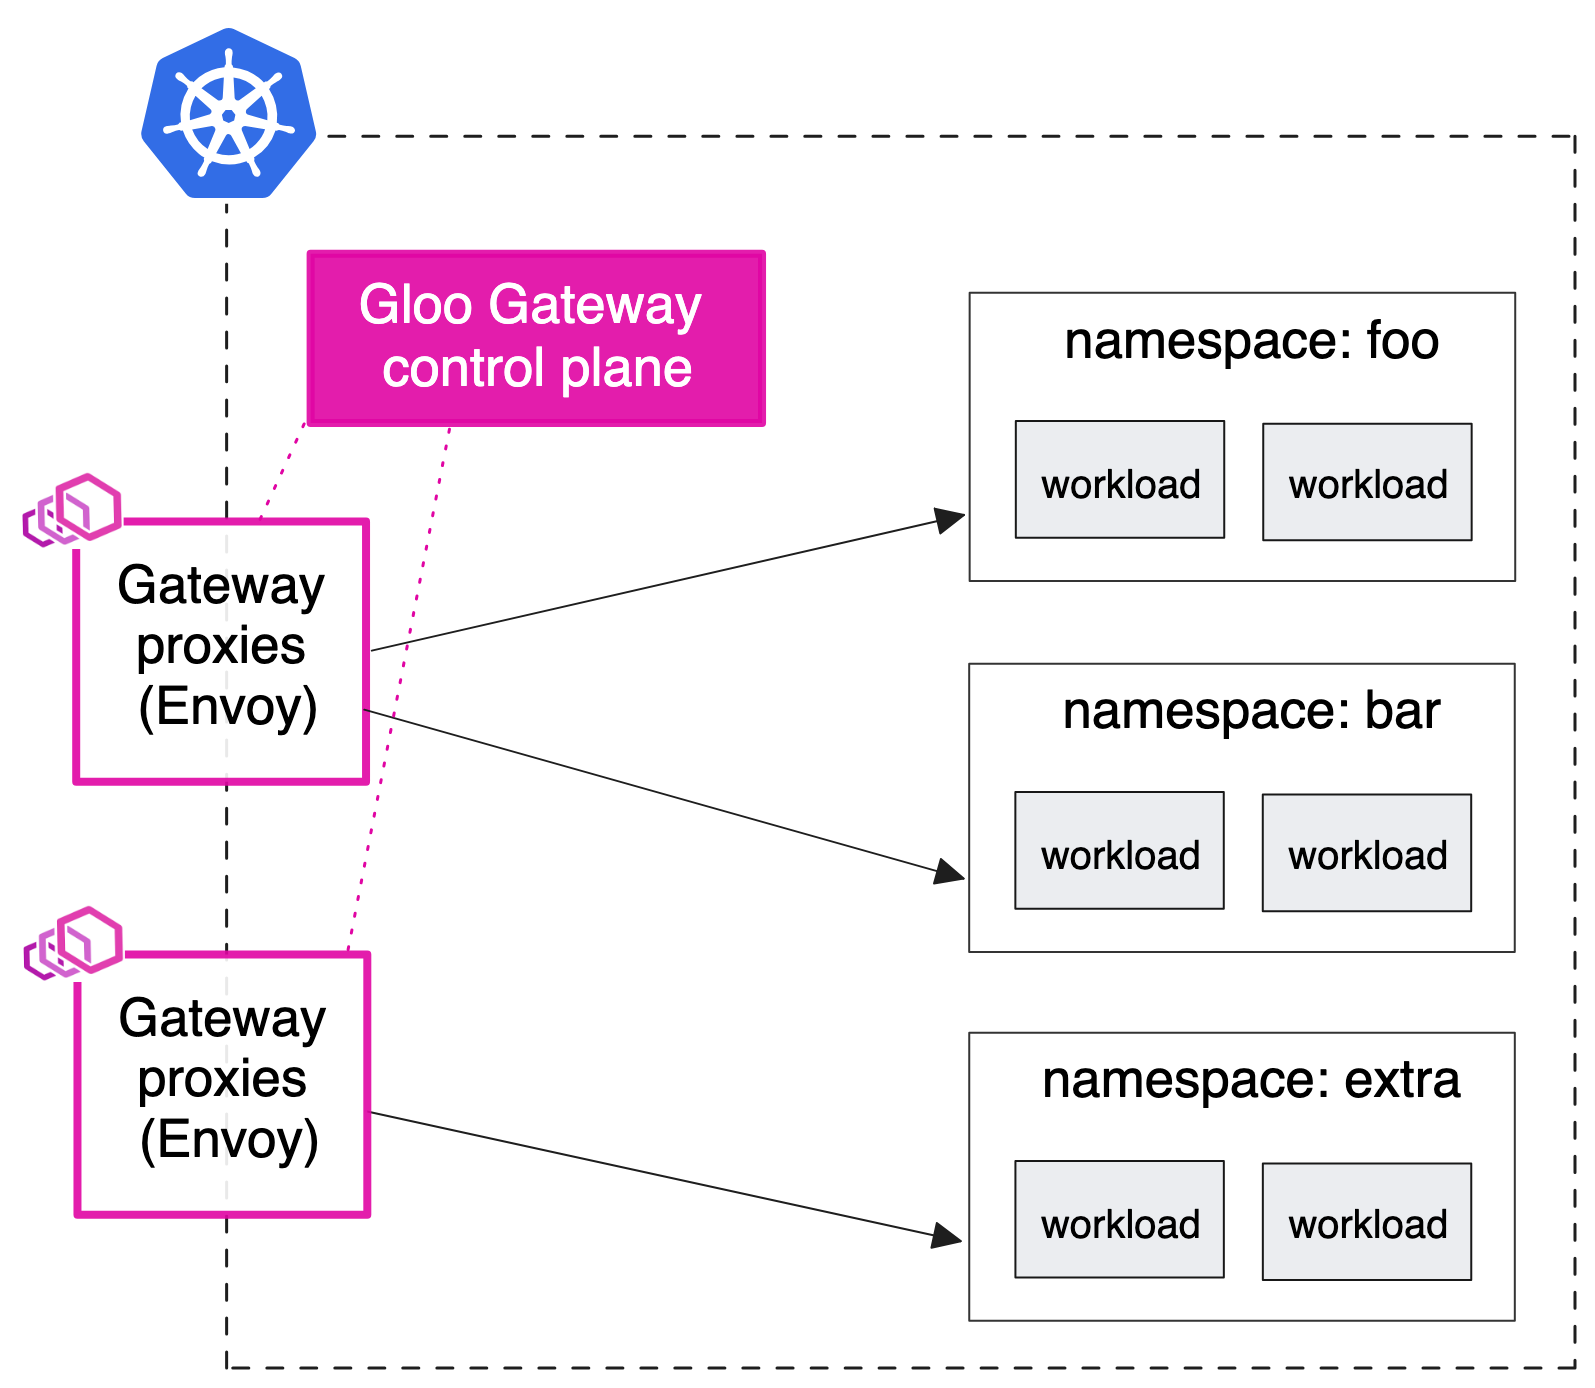
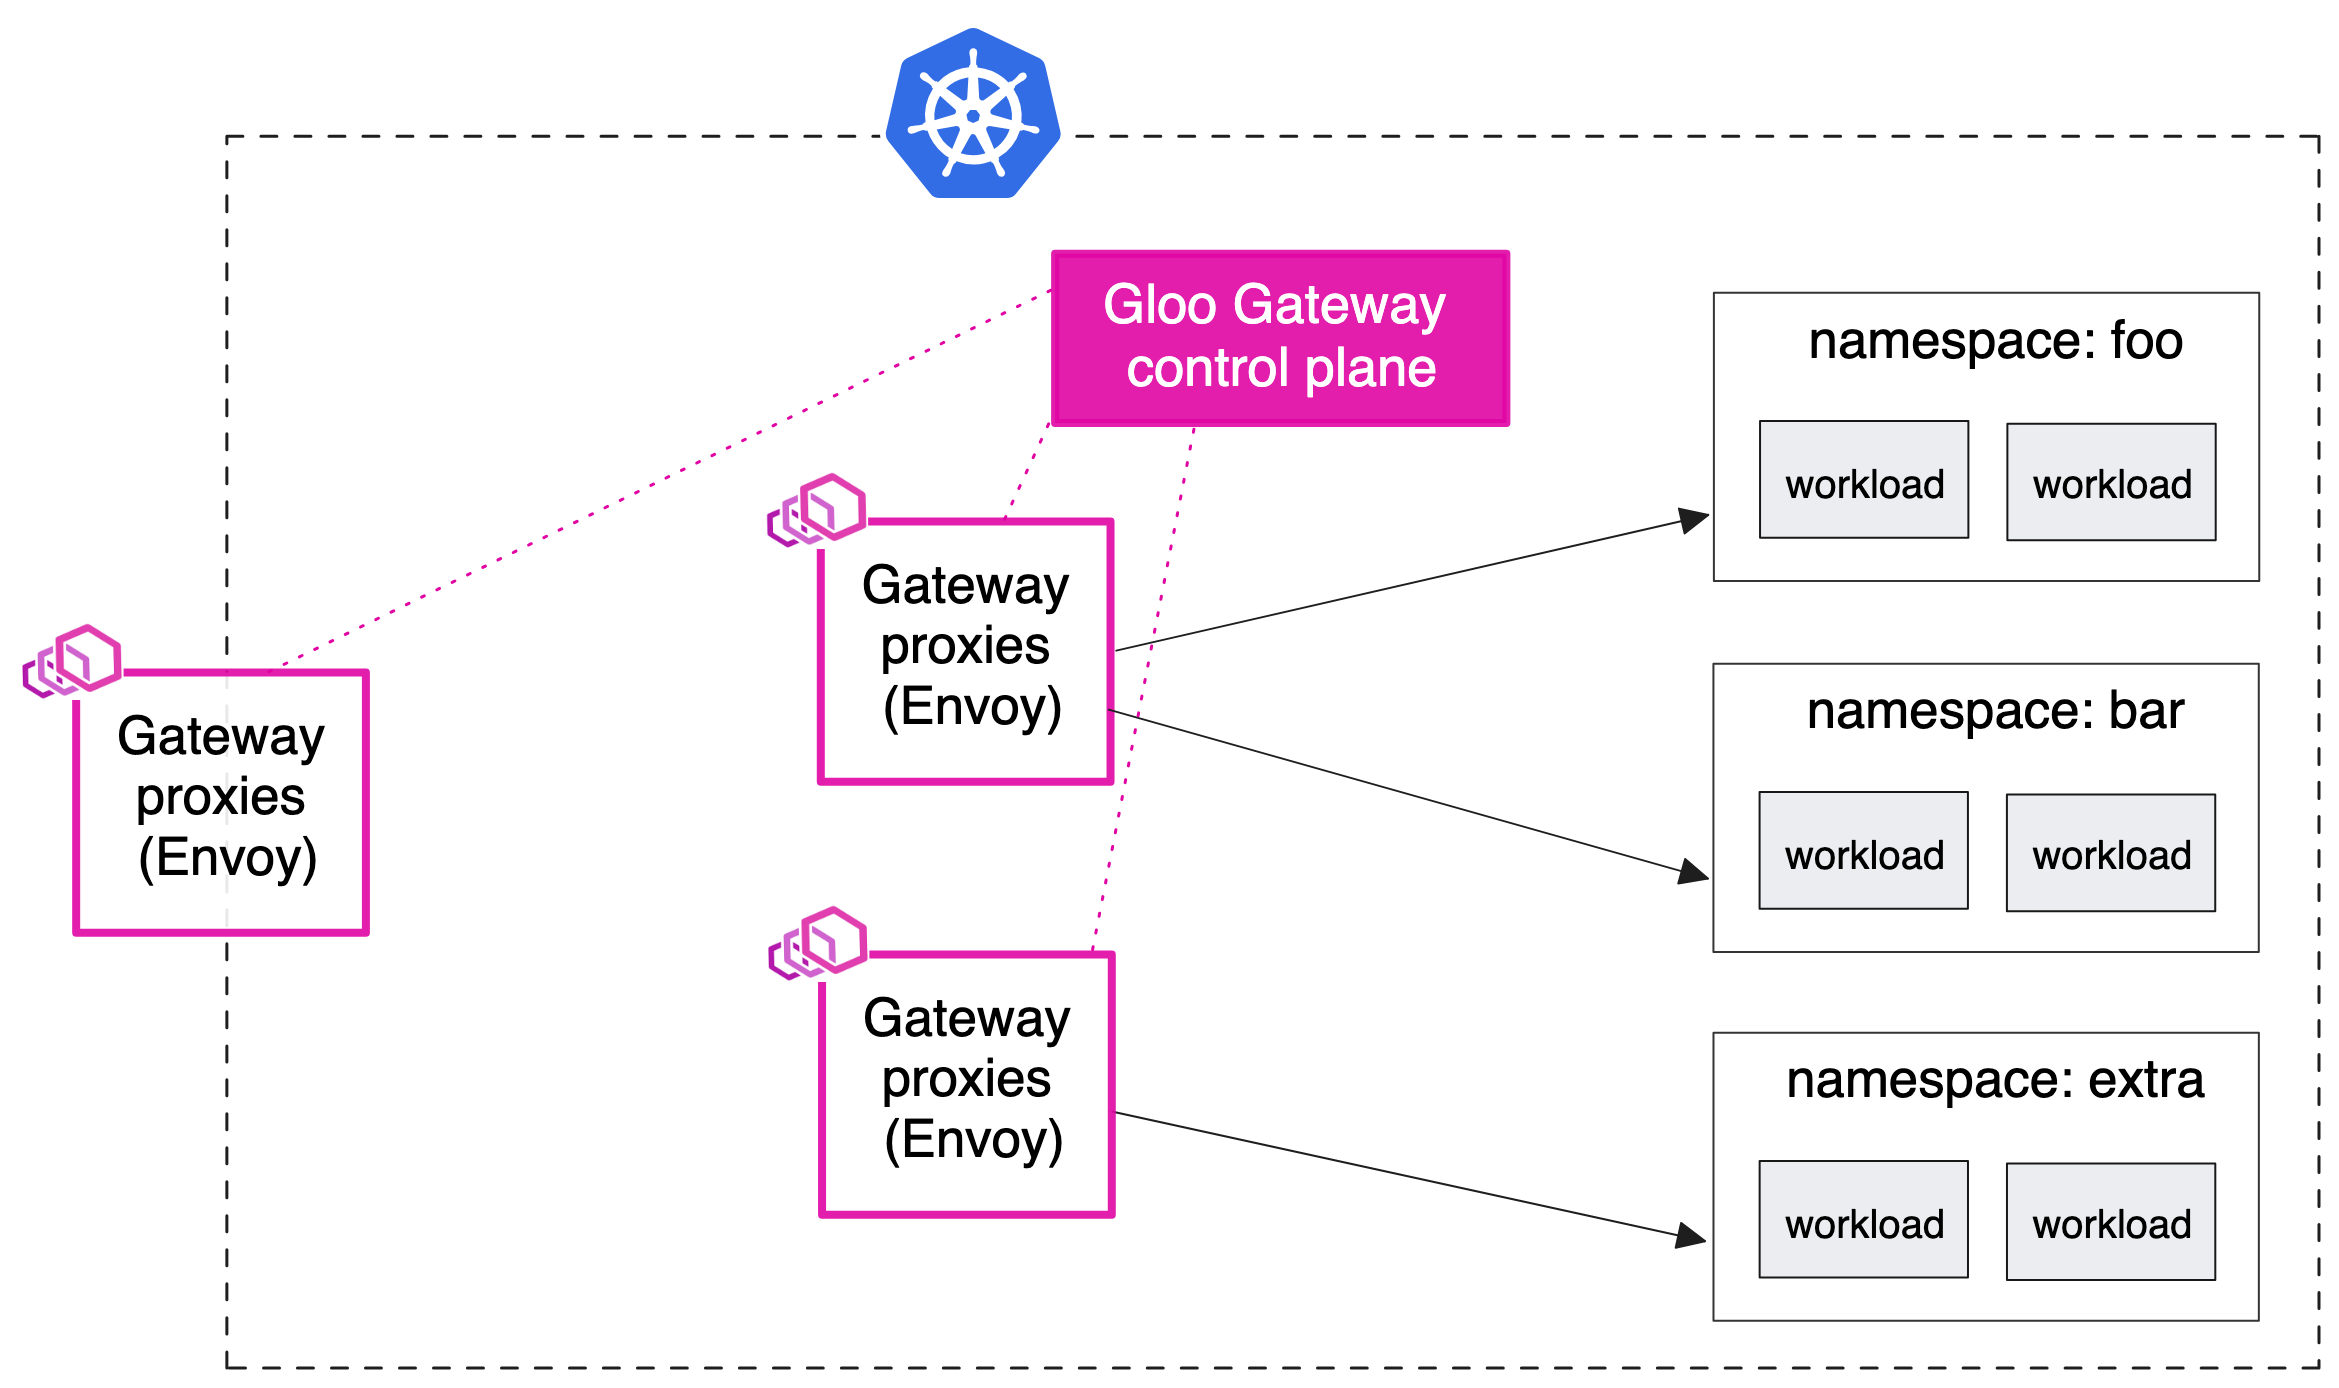
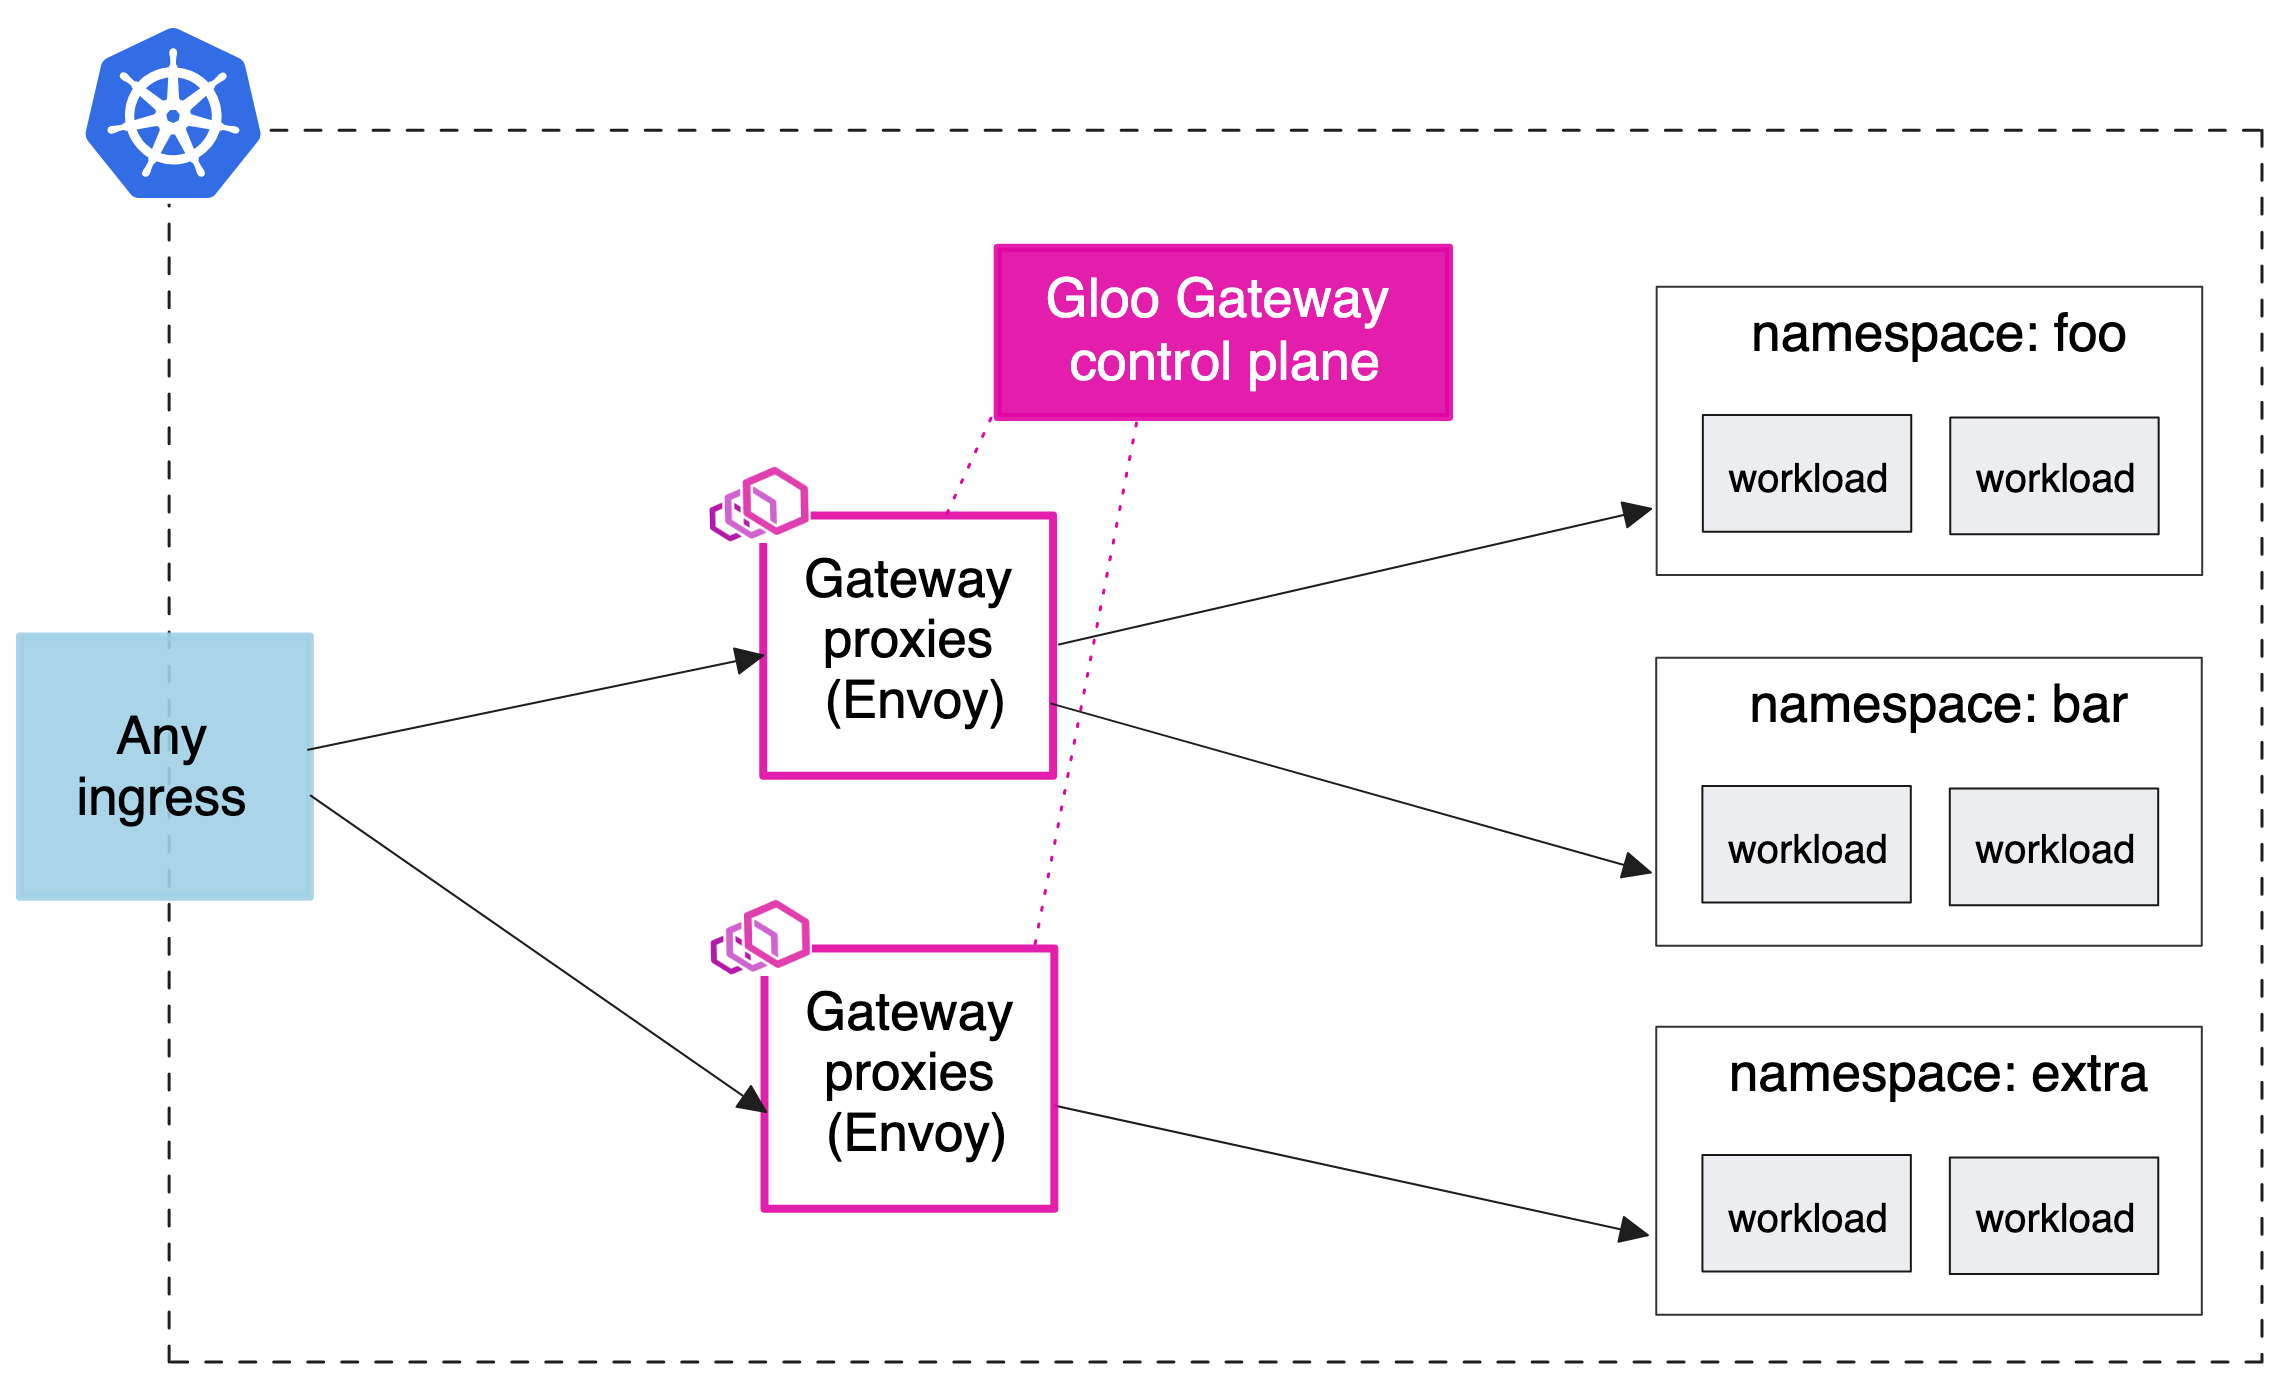
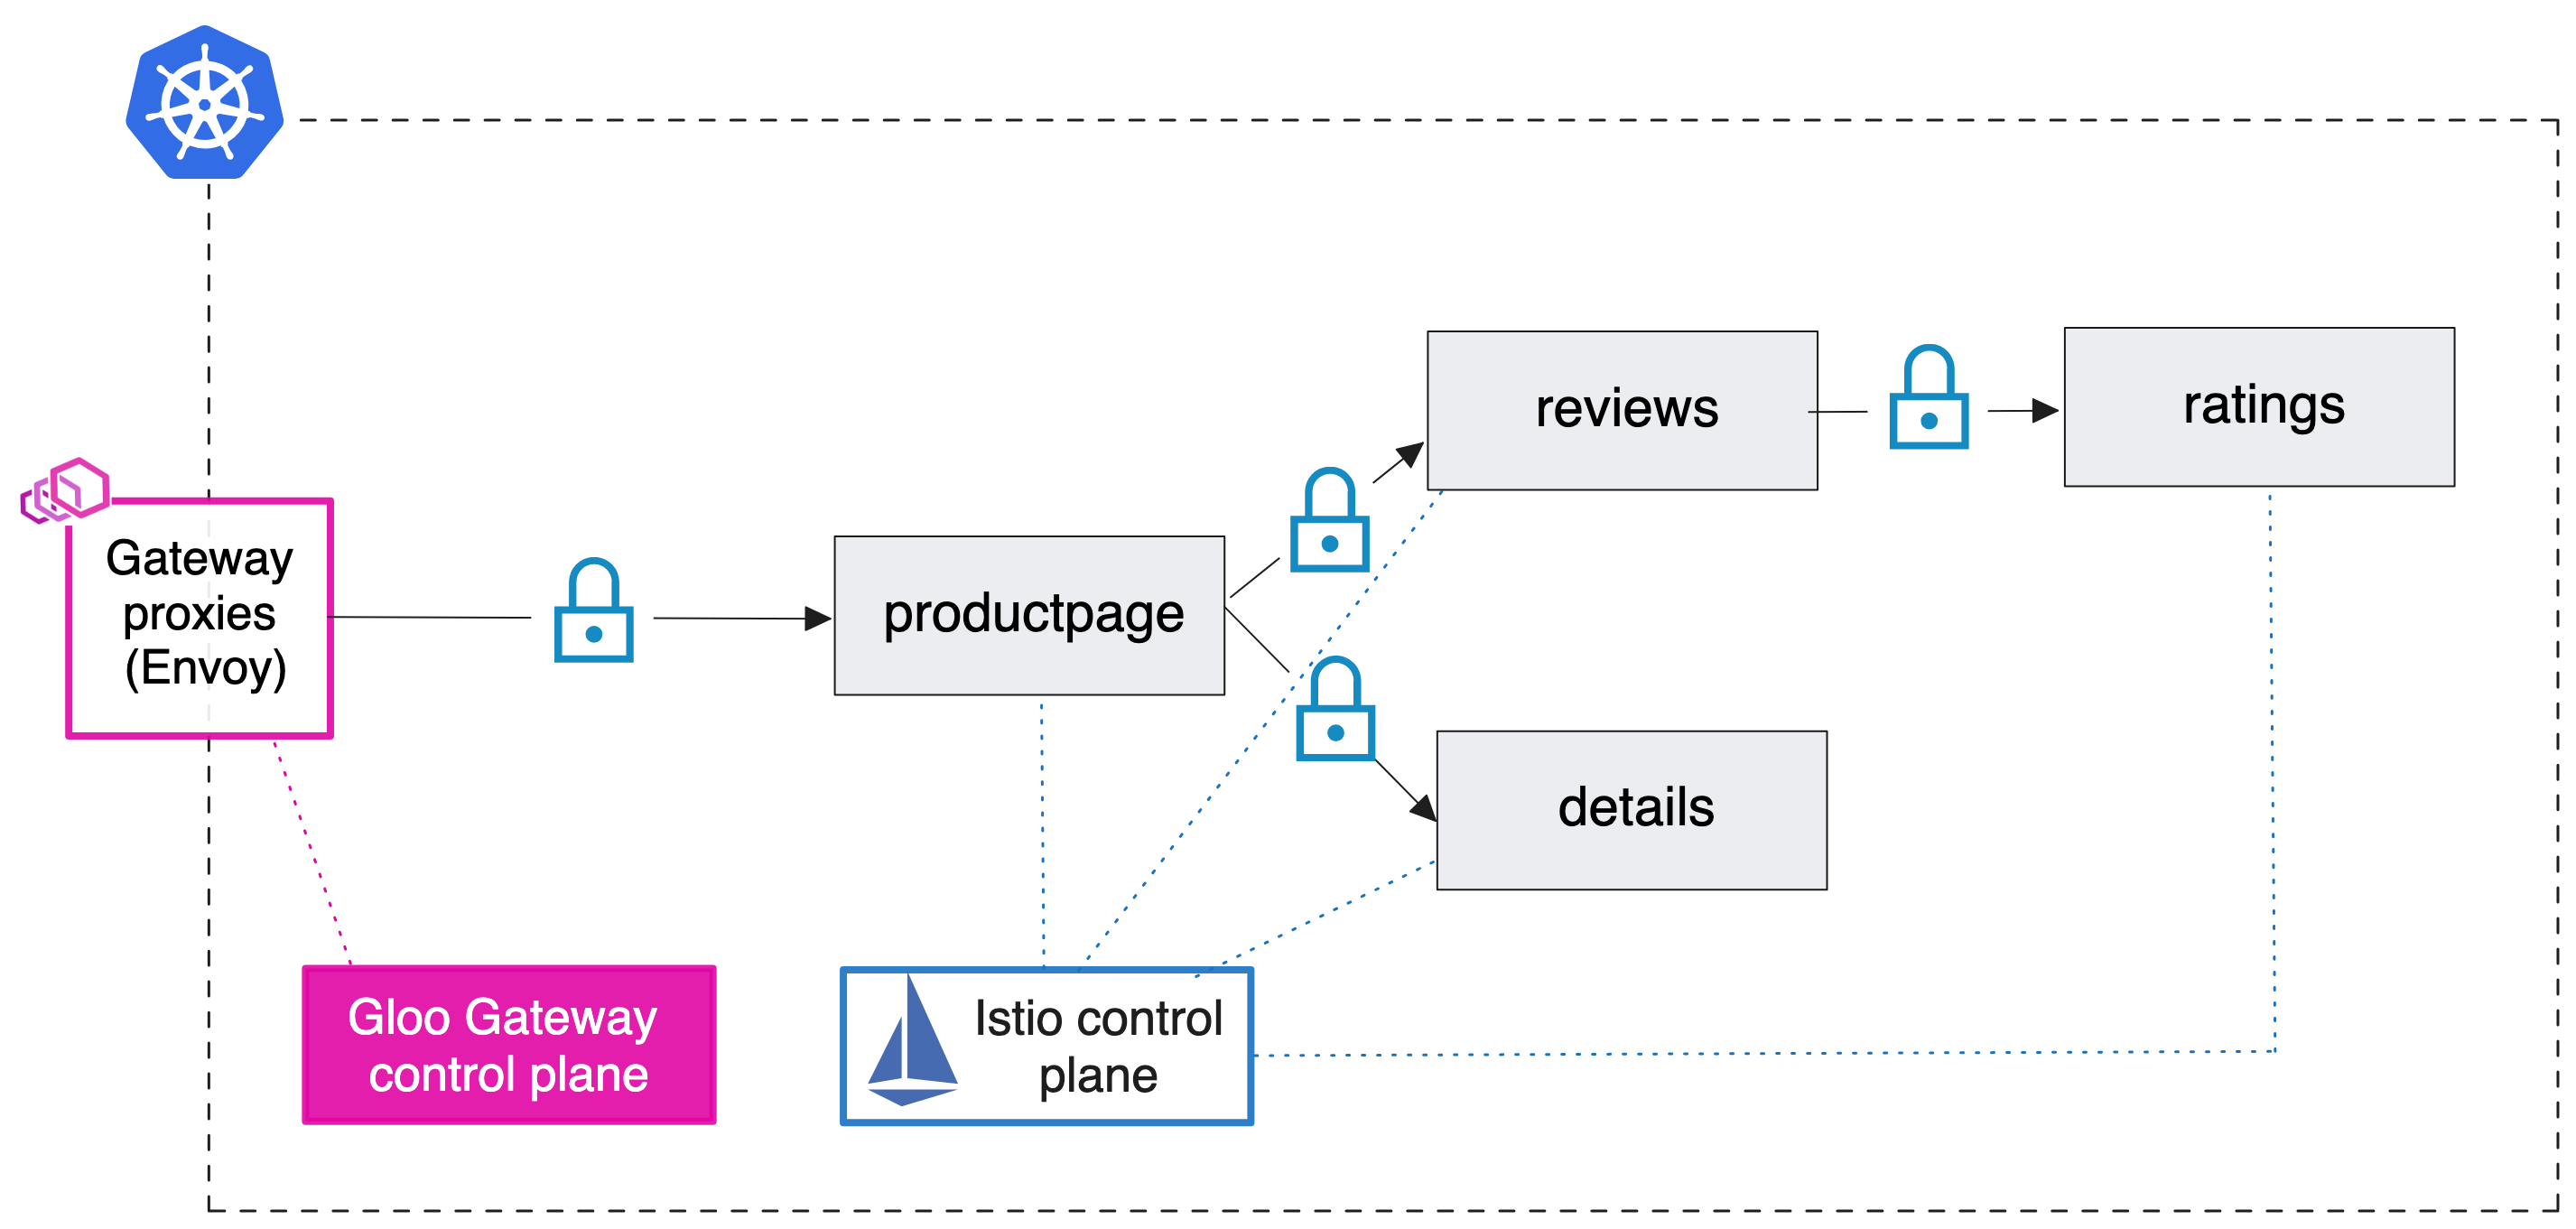
Deployment patterns - Docs
-
Simple ingress
-
Shared gateway
-
Sharded gateway with central ingress
- 기존 설정에 따라 중앙 인그레스 엔드포인트로 다른 유형의 프록시를 사용하고 싶을 수 있습니다.
- 예를 들어 모든 트래픽이 통과해야 하는 HAProxy 또는 AWS NLB/ALB 인스턴스가 있을 수 있습니다
-
API gateway for a service mesh
[Tutorial] Hands-On with the Kubernetes Gateway API and Envoy Proxy
양이 상당히 매우 많습니다 😅 - Blog Github
Kubernetes-hosted application accessible via a gateway configured with policies for routing, service discovery, timeouts, debugging, access logging, and observability
Install
Install KinD Cluster
#
cat <<EOT> kind-1node.yaml
kind: Cluster
apiVersion: kind.x-k8s.io/v1alpha4
nodes:
- role: control-plane
  extraPortMappings:
  - containerPort: 30000
    hostPort: 30000
  - containerPort: 30001
    hostPort: 30001
  - containerPort: 30002
    hostPort: 30002
EOT

# Install KinD Cluster
kind create cluster --image kindest/node:v1.30.0 --config kind-1node.yaml --name myk8s

# 노드에 기본 툴 설치
docker exec -it myk8s-control-plane sh -c 'apt update && apt install tree psmisc lsof wget bsdmainutils bridge-utils net-tools dnsutils tcpdump ngrep iputils-ping git vim -y'

# 노드/파드 확인
kubectl get nodes -o wide
kubectl get pod -A
Install Gateway API CRDs : The Kubernetes Gateway API abstractions are expressed using Kubernetes CRDs.
# CRDs 설치 및 확인
kubectl apply -f https://github.com/kubernetes-sigs/gateway-api/releases/download/v1.0.0/standard-install.yaml
kubectl get crd
Install Glooctl Utility : GLOOCTL is a command-line utility that allows users to view, manage, and debug Gloo Gateway deployments - Link
# [신규 터미널] 아래 bash 진입 후 glooctl 툴 사용
docker exec -it myk8s-control-plane bash
----------------------------------------
# Install Glooctl Utility
## glooctl install gateway     # install gloo's function gateway functionality into the 'gloo-system' namespace
## glooctl install ingress     # install very basic Kubernetes Ingress support with Gloo into namespace gloo-system
## glooctl install knative     # install Knative serving with Gloo configured as the default cluster ingress
## curl -sL https://run.solo.io/gloo/install | sh
curl -sL https://run.solo.io/gloo/install | GLOO_VERSION=v1.17.7 sh
export PATH=$HOME/.gloo/bin:$PATH

# 버전 확인
glooctl version

----------------------------------------
Install Gloo Gateway : 오픈소스 버전
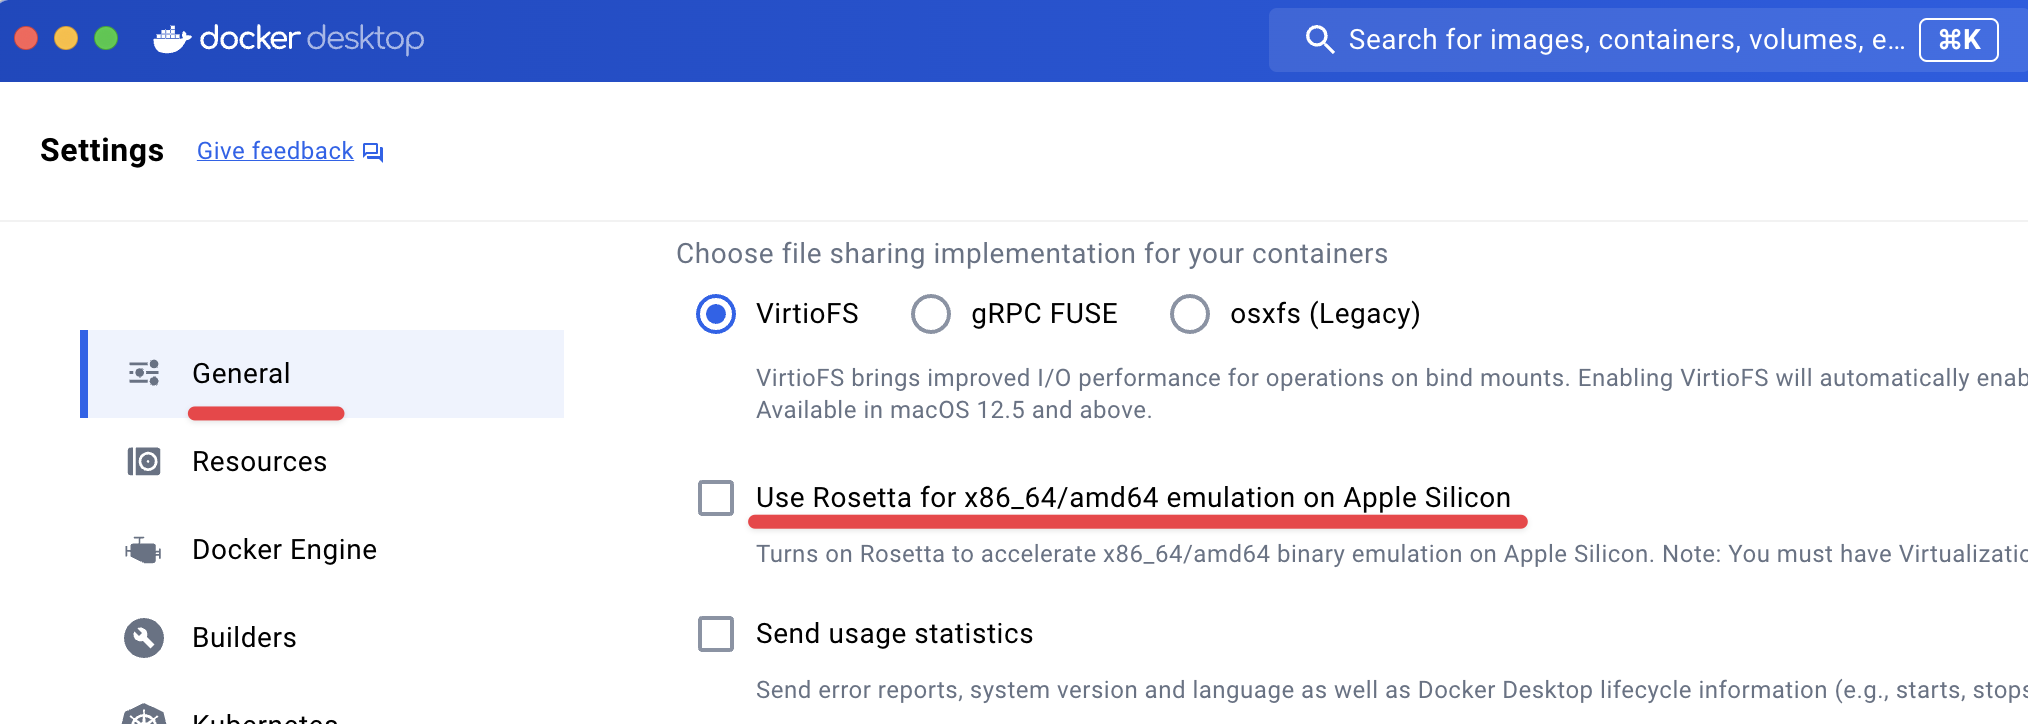
rosetta 비활성화 방법
- [macOS m시리즈] Docker Desktop : 아래 옵션 Uncheck 해둘 것 → Apply & restart
# Install Gloo Gateway
helm repo add gloo https://storage.googleapis.com/solo-public-helm
helm repo update
helm install -n gloo-system gloo-gateway gloo/gloo \
--create-namespace \
--version 1.17.7 \
--set kubeGateway.enabled=true \
--set gloo.disableLeaderElection=true \
--set discovery.enabled=false
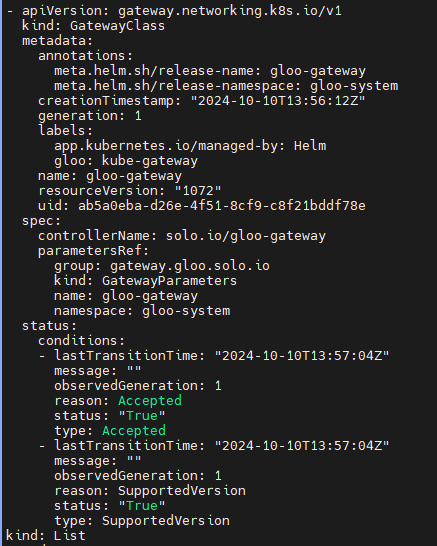
kubectl get gatewayclasses
NAME CONTROLLER ACCEPTED AGE
gloo-gateway solo.io/gloo-gateway True 21m
kubectl get gatewayclasses -o yaml
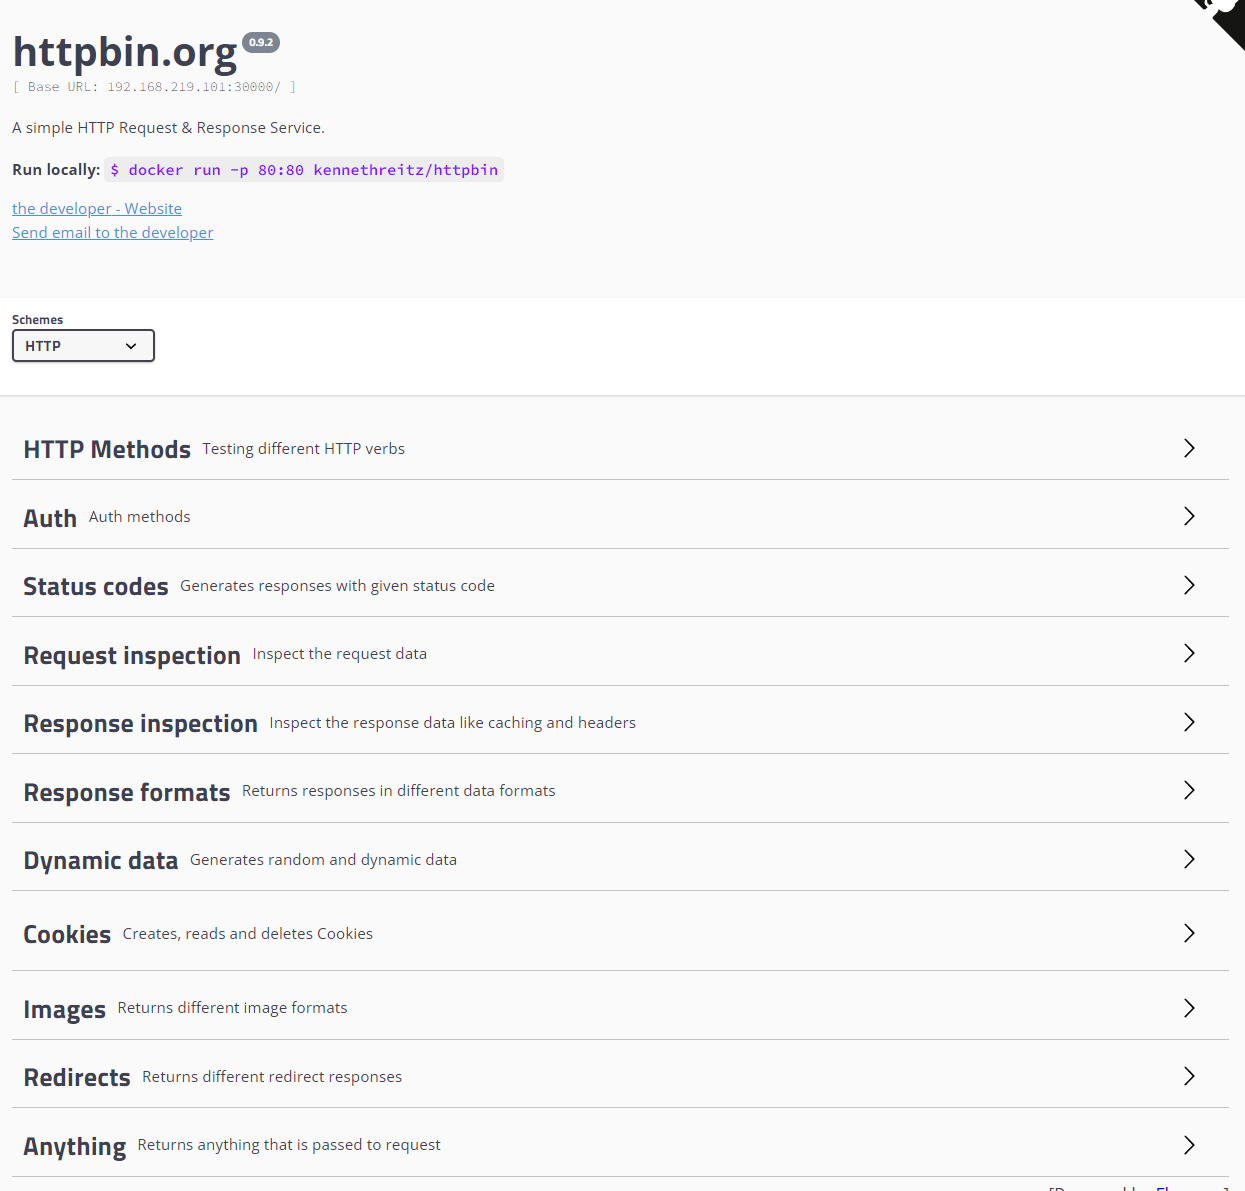
Install Httpbin Application : A simple HTTP Request & Response Service - Link
# Install Httpbin Application
kubectl apply -f https://raw.githubusercontent.com/solo-io/solo-blog/main/gateway-api-tutorial/01-httpbin-svc.yaml

# 설치 확인
kubectl get deploy,pod,svc,endpointslices,sa -n httpbin
kubectl rollout status deploy/httpbin -n httpbin

# (옵션) NodePort 설정
cat <<EOF | kubectl apply -f -
apiVersion: v1
kind: Service
metadata:
  labels:
    app: httpbin
    service: httpbin
  name: httpbin
  namespace: httpbin
spec:
  type: NodePort
  ports:
  - name: http
    port: 8000
    targetPort: 80
    nodePort: 30000
  selector:
    app: httpbin
EOF

# (옵션) 로컬 접속 확인
echo "httpbin web - http://localhost:30000"     # macOS 사용자
Gateway API kinds - Docs
- GatewayClass: Defines a set of gateways with common configuration and managed by a controller that implements the class.
- Gateway: Defines an instance of traffic handling infrastructure, such as cloud load balancer.
- HTTPRoute: Defines HTTP-specific rules for mapping traffic from a Gateway listener to a representation of backend network endpoints. These endpoints are often represented as a Service.
https://kubernetes.io/docs/concepts/services-networking/gateway/
Control : Envoy data plane and the Gloo control plane.
- Now we’ll configure a Gateway listener, establish external access to Gloo Gateway, and test the routing rules that are the core of the proxy configuration.
Configure a Gateway Listener
- Let’s begin by establishing a Gateway resource that sets up an HTTP listener on port 8080 to expose routes from all our namespaces. Gateway custom resources like this are part of the Gateway API standard.
# 02-gateway.yaml
*kind: Gateway
apiVersion: gateway.networking.k8s.io/v1
metadata:
name: http
spec:
gatewayClassName: gloo-gateway
listeners:
- protocol: HTTP
port: 8080
name: http
allowedRoutes:
namespaces:
from: All*
# gateway 리소스 생성
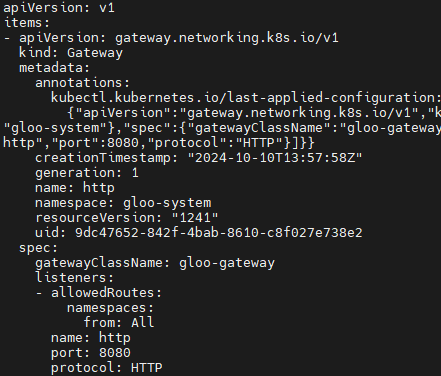
kubectl apply -f https://raw.githubusercontent.com/solo-io/gloo-gateway-use-cases/main/gateway-api-tutorial/02-gateway.yaml
# 확인 : Now we can confirm that the Gateway has been activated
kubectl get gateway -n gloo-system
# You can also confirm that Gloo Gateway has spun up an Envoy proxy instance in response to the creation of this Gateway object by deploying gloo-proxy-http:
kubectl get deployment gloo-proxy-http -n gloo-system
NAME              READY   UP-TO-DATE   AVAILABLE   AGE
gloo-proxy-http   1/1     1            1           5m22s

# envoy 사용 확인
kubectl get pod -n gloo-system

# gloo-proxy-http 서비스는 External-IP는 Pending 상태
kubectl get svc -n gloo-system gloo-proxy-http
NAME              TYPE           CLUSTER-IP    EXTERNAL-IP   PORT(S)          AGE
gloo-proxy-http   LoadBalancer   10.96.71.22   <pending>     8080:31555/TCP   2m4s

# gloo-proxy-http NodePort 30001 설정
~~~~cat <<EOF | kubectl apply -f -
apiVersion: v1
kind: Service
metadata:
  labels:
    app.kubernetes.io/instance: http
    app.kubernetes.io/managed-by: Helm
    app.kubernetes.io/name: gloo-proxy-http
    app.kubernetes.io/version: 1.17.7
    gateway.networking.k8s.io/gateway-name: http
    gloo: kube-gateway
    helm.sh/chart: gloo-gateway-1.17.7
  name: gloo-proxy-http
  namespace: gloo-system
spec:
  ports:
  - name: http
    nodePort: 30001
    port: 8080
  selector:
    app.kubernetes.io/instance: http
    app.kubernetes.io/name: gloo-proxy-http
    gateway.networking.k8s.io/gateway-name: http
  type: LoadBalancer
EOF

kubectl get svc -n gloo-system gloo-proxy-http
Establish External Access to Proxy
# Port Forward
# We will use a simple port-forward to expose the proxy’s HTTP port for us to use.
# (Note that gloo-proxy-http is Gloo’s deployment of the Envoy data plane.)
kubectl port-forward deployment/gloo-proxy-http -n gloo-system 8080:8080 &
Configure Simple Routing with an HTTPRoute
](/images/KANS/week6/part2/Untitled4.png)
https://gateway-api.sigs.k8s.io/api-types/httproute/
Let’s begin our routing configuration with the simplest possible route to expose the /get operation on httpbin
HTTPRoute is one of the new Kubernetes CRDs introduced by the Gateway API, as documented here. We’ll start by introducing a simple HTTPRoute for our service.
HTTPRoute Spec
- [ParentRefs](https://gateway-api.sigs.k8s.io/reference/spec/#gateway.networking.k8s.io/v1.ParentRef)-Define which Gateways this Route wants to be attached to.
- Hostnames (optional)- Define a list of hostnames to use for matching the Host header of HTTP requests.
- [Rules](https://gateway-api.sigs.k8s.io/reference/spec/#gateway.networking.k8s.io/v1.HTTPRouteRule)-Define a list of rules to perform actions against matching HTTP requests.
- Each rule consists of matches, filters (optional), backendRefs (optional) and timeouts (optional) fields.
apiVersion: gateway.networking.k8s.io/v1beta1
kind: HTTPRoute
metadata:
  name: httpbin
  namespace: httpbin
  labels:
    example: httpbin-route
spec:
  parentRefs:
    - name: http
      namespace: gloo-system
  hostnames:
    - "api.montkim.org"
  rules:
  - matches:
    - path:
        type: Exact
        value: /get
    backendRefs:
      - name: httpbin
        port: 8000
This example attaches to the default Gateway object created for us when we installed Gloo Gateway earlier.
See the gloo-system/http reference in the parentRefs stanza.
The Gateway object simply represents a host:port listener that the proxy will expose to accept ingress traffic.
# Our route watches for HTTP requests directed at the host api.example.com with the request path /get and then forwards the request to the httpbin service on port 8000.
# Let’s establish this route now:
kubectl apply -f https://raw.githubusercontent.com/solo-io/gloo-gateway-use-cases/main/gateway-api-tutorial/03-httpbin-route.yaml

#
kubectl get httproute -n httpbin
NAME      HOSTNAMES             AGE
httpbin   ["api.example.com"]   3m15s

kubectl describe httproute -n httpbin
...
Spec:
  Hostnames:
    api.example.com
  Parent Refs:
    Group:      gateway.networking.k8s.io
    Kind:       Gateway
    Name:       http
    Namespace:  gloo-system
  Rules:
    Backend Refs:
      Group:
      Kind:    Service
      Name:    httpbin
      Port:    8000
      Weight:  1
    Matches:
      Path:
        Type:   Exact
        Value:  /get
...
Test the Simple Route with Curl
# let’s use curl to display the response with the -i option to additionally show the HTTP response code and headers.
echo "127.0.0.1 api.example.com" | sudo tee -a /etc/hosts
echo "httproute - http://api.example.com:30001/get" # 웹브라우저
혹은
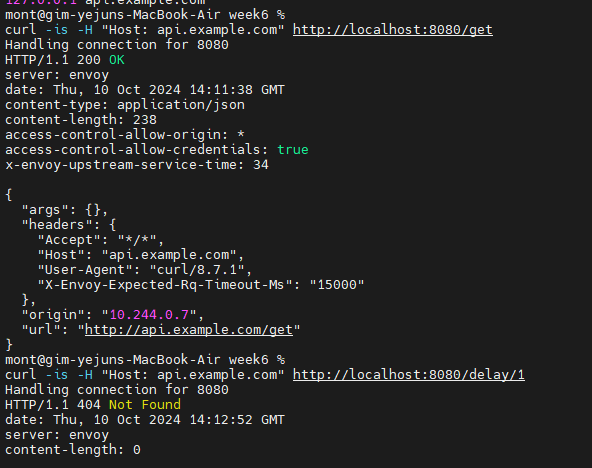
curl -is -H "Host: api.example.com" http://localhost:8080/get # kubectl port-forward 사용 시
Note that if we attempt to invoke another valid endpoint /delay on the httpbin service, it will fail with a 404 Not Found error. Why? Because our HTTPRoute policy is only exposing access to /get, one of the many endpoints available on the service. If we try to consume an alternative httpbin endpoint like /delay:
# 호출 응답 왜 그럴까?
curl -is -H "Host: api.example.com" http://localhost:8080/delay/1
#
echo "httproute - http://api.example.com:30001/delay/1" # 웹브라우저

# nodeport 직접 접속
echo "httproute - http://api.example.com:30000/delay/1" # 1초 후 응답
echo "httproute - http://api.example.com:30000/delay/5" # 5초 후 응답
[정규식 패턴 매칭] Explore Routing with Regex Matching Patterns
Let’s assume that now we DO want to expose other httpbin endpoints like /delay. Our initial HTTPRoute is inadequate, because it is looking for an exact path match with /get.
We’ll modify it in a couple of ways. First, we’ll modify the matcher to look for path prefix matches instead of an exact match. Second, we’ll add a new request filter to rewrite the matched /api/httpbin/ prefix with just a / prefix, which will give us the flexibility to access any endpoint available on the httpbin service. So a path like /api/httpbin/delay/1 will be sent to httpbin with the path /delay/1.
- 예시)
/api/httpbin/delay/1⇒/delay/1
# Here are the modifications we’ll apply to our HTTPRoute:

    - matches:
        # Switch from an Exact Matcher(정확한 매팅) to a PathPrefix (경로 매팅) Matcher
        - path:
            type: PathPrefix
            value: /api/httpbin/
      filters:
        # Replace(변경) the /api/httpbin matched prefix with /
        - type: URLRewrite
          urlRewrite:
            path:
              type: ReplacePrefixMatch
              replacePrefixMatch: /
- 2가지 수정 내용 적용 후 확인
#
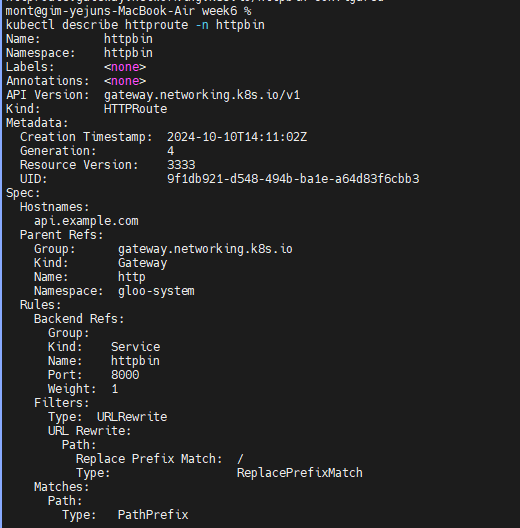
kubectl apply -f https://raw.githubusercontent.com/solo-io/gloo-gateway-use-cases/main/gateway-api-tutorial/04-httpbin-rewrite.yaml
# 확인
kubectl describe httproute -n httpbin
...
Spec:
Hostnames:
api.example.com
Parent Refs:
Group: gateway.networking.k8s.io
Kind: Gateway
Name: http
Namespace: gloo-system
Rules:
Backend Refs:
Group:
Kind: Service
Name: httpbin
Port: 8000
Weight: 1
Filters:
Type: URLRewrite
URL Rewrite:
Path:
Replace Prefix Match: /
Type: ReplacePrefixMatch
Matches:
Path:
Type: PathPrefix
Value: /api/httpbin/
Test Routing with Regex Matching Patterns
When we used only a single route with an exact match pattern, we could only exercise the httpbin /get endpoint. Let’s now use curl to confirm that both /get and /delay work as expected.
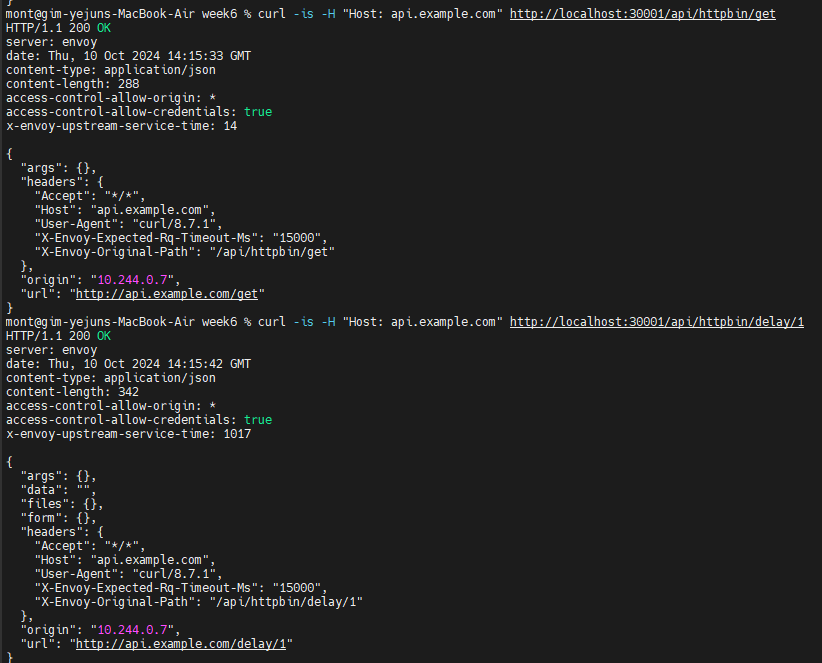
curl -is -H "Host: api.example.com" http://localhost:30001/api/httpbin/get # kubectl port-forward 사용 시

# 아래 NodePort 와 GW API 통한 접속 비교
curl -is -H "Host: api.example.com" http://localhost:30001/api/httpbin/delay/1 # kubectl port-forward 사용 시
curl -is -H "Host: api.example.com" http://localhost:30001/api/httpbin/delay/2
[업스트림 베어러 토큰을 사용한 변환] Test Transformations with Upstream Bearer Tokens
목적 : 요청을 라우팅하는 백엔드 시스템 중 하나에서 인증해야 하는 요구 사항이 있는 경우는 어떻게 할까요? 이 업스트림 시스템에는 권한 부여를 위한 API 키가 필요하고, 이를 소비하는 클라이언트에 직접 노출하고 싶지 않다고 가정해 보겠습니다. 즉, 프록시 계층에서 요청에 주입할 간단한 베어러 토큰을 구성하고 싶습니다. (정적 API 키 토큰을 직접 주입)
What if we have a requirement to authenticate with one of the backend systems to which we route our requests?
Let’s assume that this upstream system requires an API key for authorization, and that we don’t want to expose this directly to the consuming client. In other words, we’d like to configure a simple bearer token to be injected into the request at the proxy layer.
We can express this in the Gateway API by adding a filter that applies a simple transformation to the incoming request.
This will be applied along with the URLRewrite filter we created in the previous step.
# The new filters stanza in our HTTPRoute now looks like this:

      filters:
        - type: URLRewrite
          urlRewrite:
            path:
              type: ReplacePrefixMatch
              replacePrefixMatch: /

        # Add a Bearer token to supply a static API key when routing to backend system
        - type: RequestHeaderModifier
          requestHeaderModifier:
            add:
              - name: Authorization
                value: Bearer my-api-key
kubectl apply -f https://raw.githubusercontent.com/solo-io/gloo-gateway-use-cases/main/gateway-api-tutorial/05-httpbin-rewrite-xform.yaml

kubectl describe httproute -n httpbin
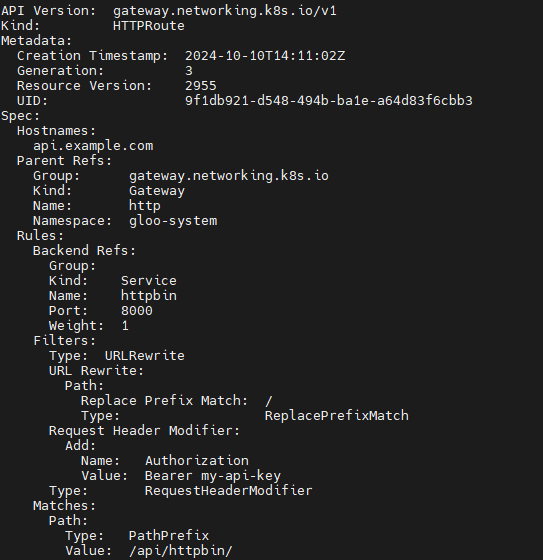
- 동작 테스트
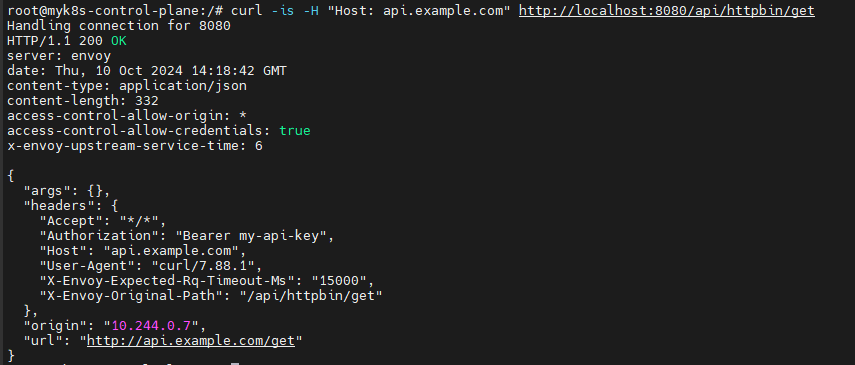
curl -is -H "Host: api.example.com" http://localhost:8080/api/httpbin/get # kubectl port-forward 사용 시
Migrate
In this section, we’ll explore how a couple of common service migration techniques, dark launches with header-based routing and canary releases with percentage-based routing, are supported by the Gateway API standard.
Configure Two Workloads for Migration Routing
Let’s first establish two versions of a workload to facilitate our migration example. We’ll use the open-source Fake Service to enable this.
- Fake service that can handle both HTTP and gRPC traffic, for testing upstream service communications and testing service mesh and other scenarios.
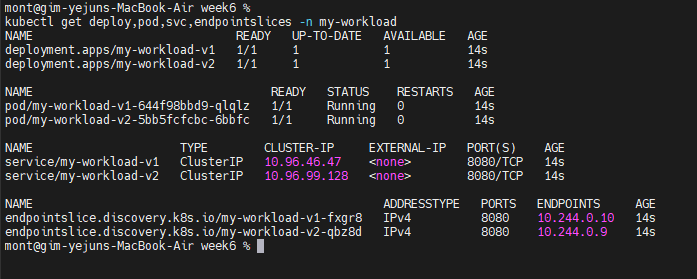
Let’s establish a v1 of our my-workload service that’s configured to return a response string containing “v1”. We’ll create a corresponding my-workload-v2 service as well.
# You should see the response below, indicating deployments for both v1 and v2 of my-workload have been created in the my-workload namespace.
kubectl apply -f https://raw.githubusercontent.com/solo-io/gloo-gateway-use-cases/main/gateway-api-tutorial/06-workload-svcs.yaml
Test Simple V1 Routing
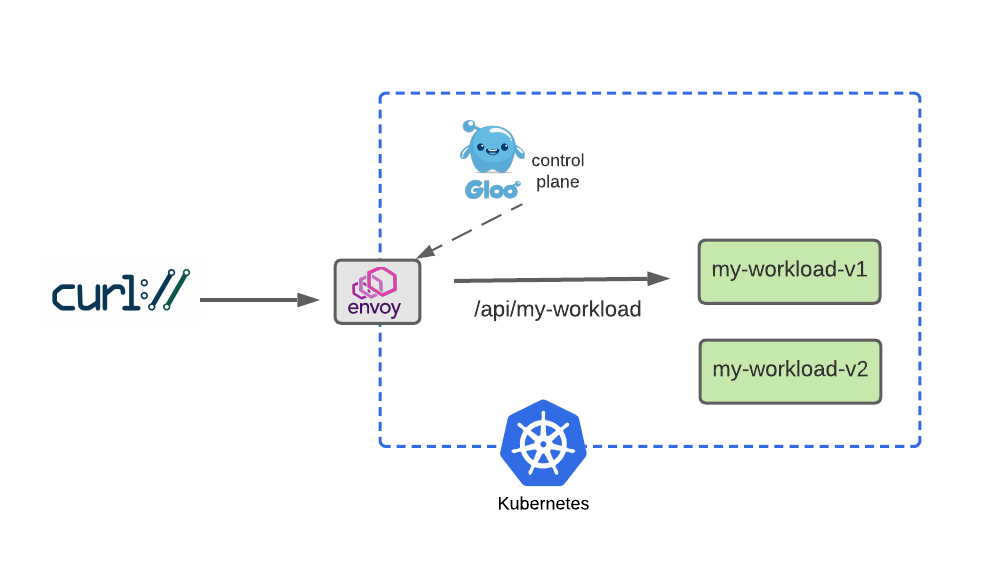
Before we dive into routing to multiple services, we’ll start by building a simple HTTPRoute that sends HTTP requests to host api.example.com whose paths begin with /api/my-workload to the v1 workload:
apiVersion: gateway.networking.k8s.io/v1beta1
kind: HTTPRoute
metadata:
  name: my-workload
  namespace: my-workload
  labels:
    example: my-workload-route
spec:
  parentRefs:
    - name: http
      namespace: gloo-system
  hostnames:
    - "api.example.com"
  rules:
    - matches:
      - path:
          type: PathPrefix
          value: /api/my-workload
      backendRefs:
        - name: my-workload-v1
          namespace: my-workload
          port: 8080
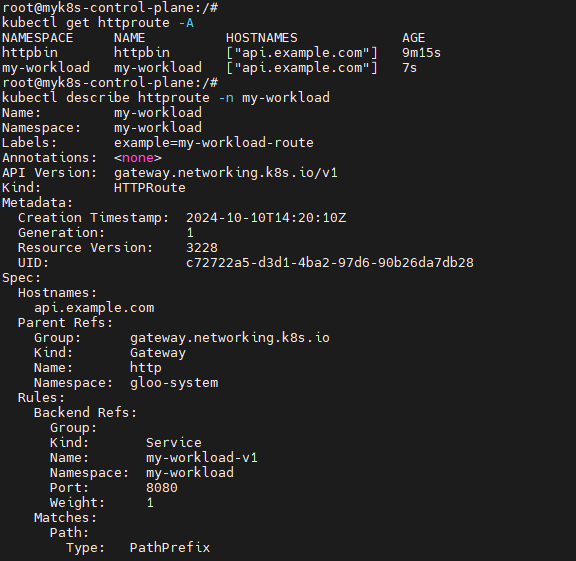
Now apply this route:
kubectl apply -f https://raw.githubusercontent.com/solo-io/gloo-gateway-use-cases/main/gateway-api-tutorial/07-workload-route.yaml

#
kubectl get httproute -A
kubectl describe httproute -n my-workload
#
curl -is -H "Host: api.example.com" http://localhost:8080/api/my-workload

Simulate a v2 Dark Launch with Header-Based Routing
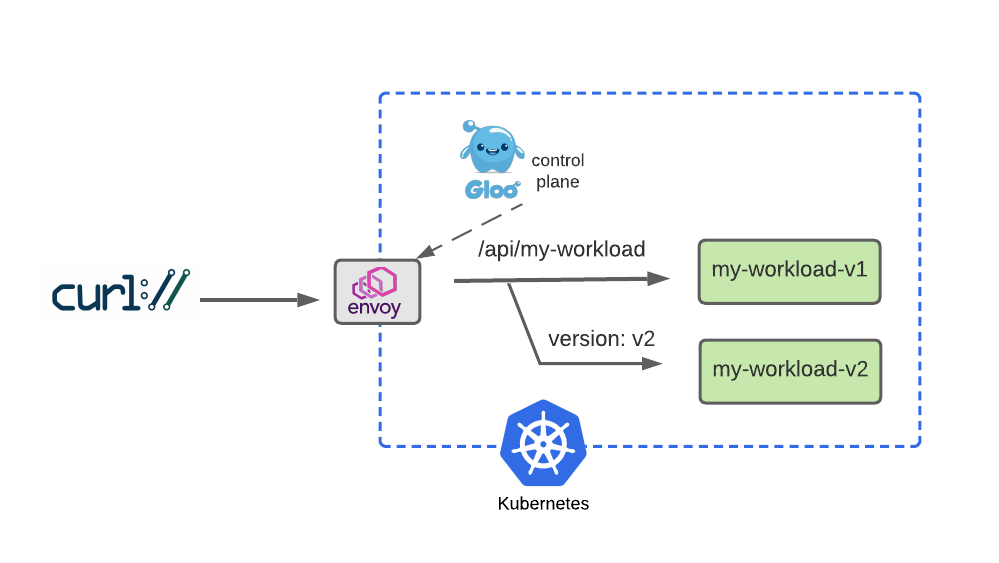
Dark Launch is a great cloud migration technique that releases new features to a select subset of users to gather feedback and experiment with improvements before potentially disrupting a larger user community.
- Dark Launch : 일부 사용자에게 새로운 기능을 출시하여 피드백을 수집하고 잠재적으로 더 큰 사용자 커뮤니티를 방해하기 전에 개선 사항을 실험하는 훌륭한 클라우드 마이그레이션 기술
We will simulate a dark launch in our example by installing the new cloud version of our service in our Kubernetes cluster, and then using declarative policy to route only requests containing a particular header to the new v2 instance. The vast majority of users will continue to use the original v1 of the service just as before.
- 우리는 Kubernetes 클러스터에 서비스의 새로운 클라우드 버전을 설치한 다음 선언적 정책을 사용하여 특정 헤더를 포함하는 요청만 새 인스턴스로 라우팅하여 예제에서 다크 런치를 시뮬레이션할 것입니다 . 대다수의 사용자는 이전과 마찬가지로 서비스의
v1을 계속 사용할 것 입니다.
  rules:
    - matches:
      - path:
          type: PathPrefix
          value: /api/my-workload
        # Add a matcher to route requests with a v2 version header to v2
        # version=v2 헤더값이 있는 사용자만 v2 라우팅
        headers:
        - name: version
          value: v2
      backendRefs:
        - name: my-workload-v2
          namespace: my-workload
          port: 8080
    - matches:
      # Route requests without the version header to v1 as before
      # 대다수 일반 사용자는 기존 처럼 v1 라우팅
      - path:
          type: PathPrefix
          value: /api/my-workload
      backendRefs:
        - name: my-workload-v1
          namespace: my-workload
          port: 8080
Configure two separate routes, one for v1 that the majority of service consumers will still use, and another route for v2 that will be accessed by specifying a request header with name version and value v2. Let’s apply the modified HTTPRoute:
#
kubectl apply -f https://raw.githubusercontent.com/solo-io/gloo-gateway-use-cases/main/gateway-api-tutorial/08-workload-route-header.yaml

#
kubectl describe httproute -n my-workload
# Now we’ll test the original route, with no special headers supplied, and confirm that traffic still goes to v1:
curl -is -H "Host: api.example.com" http://localhost:8080/api/my-workload
curl -is -H "Host: api.example.com" http://localhost:8080/api/my-workload | grep body
"body": "Hello From My Workload (v1)!",

# But it we supply the version: v2 header, note that our gateway routes the request to v2 as expected:
curl -is -H "Host: api.example.com" -H "version: v2" http://localhost:8080/api/my-workload
curl -is -H "Host: api.example.com" -H "version: v2" http://localhost:8080/api/my-workload | grep body
Expand V2 Testing with Percentage-Based Routing
After a successful dark-launch, we may want a period where we use a blue-green strategy of gradually shifting user traffic from the old version to the new one. Let’s explore this with a routing policy that splits our traffic evenly, sending half our traffic to v1 and the other half to v2.
- 성공적인 다크 런칭 이후, 우리는 점진적으로 이전 버전에서 새 버전으로 사용자 트래픽을 옮기는 블루-그린 전략을 사용하는 기간을 원할 수 있습니다. 트래픽을 균등하게 분할하고 트래픽의 절반을 로 보내고
v1나머지 절반을 로 보내는 라우팅 정책으로 이를 살펴보겠습니다v2.
We will modify our HTTPRoute to accomplish this by removing the header-based routing rule that drove our dark launch. Then we will replace that with a 50-50 weight applied to each of the routes, as shown below:

  rules:
    - matches:
      - path:
          type: PathPrefix
          value: /api/my-workload
      # Configure a 50-50 traffic split across v1 and v2 : 버전 1,2 50:50 비율
      backendRefs:
        - name: my-workload-v1
          namespace: my-workload
          port: 8080
          weight: 50
        - name: my-workload-v2
          namespace: my-workload
          port: 8080
          weight: 50
# Apply this 50-50 routing policy with kubectl:
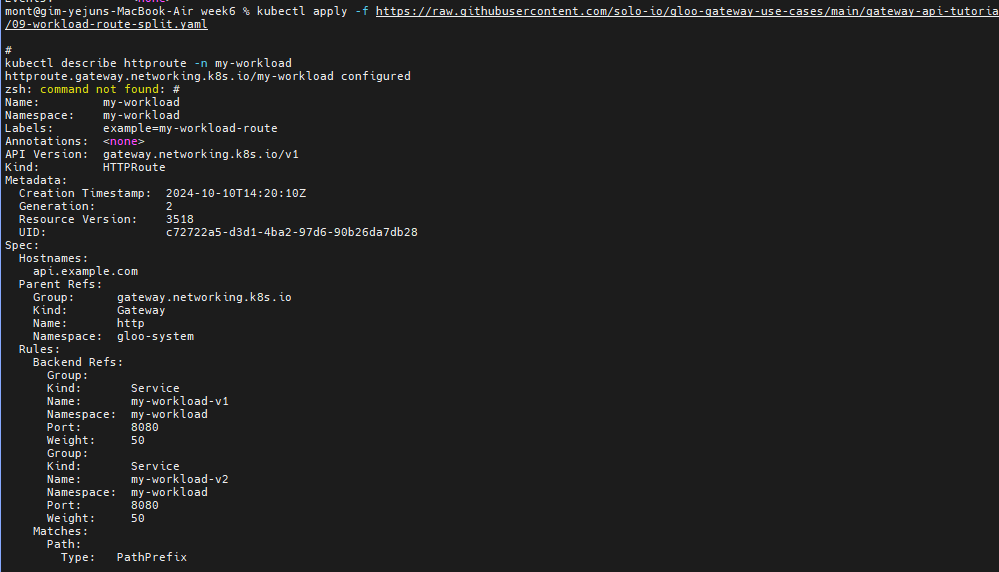
kubectl apply -f https://raw.githubusercontent.com/solo-io/gloo-gateway-use-cases/main/gateway-api-tutorial/09-workload-route-split.yaml
#
kubectl describe httproute -n my-workload
...
# 반복 접속 후 대략 비률 확인
for i in {1..100}; do curl -s -H "Host: api.example.com" http://localhost:8080/api/my-workload/ | grep body; done | sort | uniq -c | sort -nr
for i in {1..200}; do curl -s -H "Host: api.example.com" http://localhost:8080/api/my-workload/ | grep body; done | sort | uniq -c | sort -nr


Debug
Solve a Problem with Glooctl CLI
A common source of Gloo configuration errors is mistyping an upstream reference, perhaps when copy/pasting it from another source but “missing a spot” when changing the name of the backend service target. In this example, we’ll simulate making an error like that, and then demonstrating how glooctl can be used to detect it.
- Gloo 구성 오류의 일반적인 원인은 업스트림 참조를 잘못 입력하는 것입니다. 아마도 다른 소스에서 복사/붙여넣을 때이지만 백엔드 서비스 대상의 이름을 변경할 때 “한 군데를 놓친” 것입니다. 이 예에서 우리는 그런 오류를 만드는 것을 시뮬레이션하고,
glooctl그것을 감지하는 데 어떻게 사용할 수 있는지 보여줍니다.
First, let’s apply a change to simulate the mistyping of an upstream config so that it is targeting a non-existent my-bad-workload-v2 backend service, rather than the correct my-workload-v2.
my-bad-workload-v2업스트림 구성의 오타를 시뮬레이션하여 올바른 타겟팅하는 대신 존재하지 않는 백엔드 서비스를 타겟팅하도록 변경
# [신규 터미널] 모니터링
kubectl get httproute -n my-workload my-workload -o yaml -w

#
kubectl apply -f https://raw.githubusercontent.com/solo-io/gloo-gateway-use-cases/main/gateway-api-tutorial/10-workload-route-split-bad-dest.yaml

#
kubectl describe httproute -n my-workload
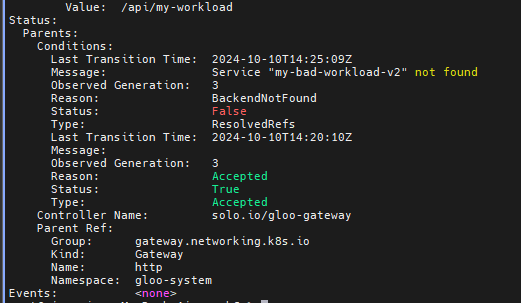
my-bad-workload-v2 가 존재하지 않는다는것을 확인할 수 있습니다.
여기에 50대 50으로 라우팅되는 정책을 그대로 활용할경우, my-bad-workload-v1 에만 트래픽이 라우팅됩니다
#
curl -is -H "Host: api.example.com" http://localhost:8080/api/my-workload
curl -is -H "Host: api.example.com" http://localhost:8080/api/my-workload
HTTP/1.1 500 Internal Server Error
date: Wed, 03 Jul 2024 08:21:11 GMT
server: envoy
content-length: 0

#
for i in {1..100}; do curl -s -H "Host: api.example.com" http://localhost:8080/api/my-workload/ | grep body; done | sort | uniq -c | sort -nr

So we’ll deploy one of the first weapons from the Gloo debugging arsenal, the glooctl check utility. It verifies a number of Gloo resources, confirming that they are configured correctly and are interconnected with other resources correctly. For example, in this case, glooctl will detect the error in the mis-connection between the HTTPRoute and its backend target:
#
docker exec -it myk8s-control-plane bash
-----------------------------------
export PATH=$HOME/.gloo/bin:$PATH
glooctl check
Checking Gateways... OK
Checking Proxies... 1 Errors!

Detected Kubernetes Gateway integration!
Checking Kubernetes GatewayClasses... OK
Checking Kubernetes Gateways... OK
Checking Kubernetes HTTPRoutes... 1 Errors!

Skipping Gloo Instance check -- Gloo Federation not detected.
Error: 2 errors occurred:
	* Found proxy with warnings by 'gloo-system': gloo-system gloo-system-http
Reason: warning:
  Route Warning: InvalidDestinationWarning. Reason: invalid destination in weighted destination list: v1.Upstream { blackhole_ns.kube-svc:blackhole-ns-blackhole-cluster-8080 } not found

	 HTTPRoute my-workload.my-workload.http status (ResolvedRefs) is not set to expected (True). Reason: BackendNotFound, Message: Service "my-bad-workload-v2" not found

# 원인 관련 정보 확인
kubectl get httproute my-workload -n my-workload -o yaml
...
status:
  parents:
  - conditions:
    - lastTransitionTime: "2023-11-28T21:09:20Z"
      message: ""
      observedGeneration: 6
      reason: BackendNotFound
      status: "False"
      type: ResolvedRefs
...

# 정상 설정으로 해결 configuration is again clean.
kubectl apply -f https://raw.githubusercontent.com/solo-io/gloo-gateway-use-cases/main/gateway-api-tutorial/09-workload-route-split.yaml
kubectl get httproute my-workload -n my-workload -o yaml

#
glooctl check
...
Observe
Explore Envoy Metrics
Envoy publishes a host of metrics that may be useful for observing system behavior. In our very modest kind cluster for this exercise, you can count over 3,000 individual metrics! You can learn more about them in the Envoy documentation here.
For this 30-minute exercise, let’s take a quick look at a couple of the useful metrics that Envoy produces for every one of our backend targets.
First, we’ll port-forward the Envoy administrative port 19000 to our local workstation:
#
kubectl -n gloo-system port-forward deployment/gloo-proxy-http 19000 &

# 아래 관리 페이지에서 각각 메뉴 링크 클릭 확인
echo "Envoy Proxy Admin - http://localhost:19000"
echo "Envoy Proxy Admin - http://localhost:19000/stats/prometheus"
For this exercise, let’s view two of the relevant metrics from the first part of this exercise: one that counts the number of successful (HTTP 2xx) requests processed by our httpbin backend (or cluster, in Envoy terminology), and another that counts the number of requests returning server errors (HTTP 5xx) from that same backend:
#
curl -s http://localhost:19000/stats | grep -E "(^cluster.kube-svc_httpbin-httpbin-8000_httpbin.upstream.*(2xx|5xx))"
cluster.kube-svc_httpbin-httpbin-8000_httpbin.upstream_rq_2xx: 32
cluster.kube-svc_httpbin-httpbin-8000_httpbin.upstream_rq_5xx: 7

# If we apply a curl request that forces a 500 failure from the httpbin backend, using the /status/500 endpoint, I’d expect the number of 2xx requests to remain the same, and the number of 5xx requests to increment by one:
curl -is -H "Host: api.example.com" http://localhost:8080/api/httpbin/status/500
HTTP/1.1 500 Internal Server Error
server: envoy
date: Wed, 03 Jul 2024 08:30:06 GMT
content-type: text/html; charset=utf-8
access-control-allow-origin: *
access-control-allow-credentials: true
content-length: 0
x-envoy-upstream-service-time: 28

#
curl -s http://localhost:19000/stats | grep -E "(^cluster.httpbin-httpbin-8000_httpbin.upstream.*(2xx|5xx))"
cluster.kube-svc_httpbin-httpbin-8000_httpbin.upstream_rq_2xx: 32
cluster.kube-svc_httpbin-httpbin-8000_httpbin.upstream_rq_5xx: 15

Cleanup
kind delete cluster --name myk8s
[2]  + 37292 exit 1     kubecolor -n gloo-system port-forward deployment/gloo-proxy-http 19000
[1]  + 27738 exit 1     kubecolor port-forward deployment/gloo-proxy-http -n gloo-system 8080:8080
Deleted nodes: ["myk8s-control-plane"]
kind 삭제, /etc/hosts 에 추가한 내용 삭제
- (참고) Kubectl Port-forward Flow Explained - Blog